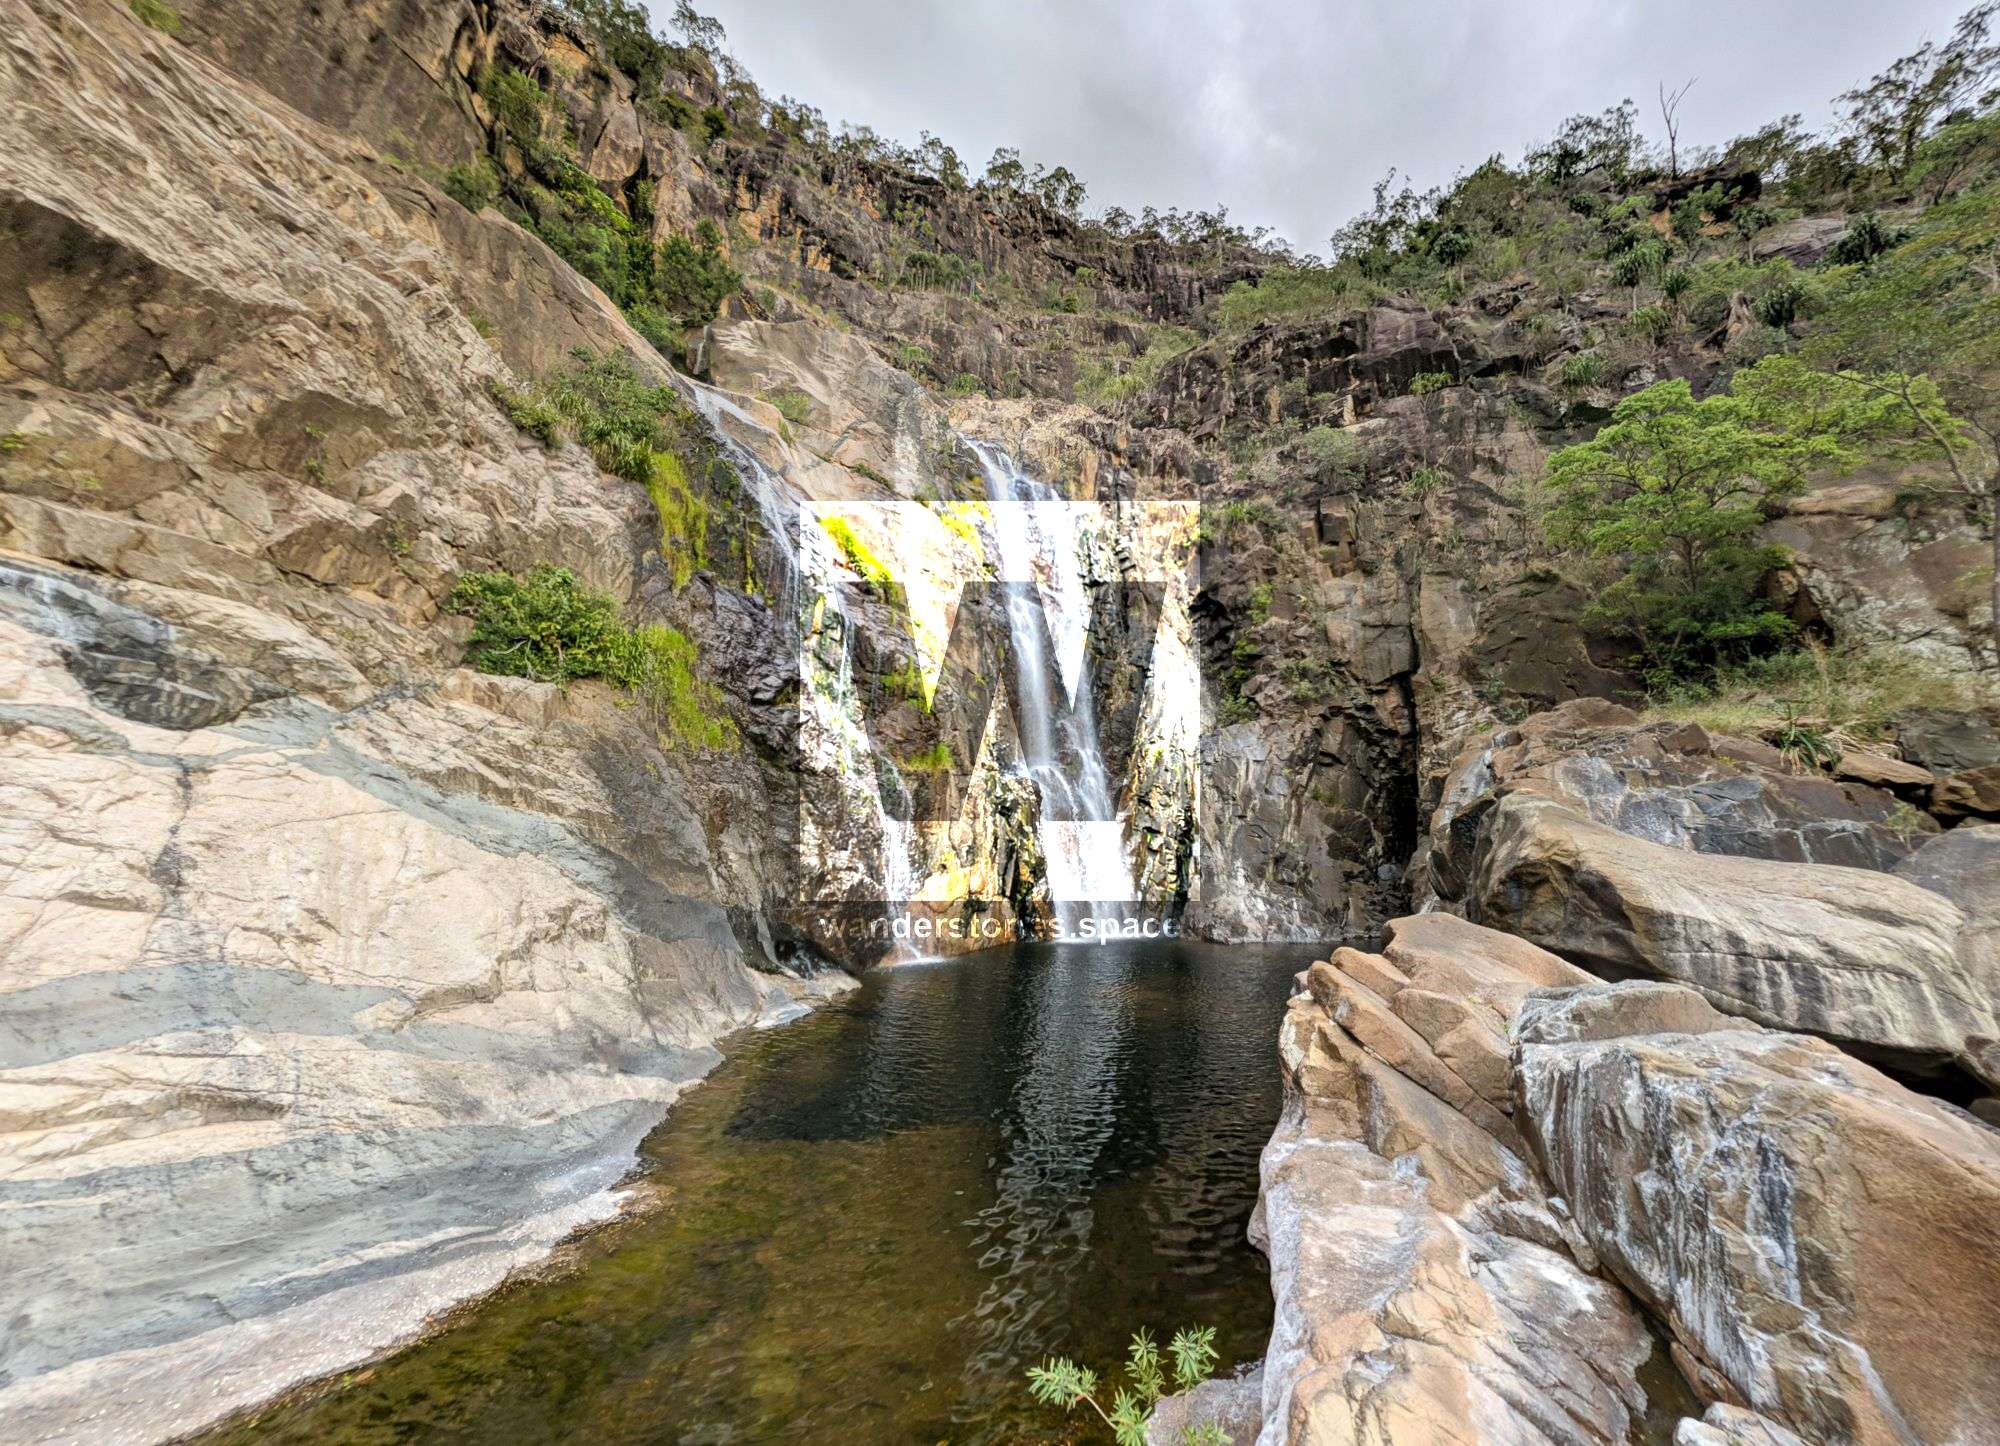
Jourama Canyon, Lower Waterview Creek
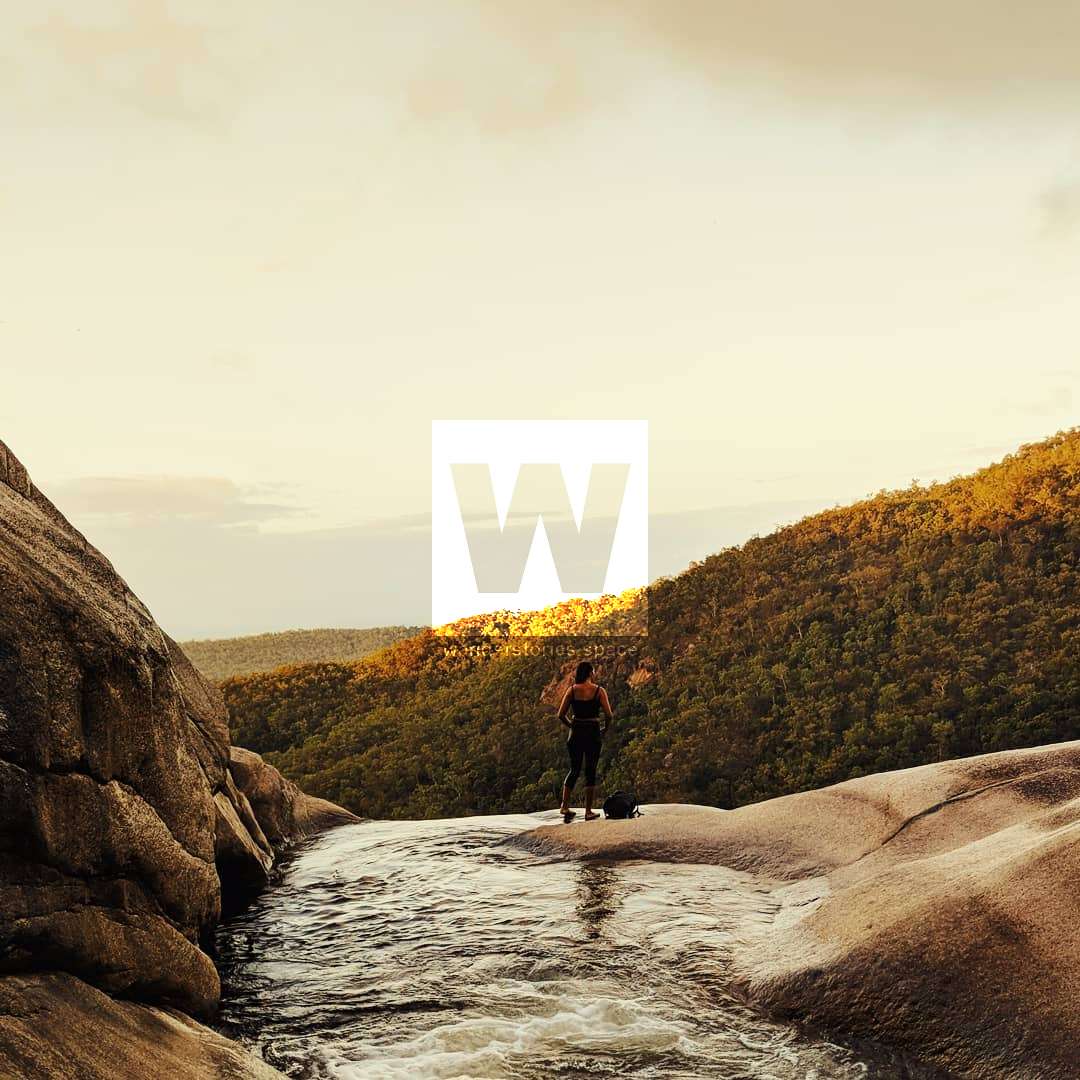
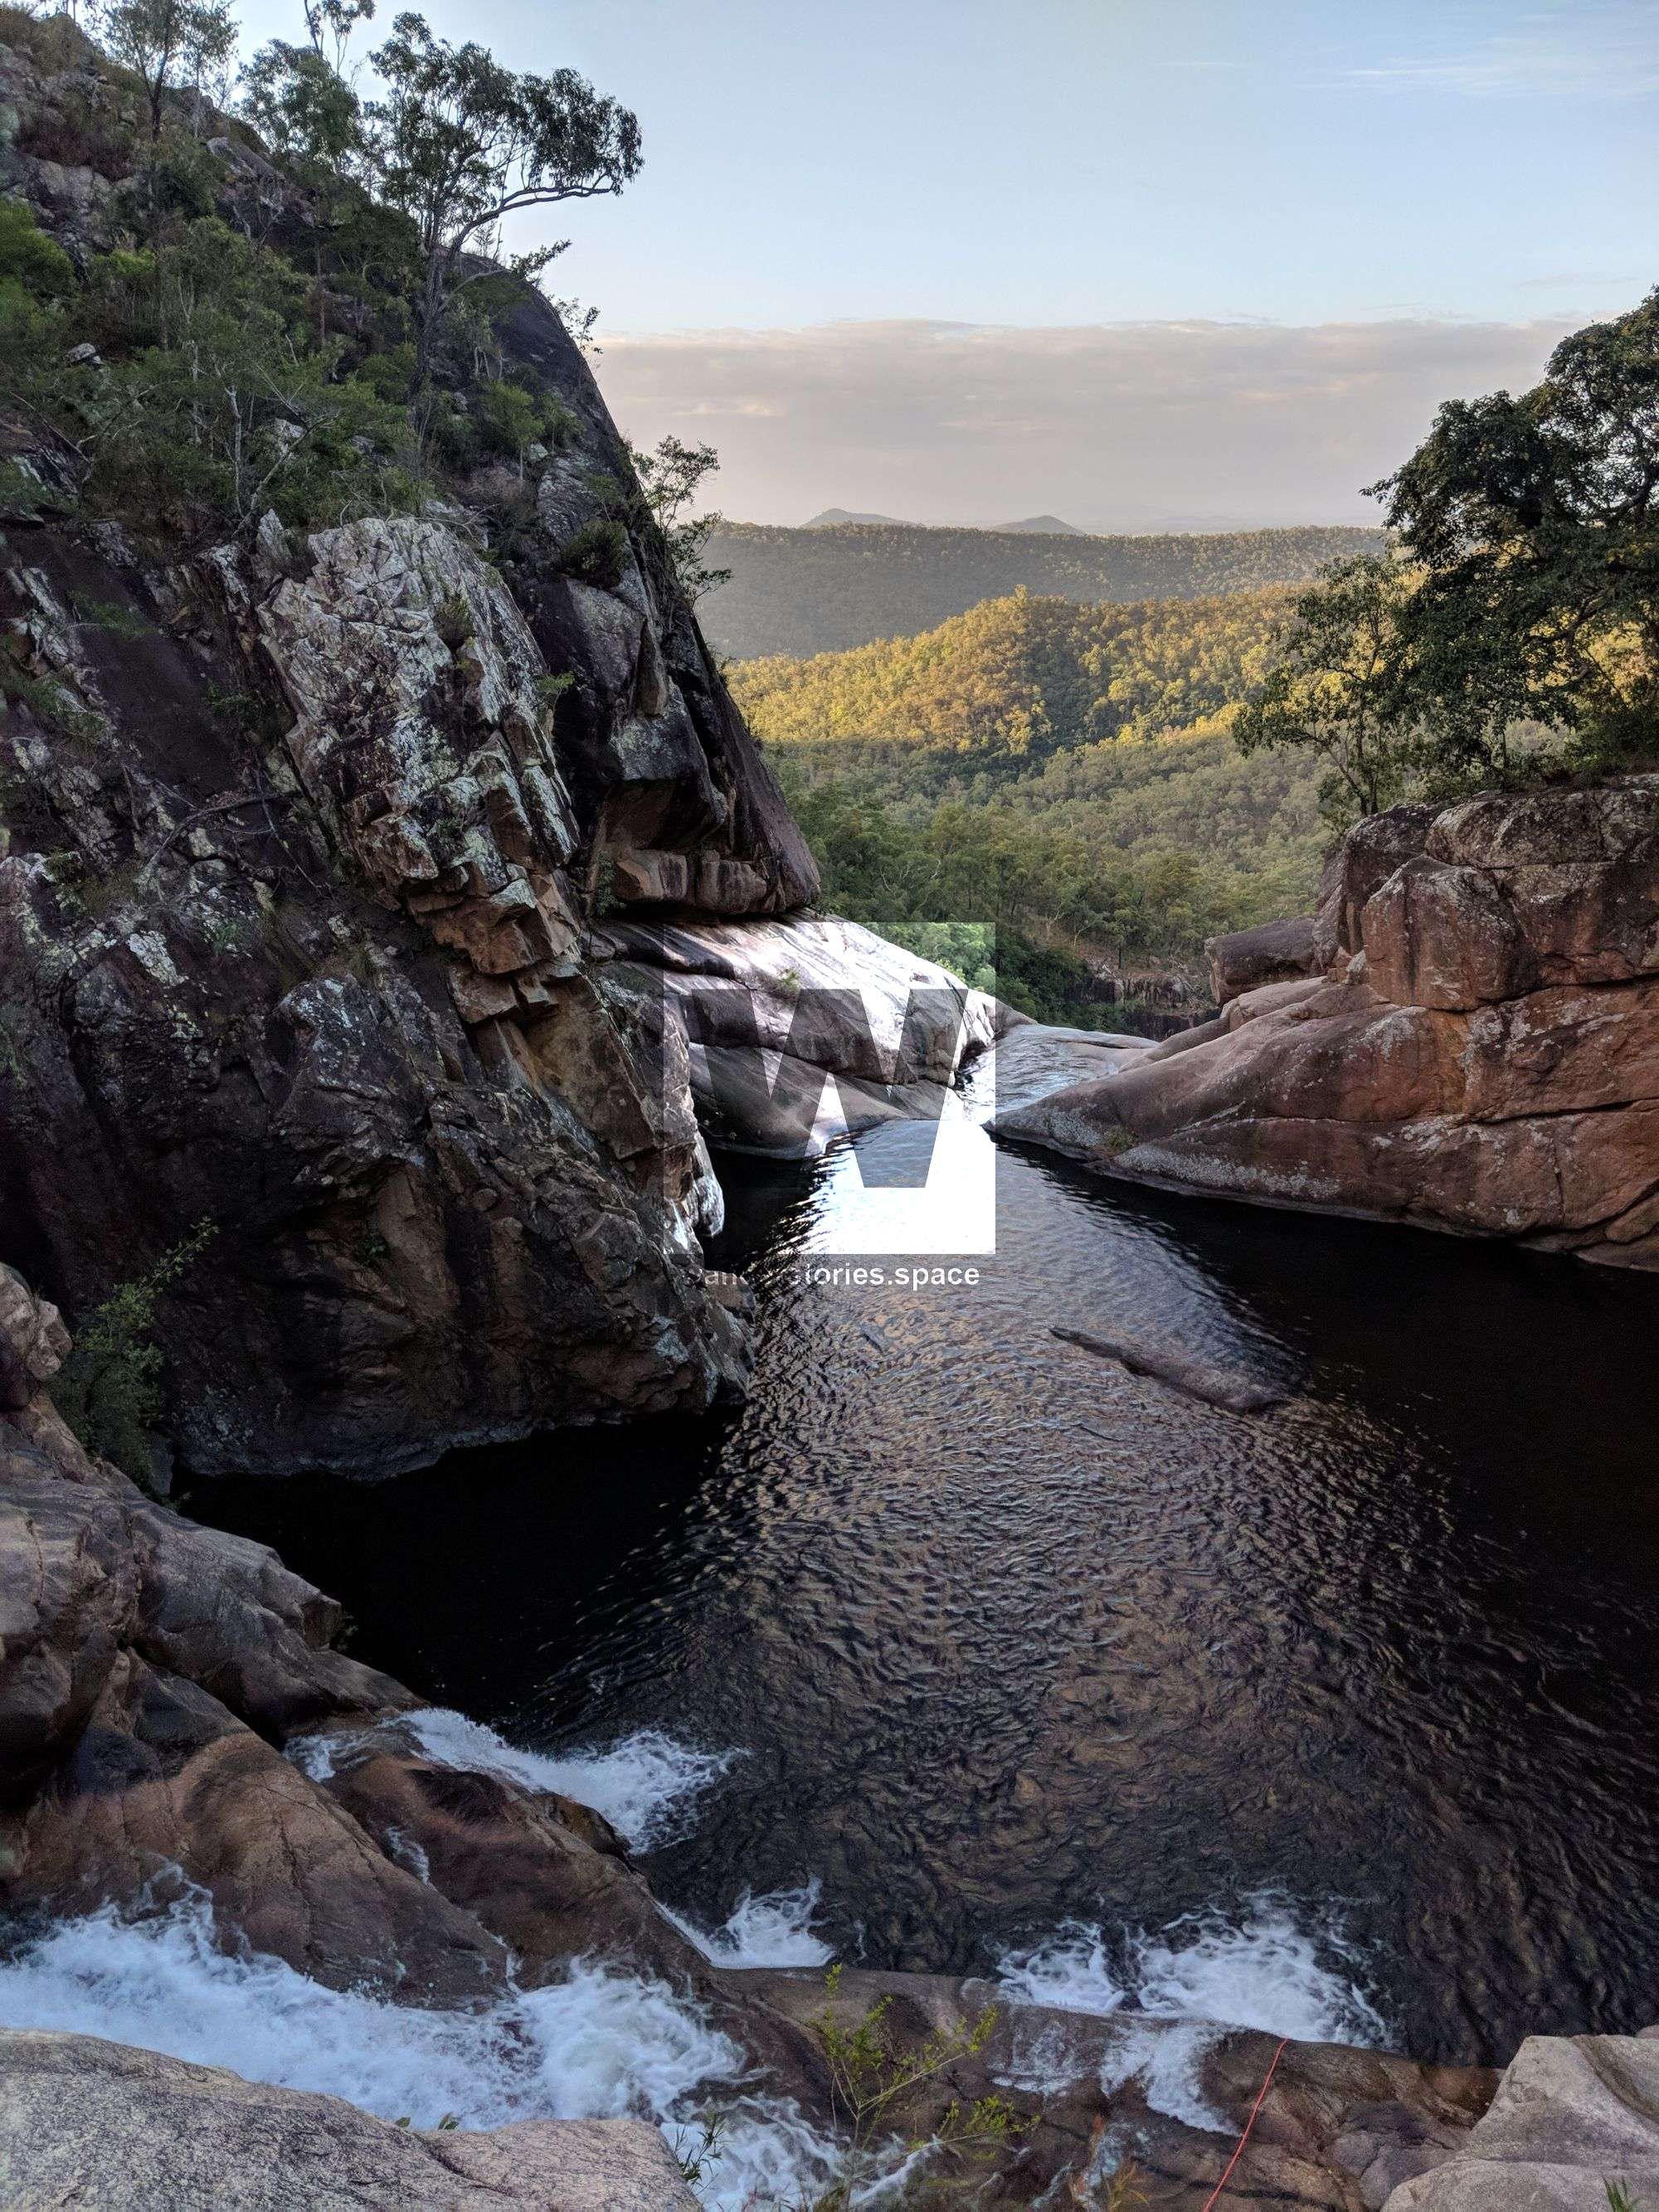
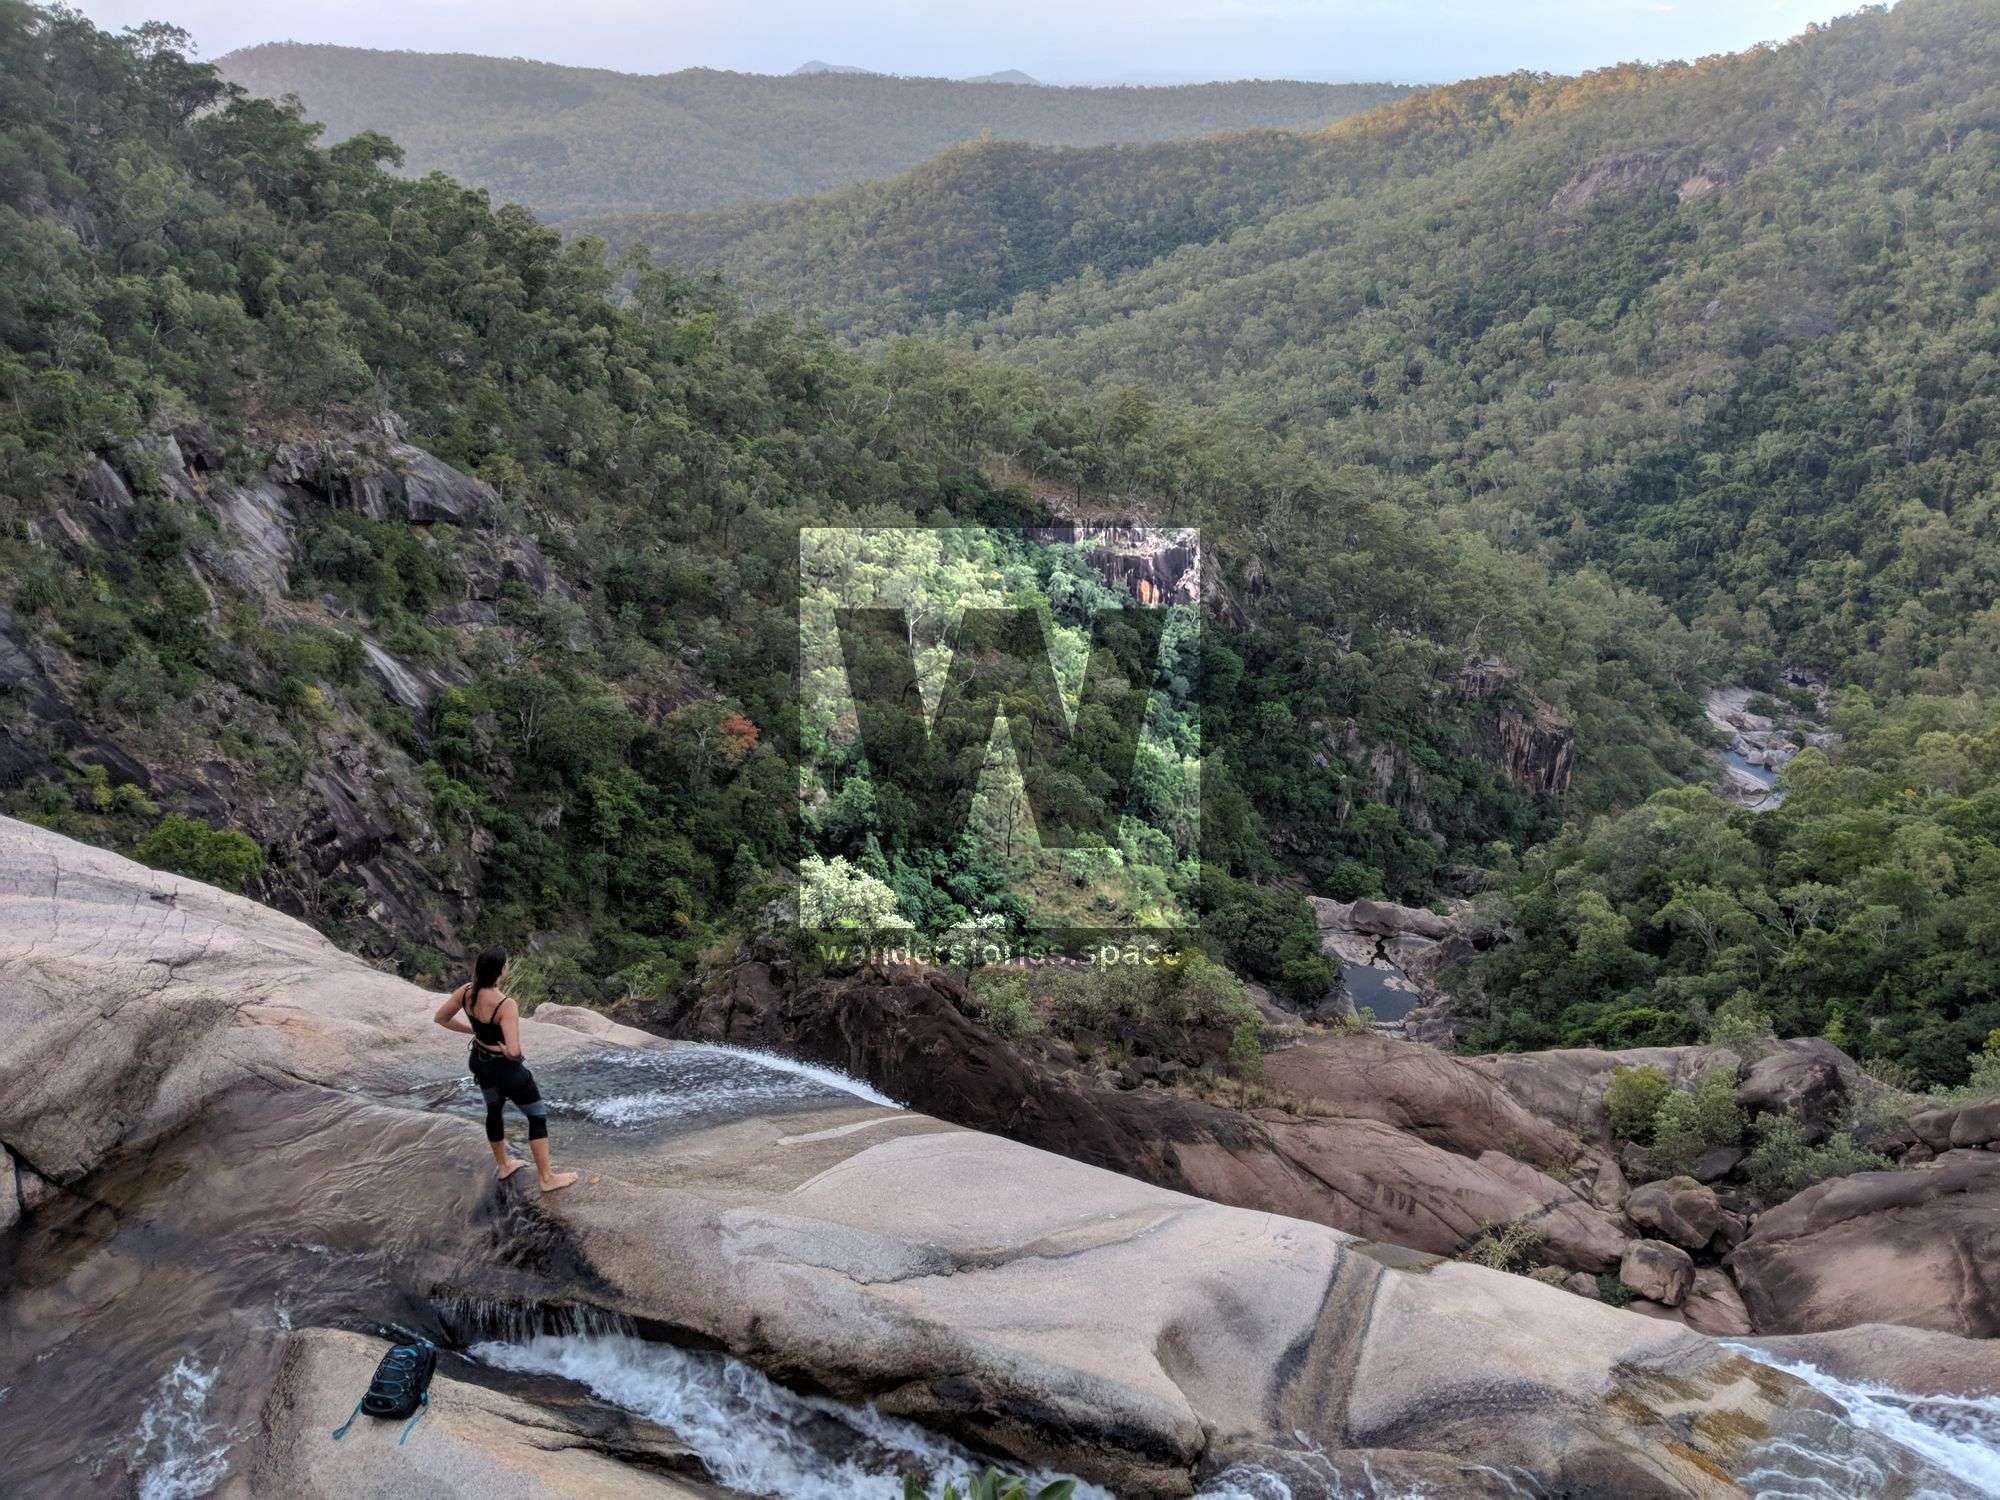
It's quite a beautiful place at the top falls with views overlooking the the coastline and ocean to horizon. The easiest way to get to the upper falls is to hike from Jourama Falls National Park's lookout up. There are some good alternative routes though.

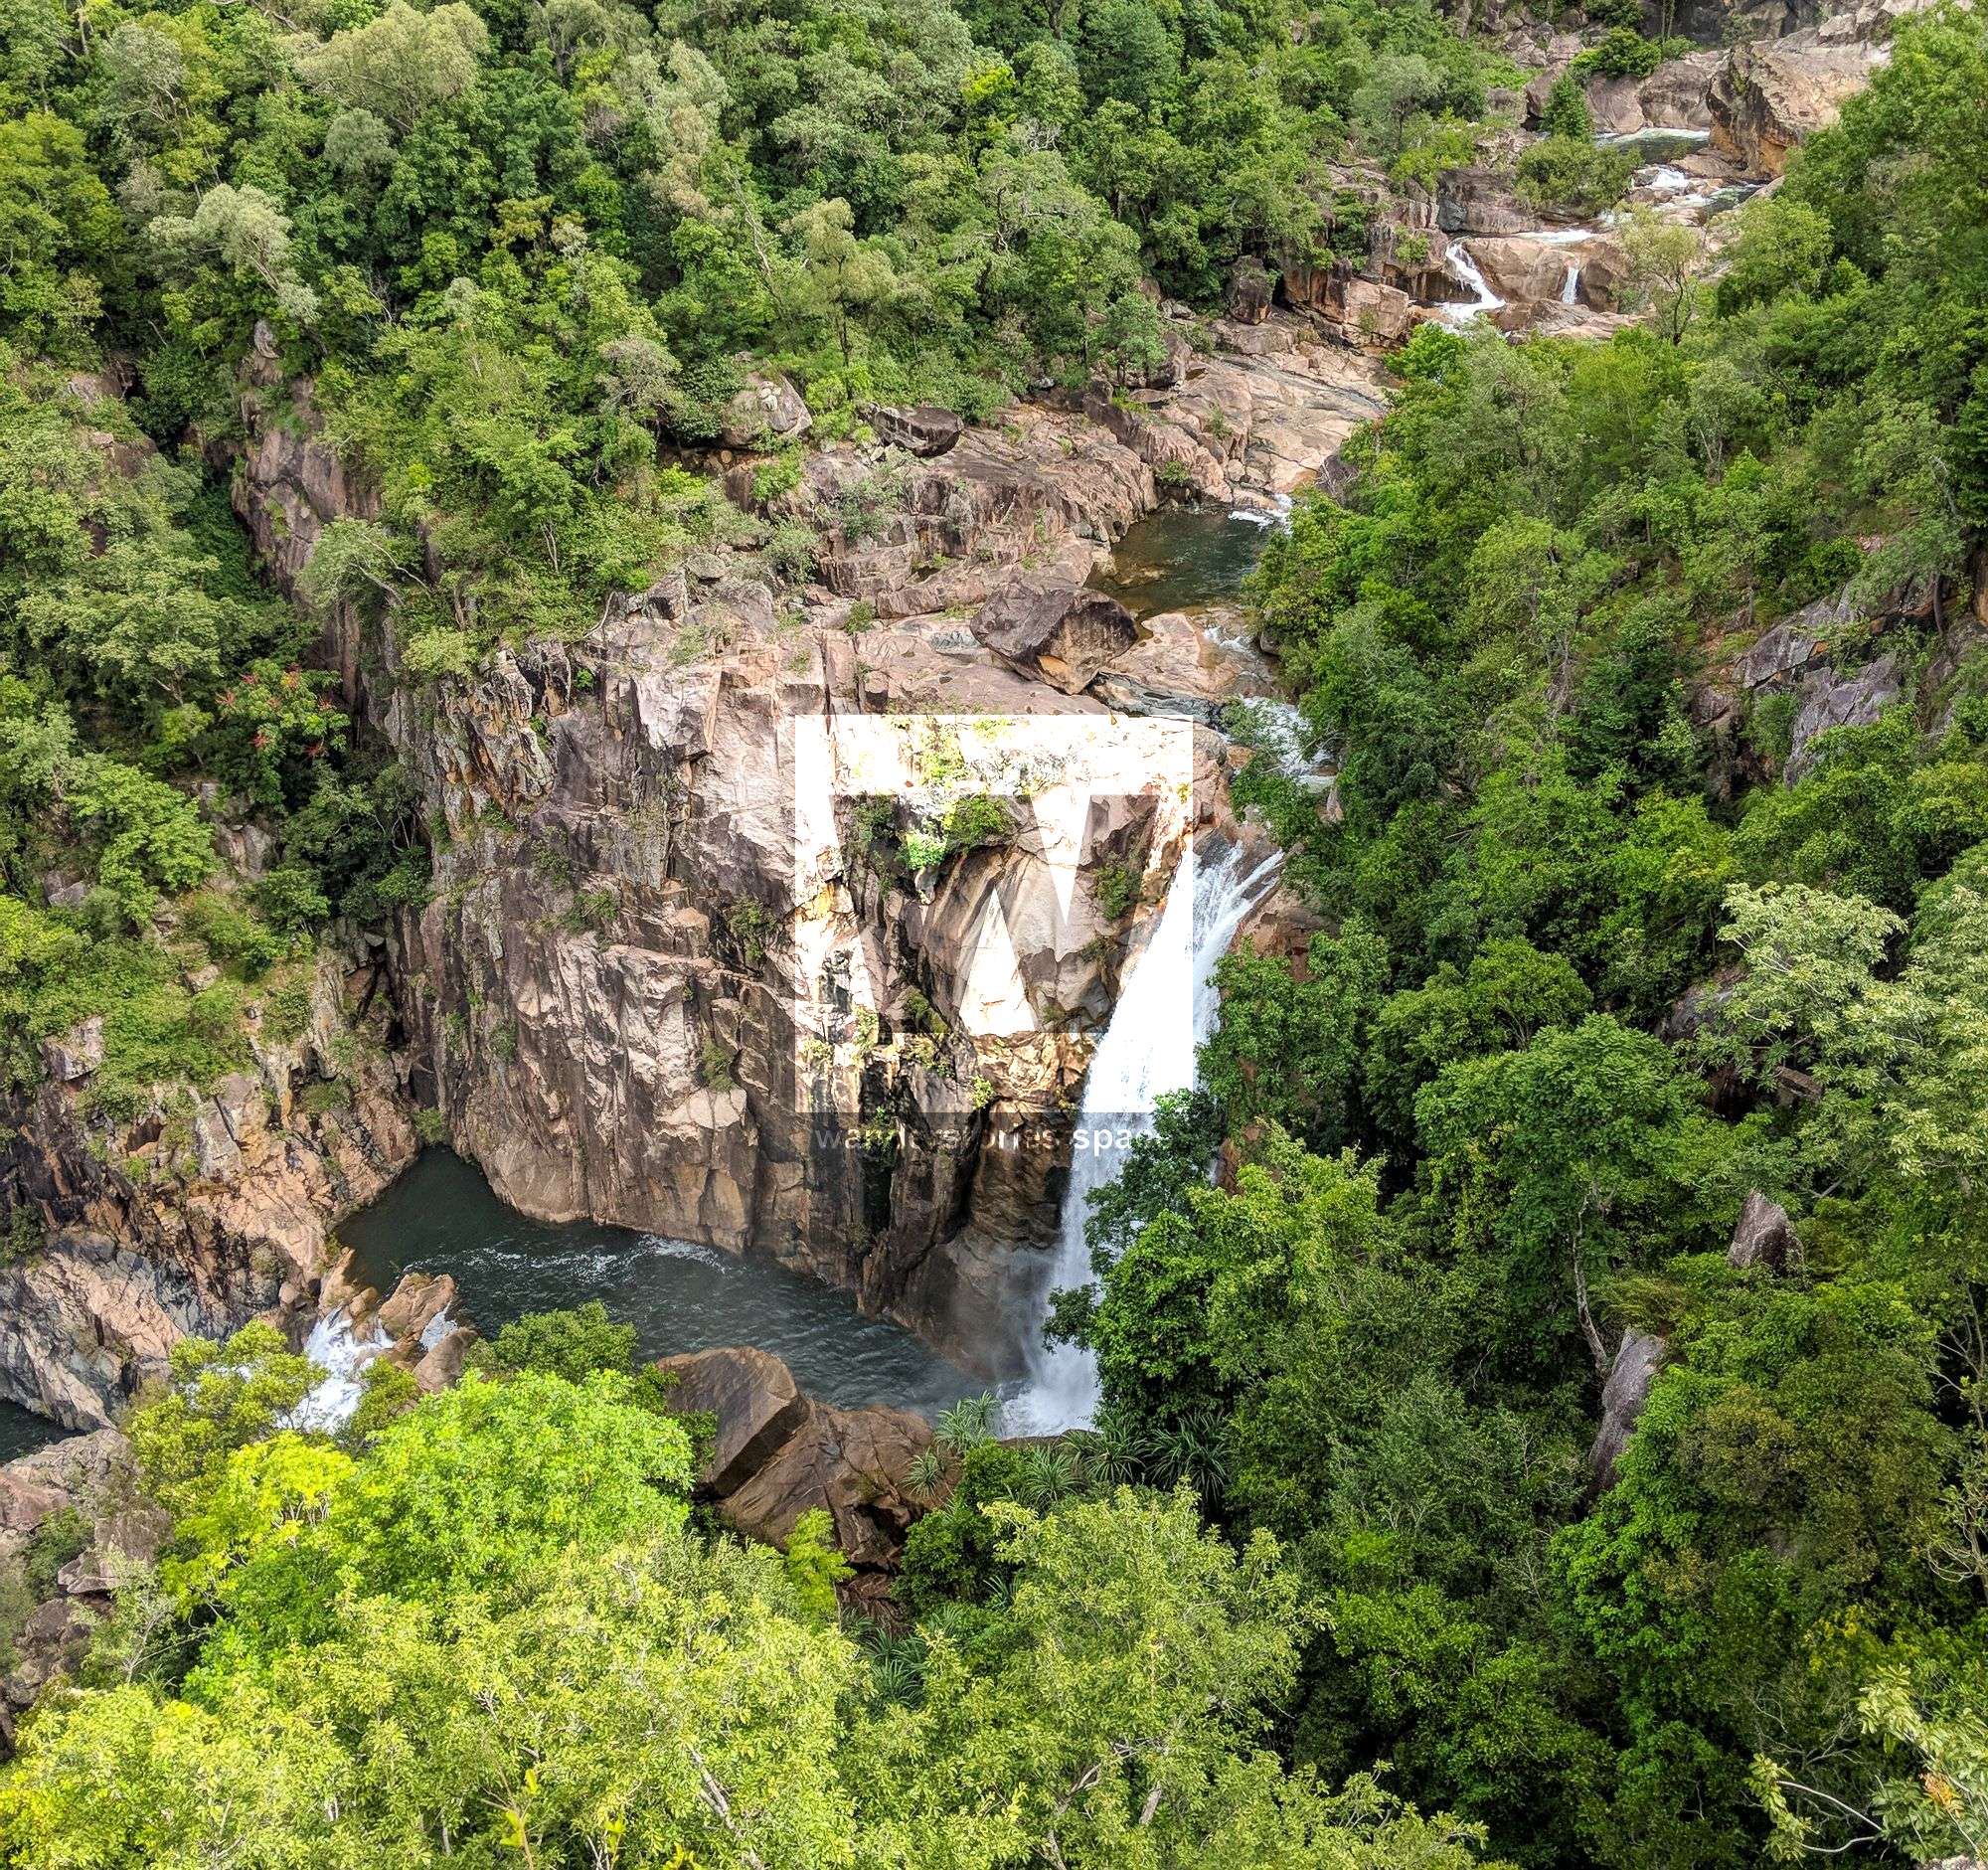
Jourama Canyon
Location: Paluma Range National Park, North Queensland, Australia
Grade: V4 A3 III *** (French Grading System)
Approach: 50 - 70 minutes
Descent: 3 - 8 hours for 4-6 people
Exit: 10 - 30 minutes depending on route
Total time: Allow 8 hours on first trip
Full course: 11 - 15 km round trip
Elevation loss: 370 metres
Flash flooding level: Medium
First descentists: Unknown
NOTE THAT THIS CANYON HAS UNDERGONE A REBOLT. This article is no longer current - 2023. I will make an effort to update this article when I get a chance.
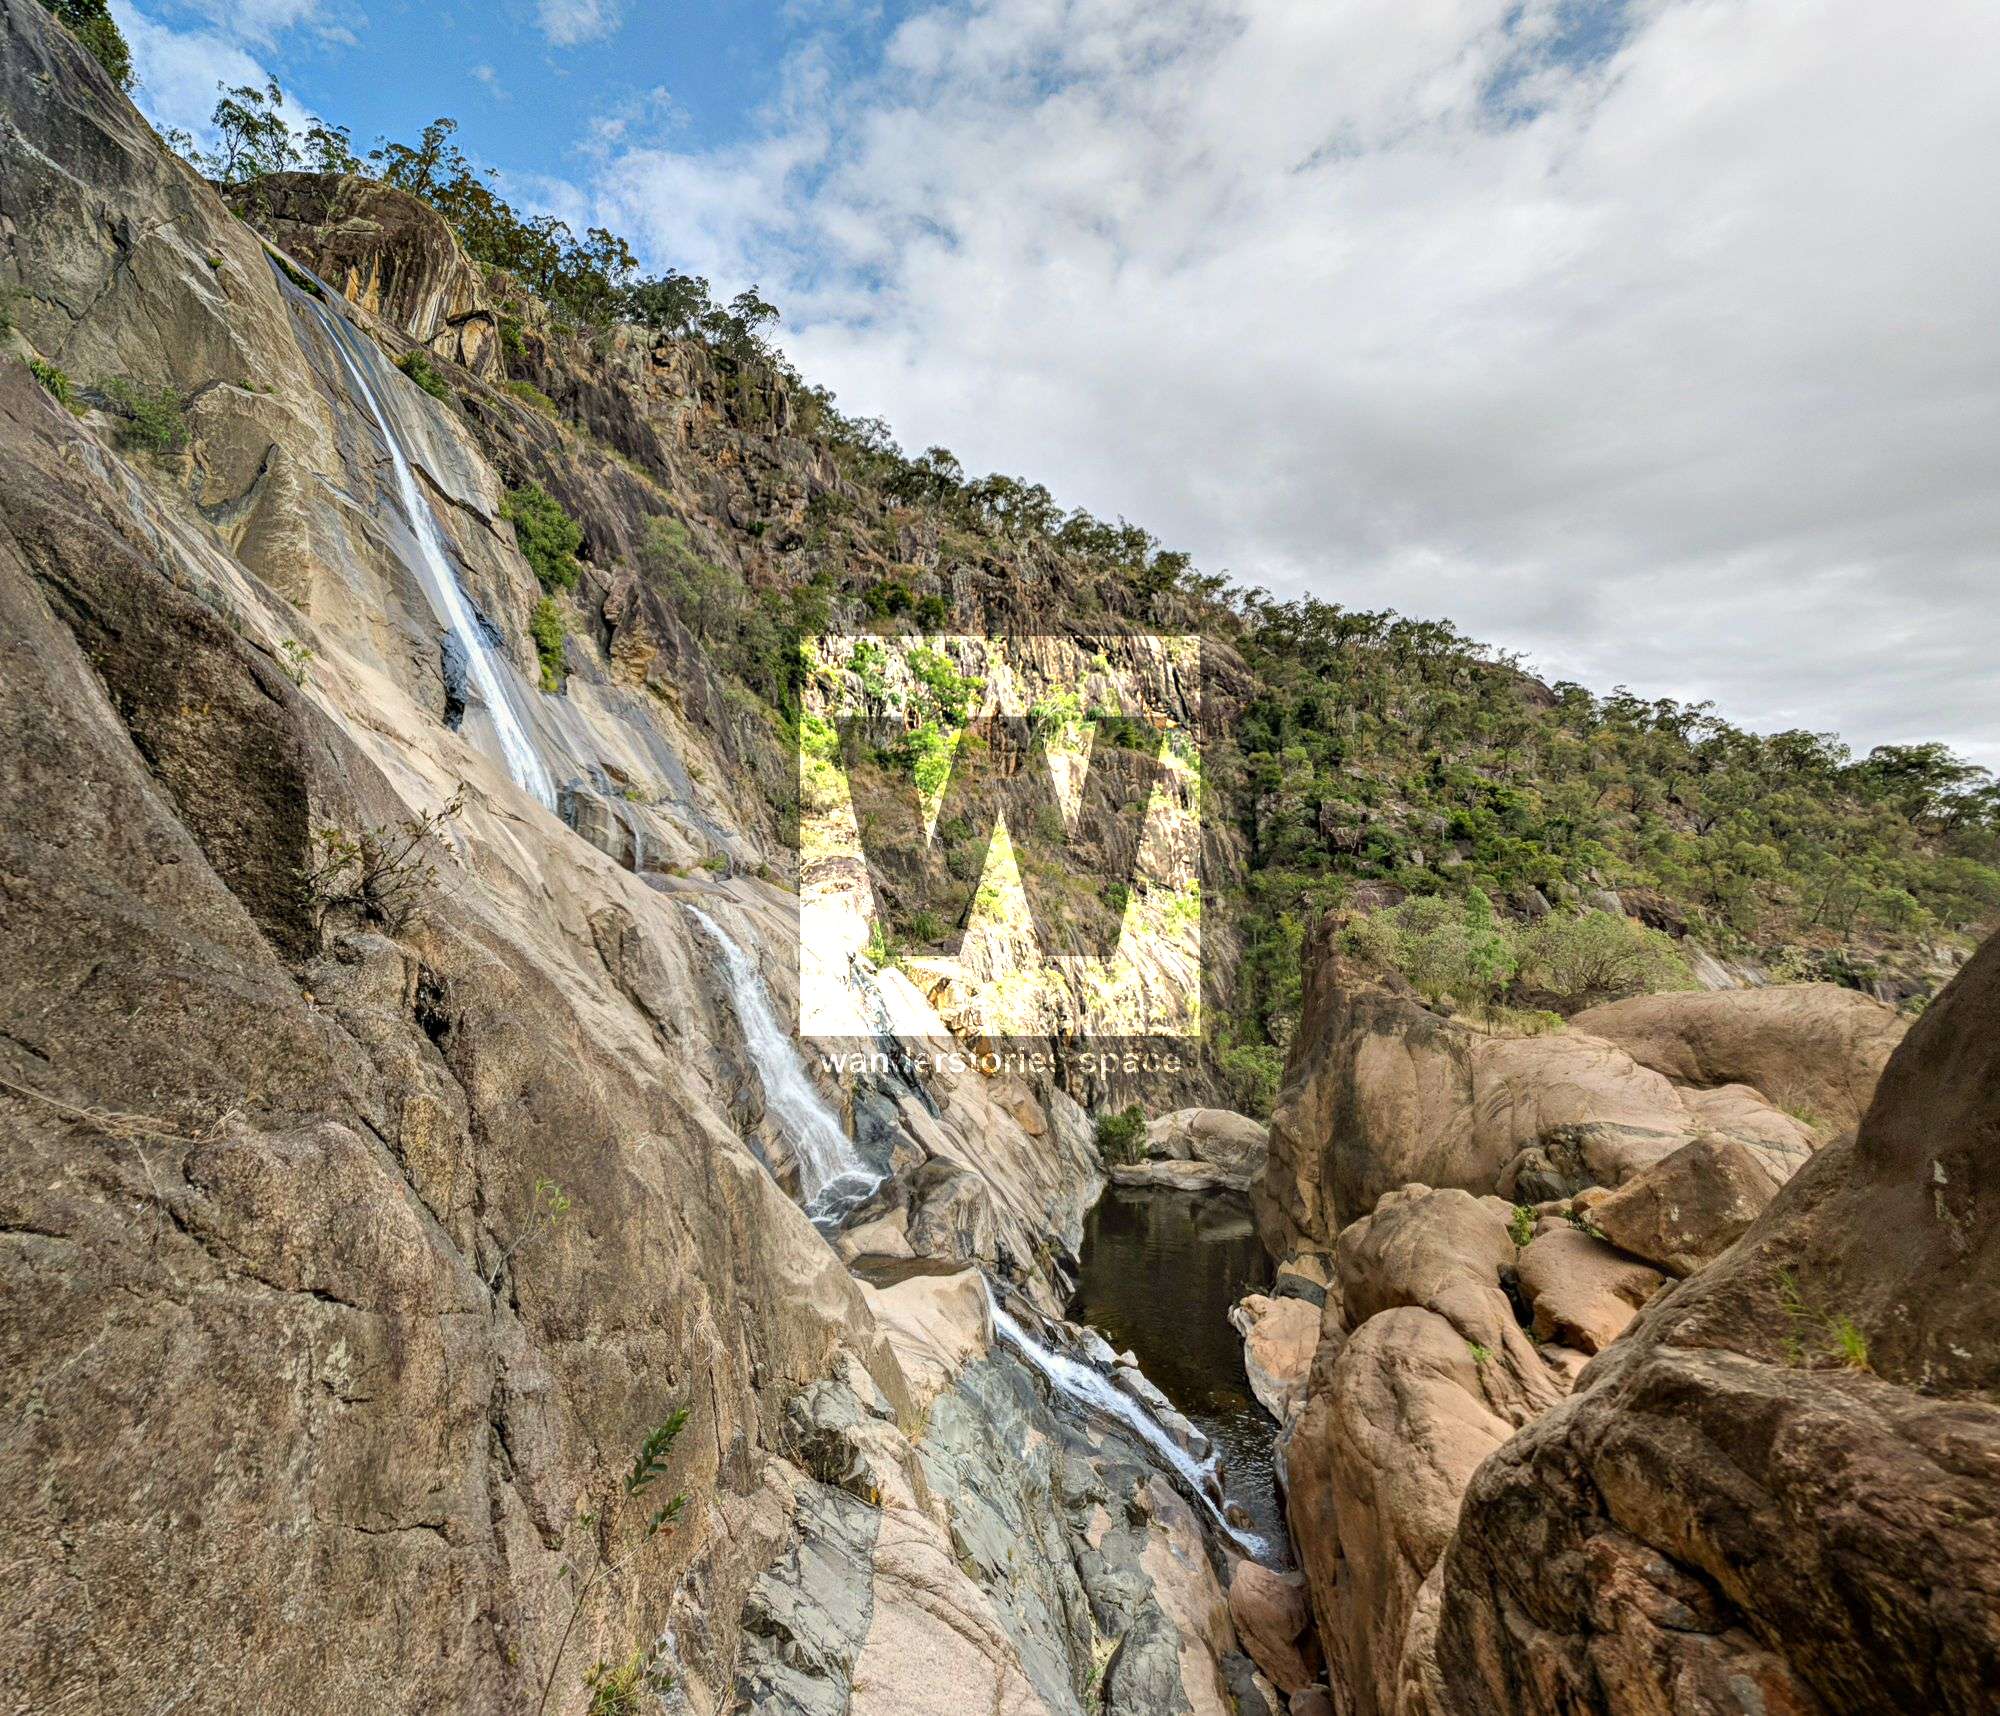
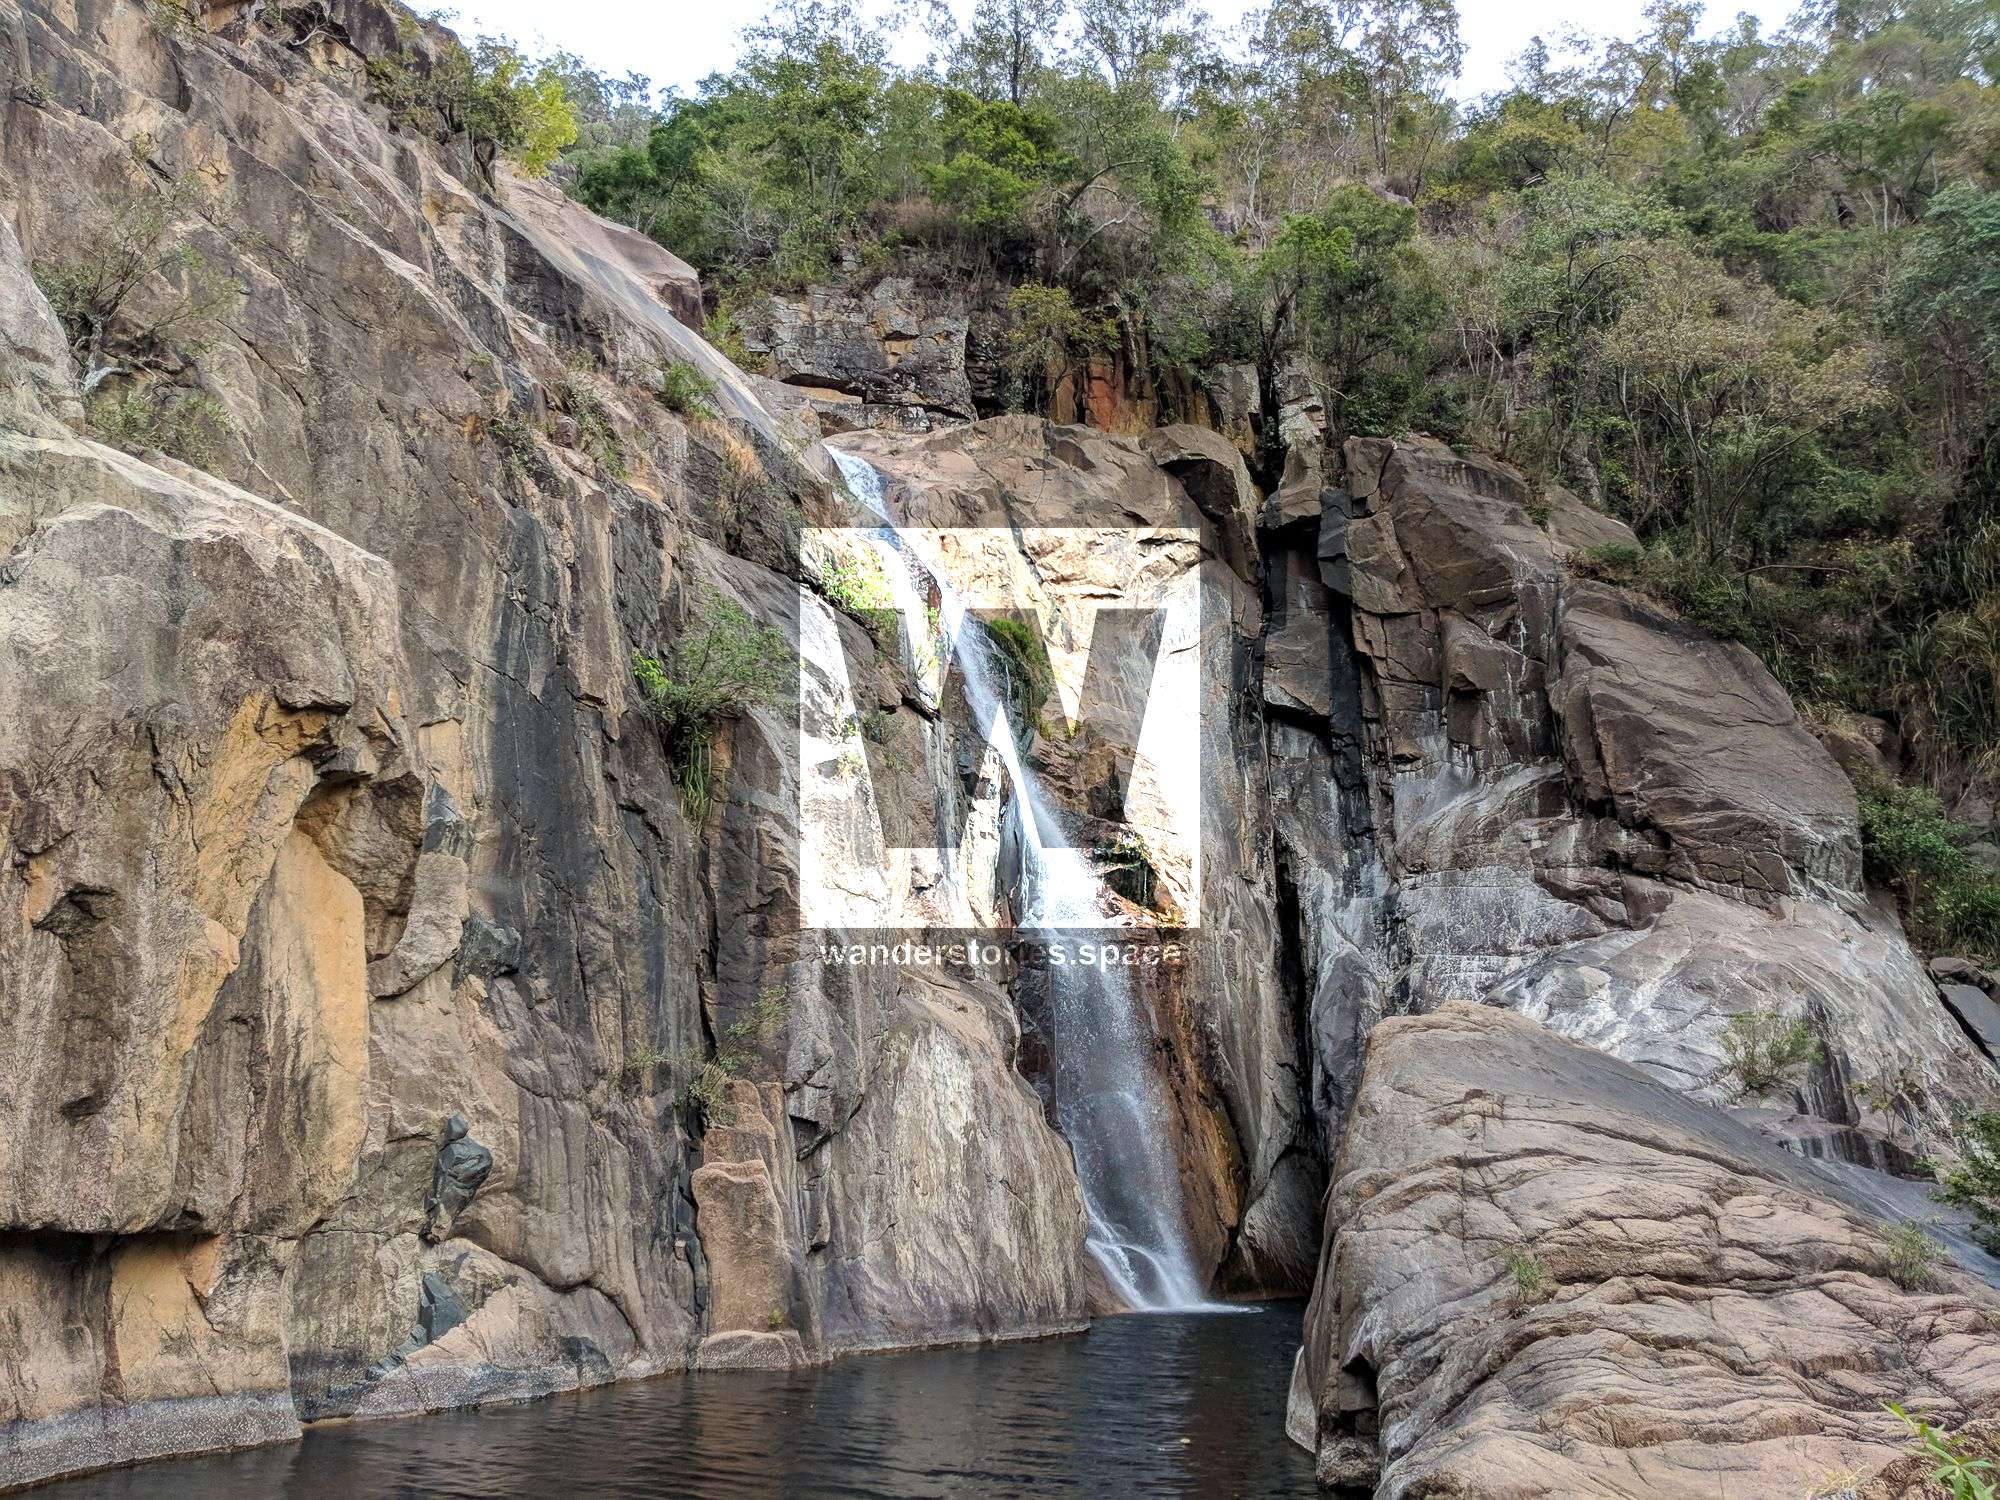
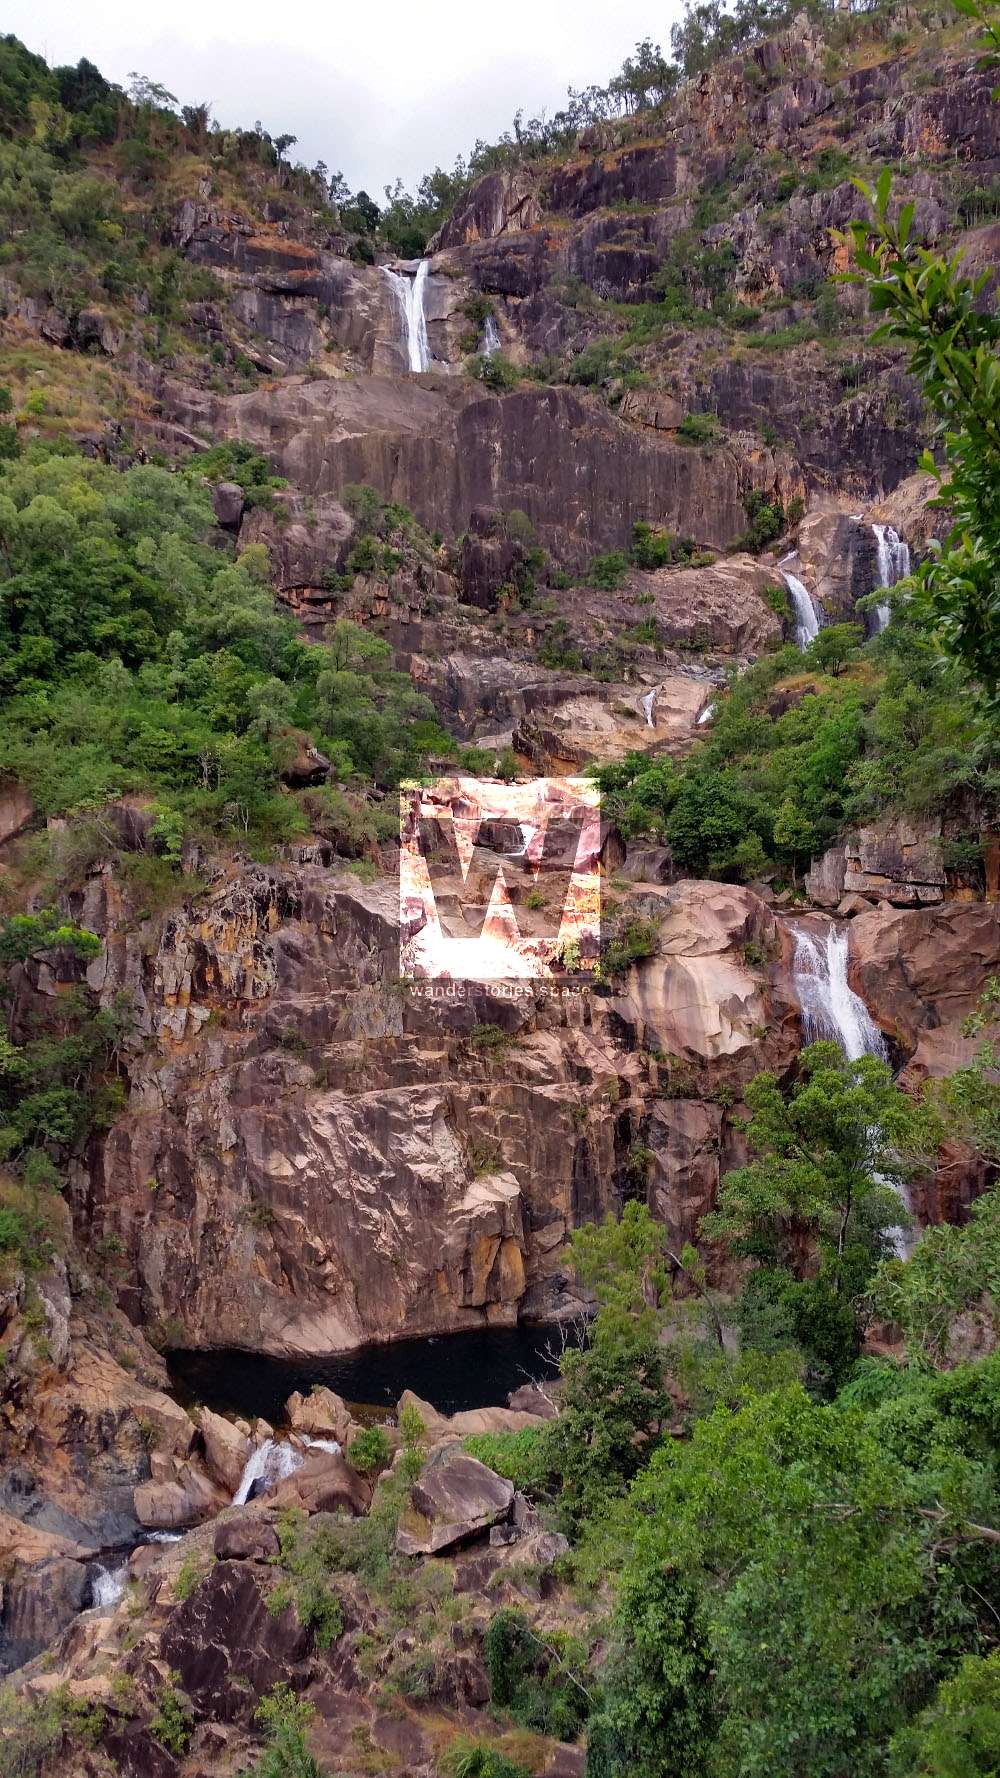
Jourama Falls is like no other. It's a pristine environment that terraces down into the valley and is a prime place to canyon.
It's a very beautiful place at the top falls with views overlooking the coastline and ocean to horizon. The easiest way to get to the upper falls is to hike from Jourama Falls National Park's lookout up.
There are alternatives to walking up and around and do a one way trip instead of a circuit:
- Option 1: You can arrange a shuttle or have a friend drop you at Hidden Valley and walk down the Jacobsen's Track to the top of the blackhole swimming pool but you'll have to arrange access with the private land owner and have a short walk through dense rainforest to get into the creek.
- Option 2: Paluma Dam to the top of Jourama Falls and then rappel the rest of the way. This is a longer hike, but you are rewarded with an amazing view once you emerge from the rainforest onto of Jourama Falls.
- Option 3: via Station Creek down into Waterview Creek and via the blackhole. There are two rappels down into the blackhole.
Approach
This is the most common approach. Walk along the national park's trail to the Jourama Falls Lookout. From the lookout, follow the rough path up to the ridge and up steeply to a cliffs edge where you'll have a good vantage point of the main falls. Continue up the trail a little and contour around before heading down a ridgeline. From here you have two options:
Option 1: Continue to follow the trail which trends down right though a gully and finally into the Waterview Creek. Rock hop down to the top of the falls on the left side of the creek.
Option 2: Go off-track and continue to follow the ridgeline down and slightly left around the rocks. The route goes down steeply to the very top of the first pitch.
Your team should have good navigation skills.
Be aware of some high water hazards and assess the risk before commiting.
Interactive Map
Here's an interactive map of the route you can take to get there:
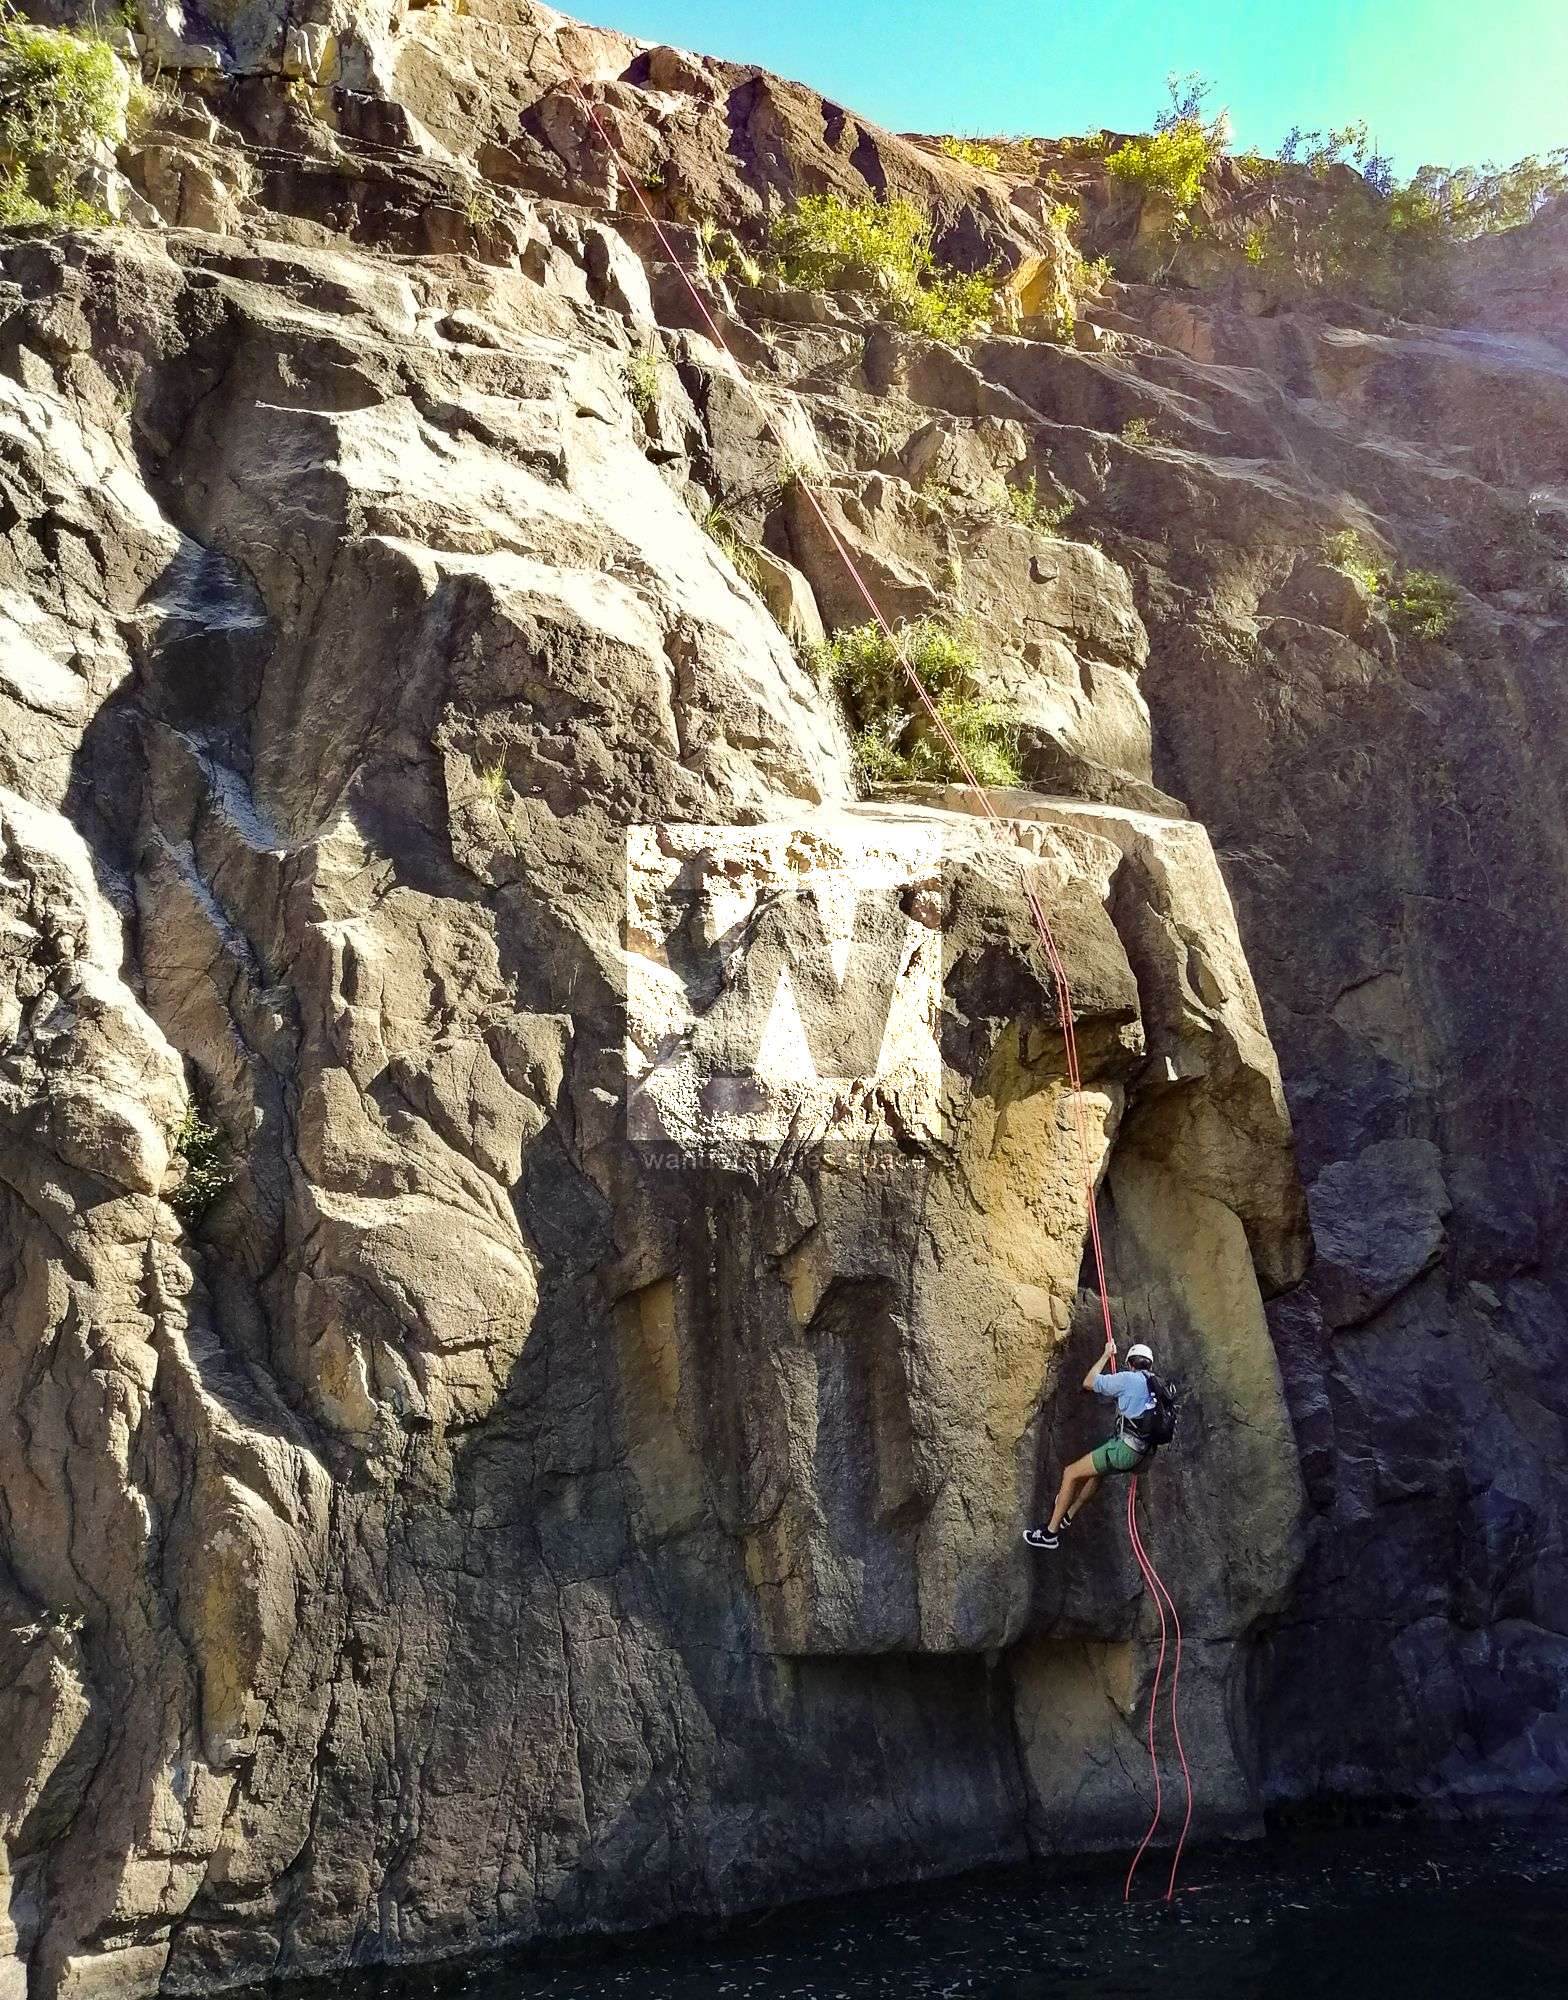
This canyon should not be undertaken by a novice unless under experineced supurvision. Lower R6 can be easily accessed from below, R7 and R8 have easily accessible anchors, slow moving water landings and easy exits making this area great for novices.
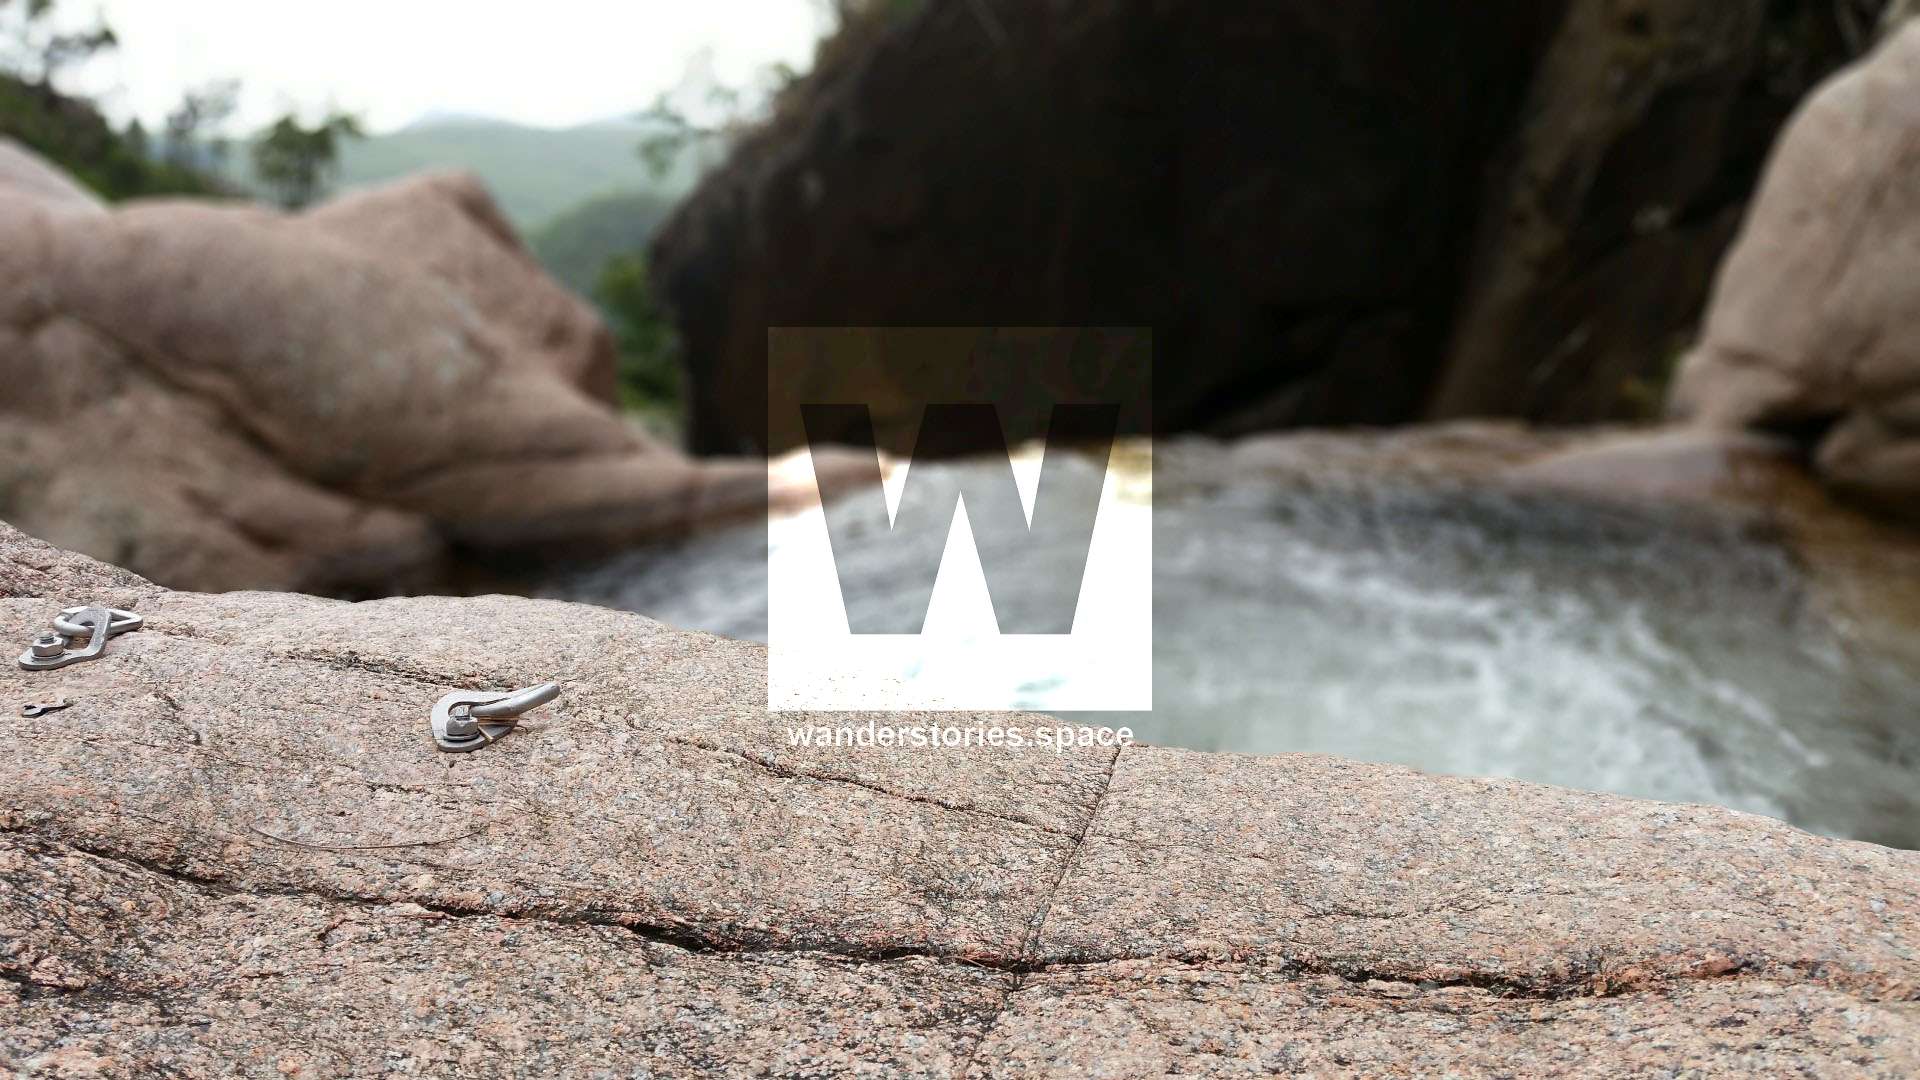
All the falls have been bolted or there's sufficient natural anchors to use (like a well-rooted tree).
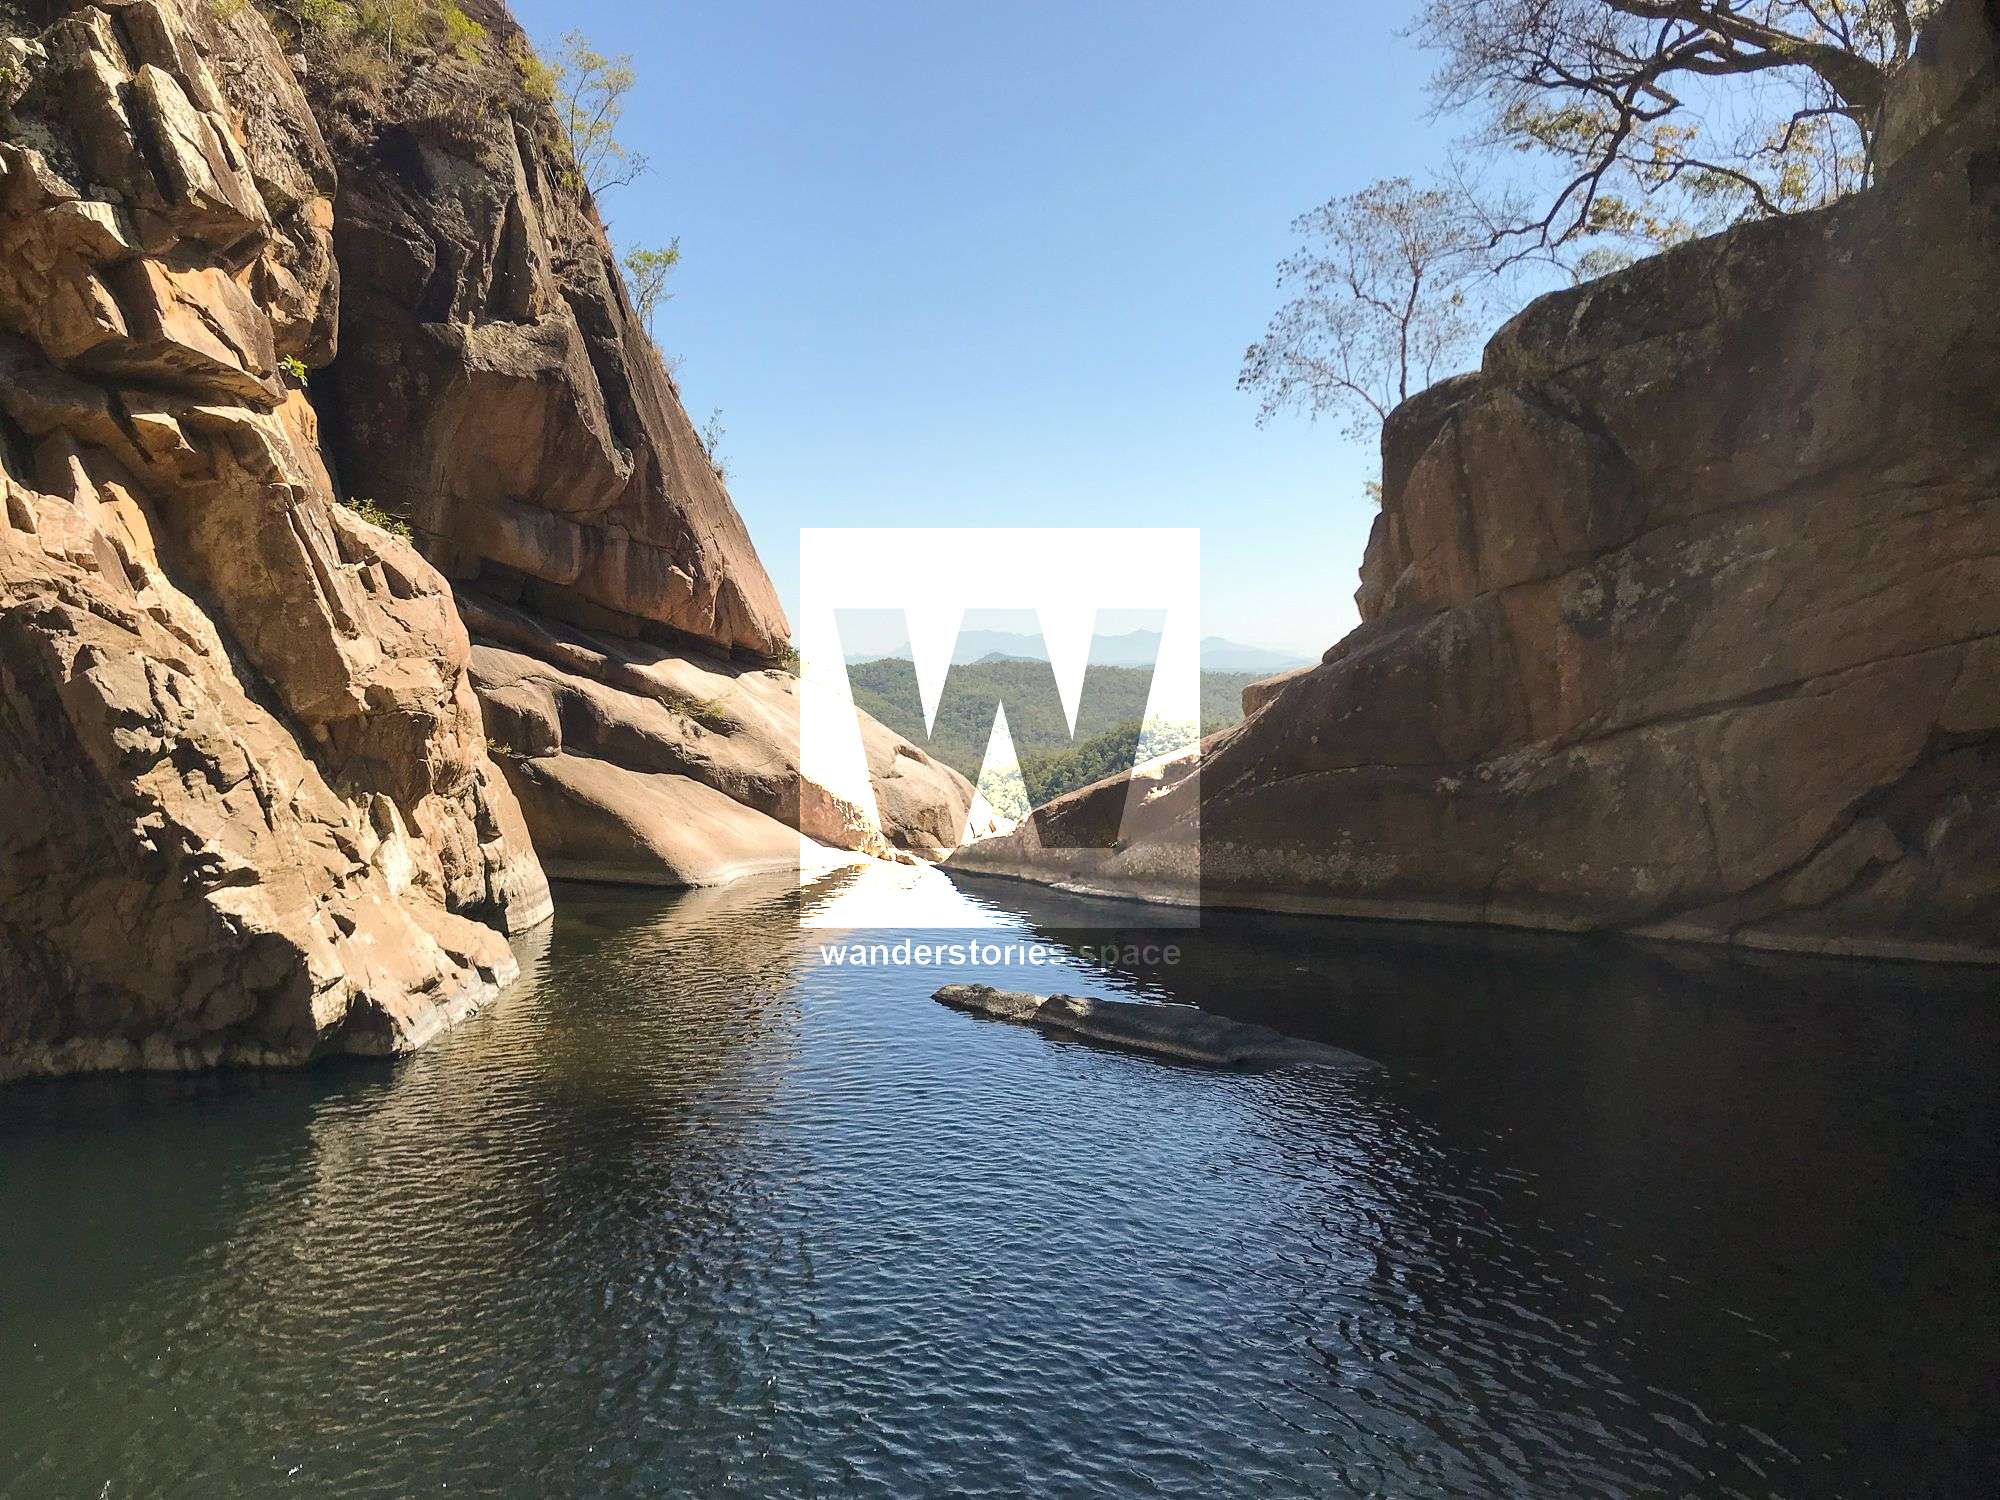
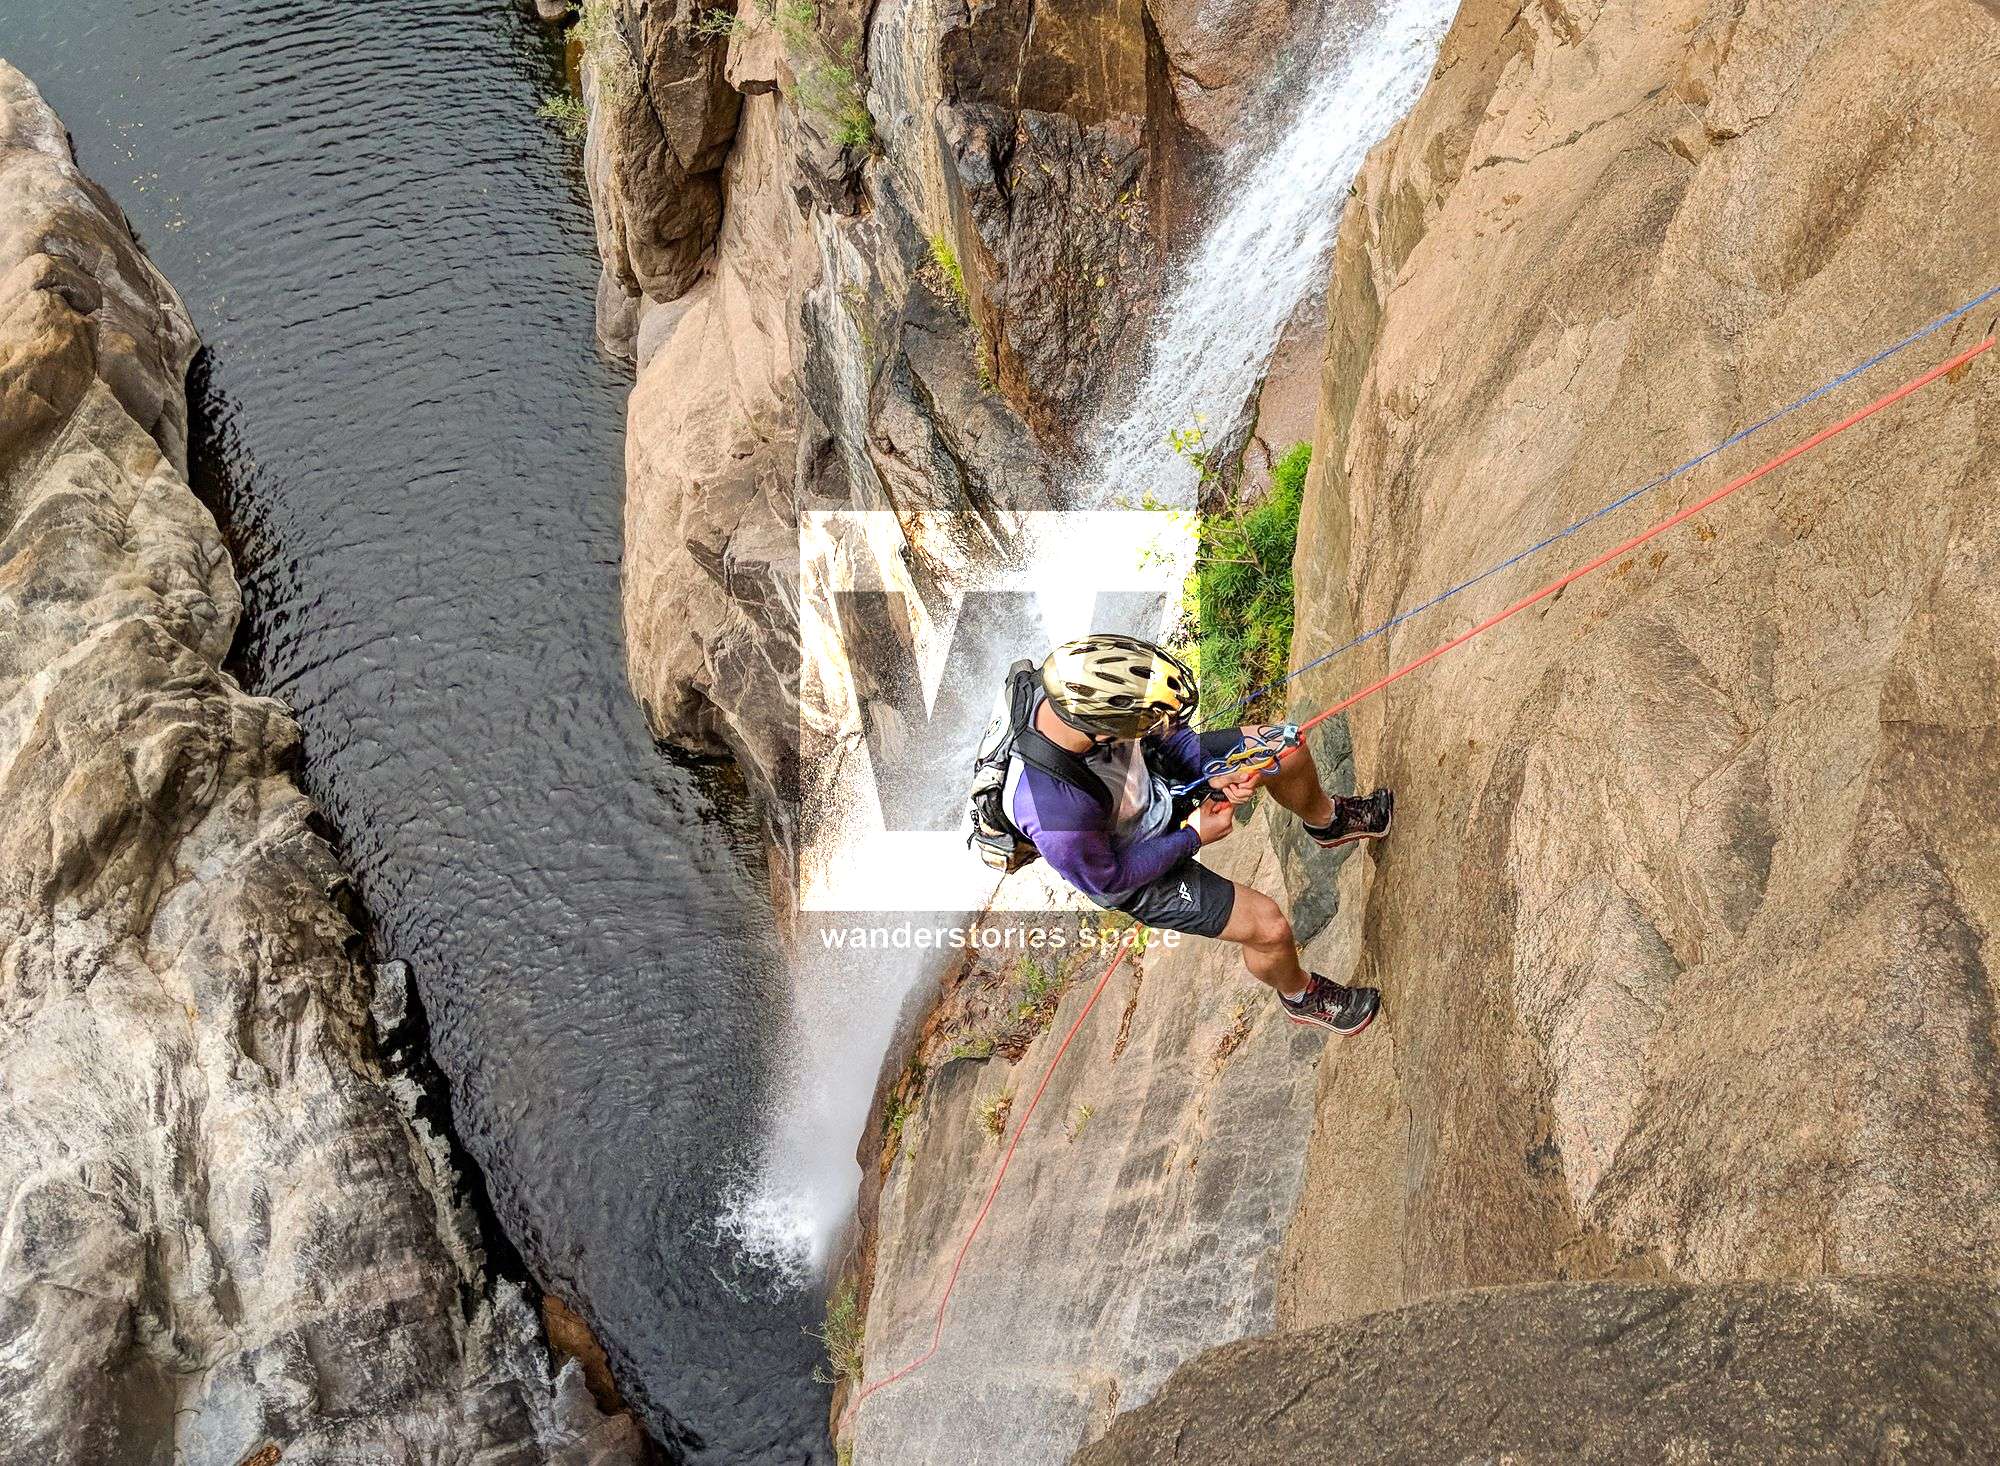
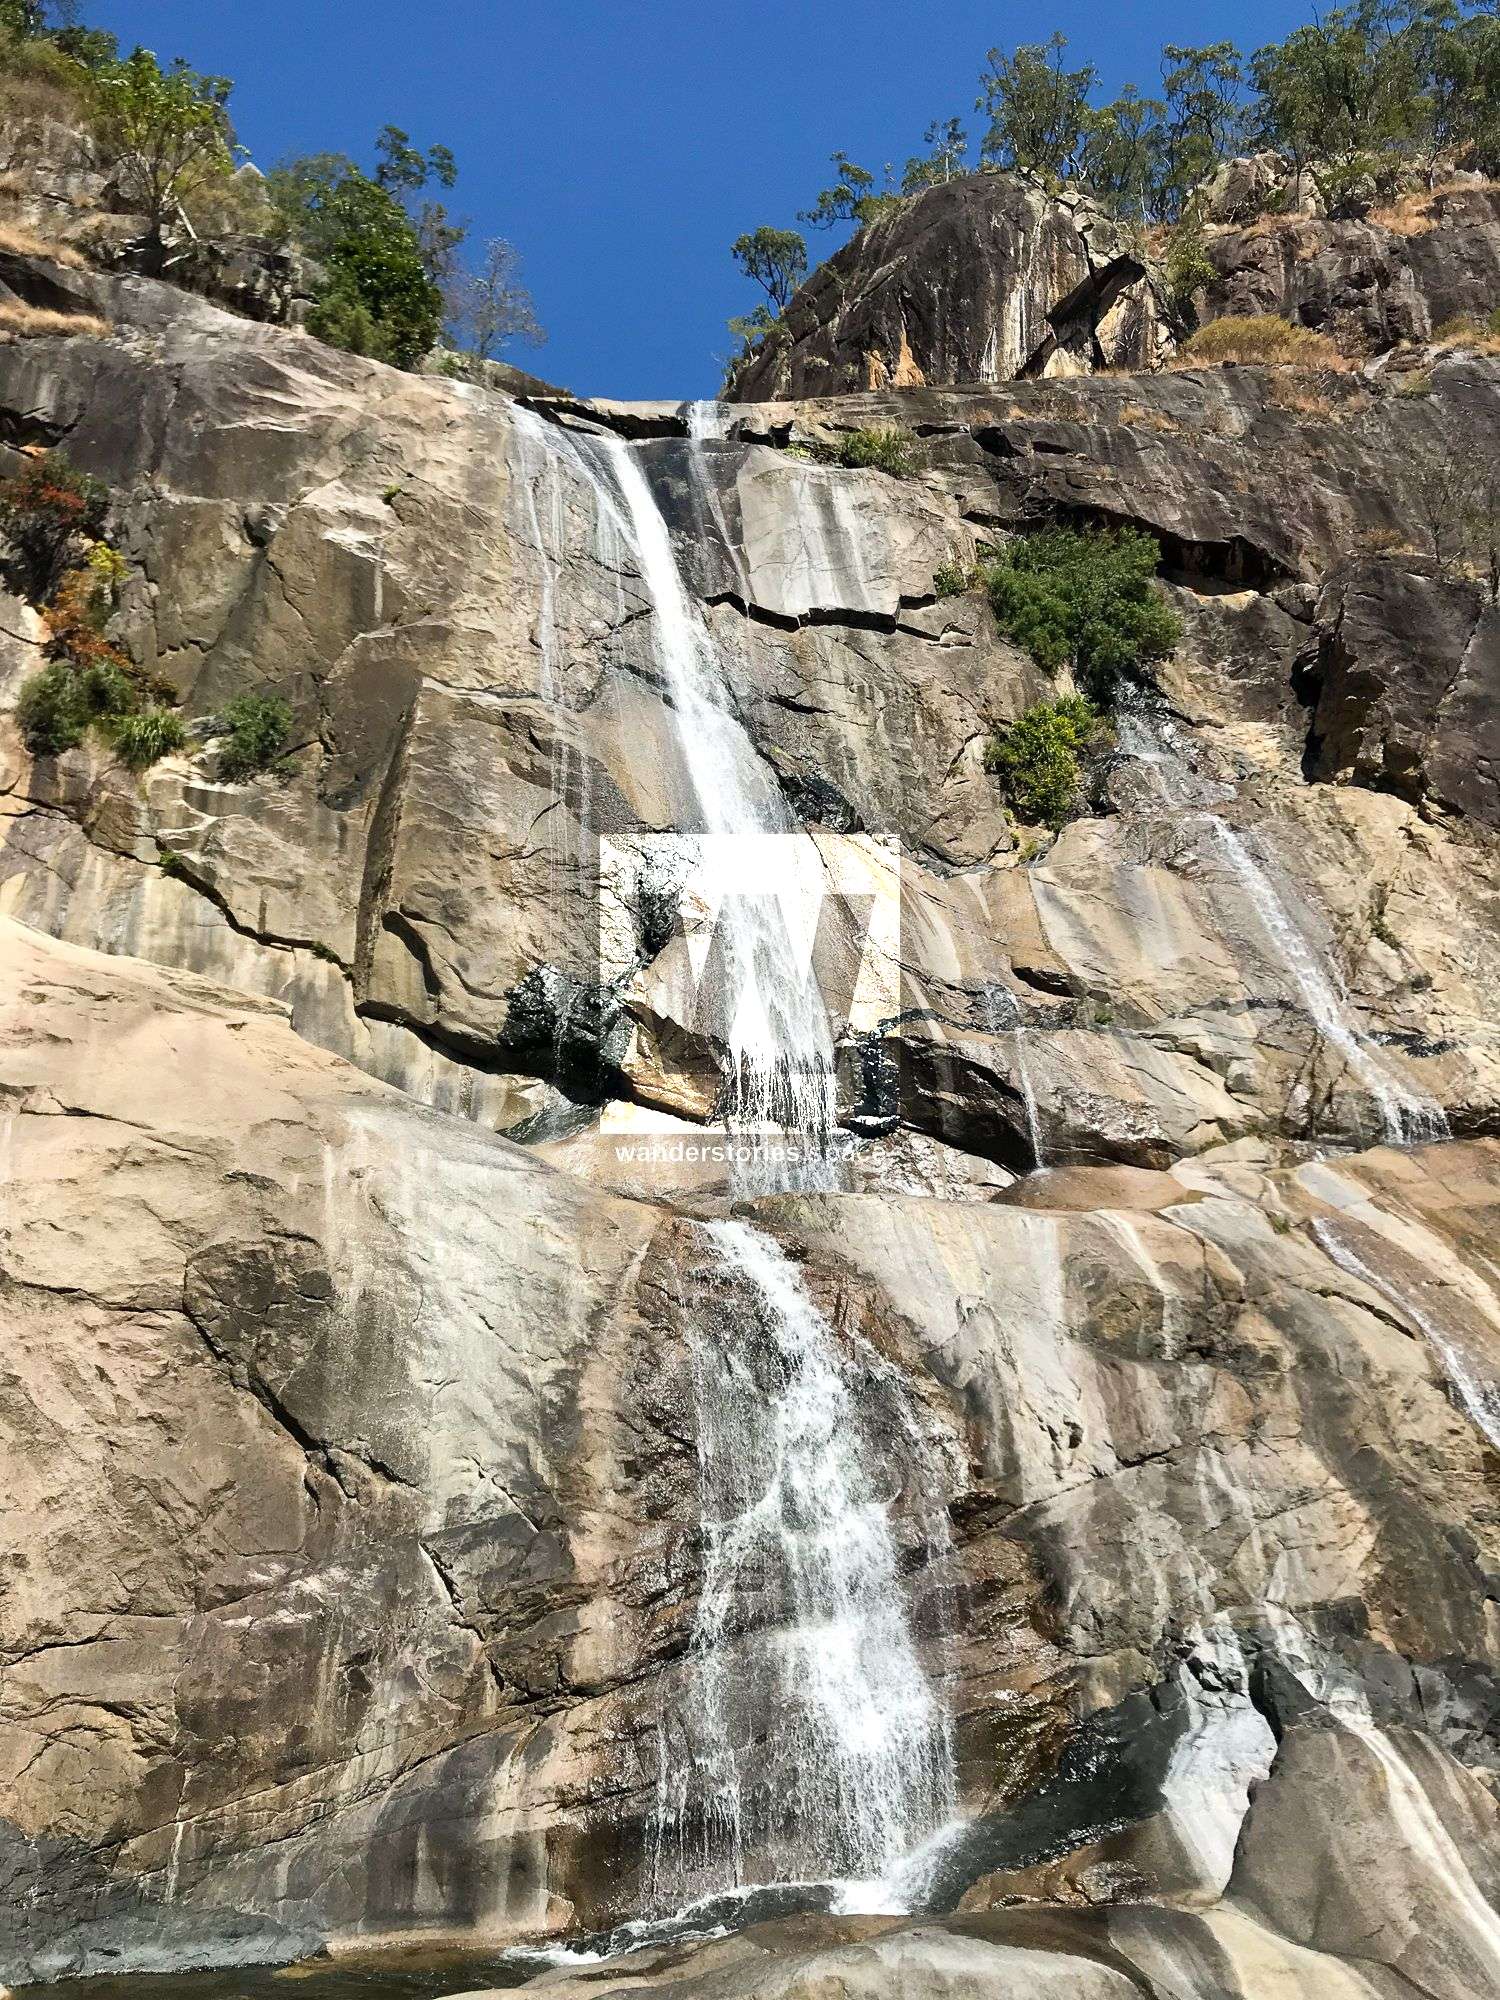
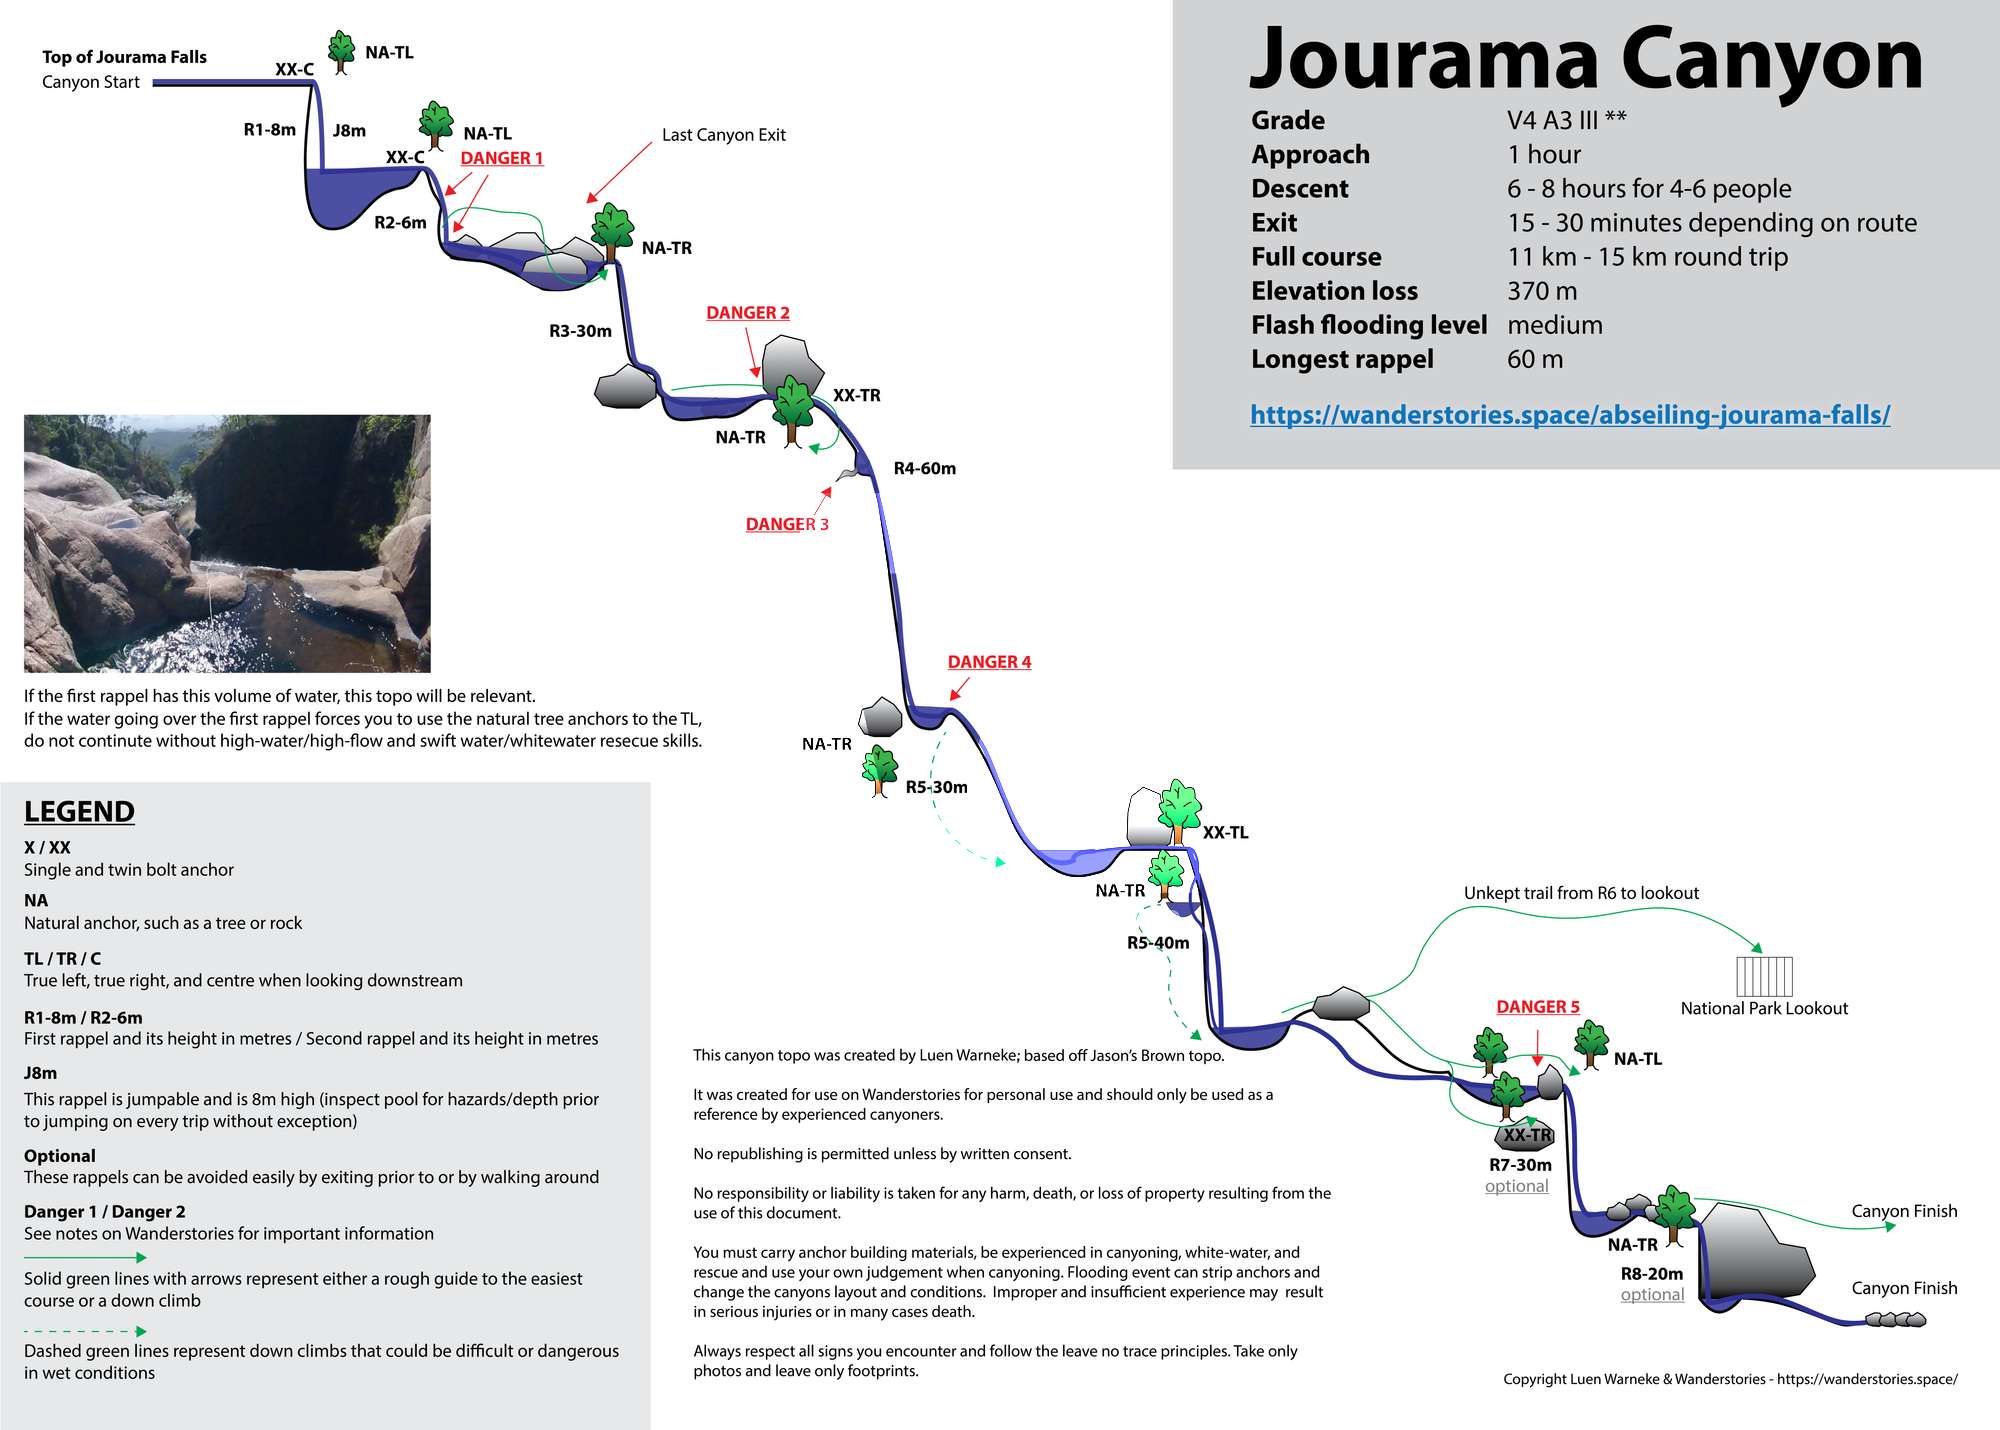
Rappel 1
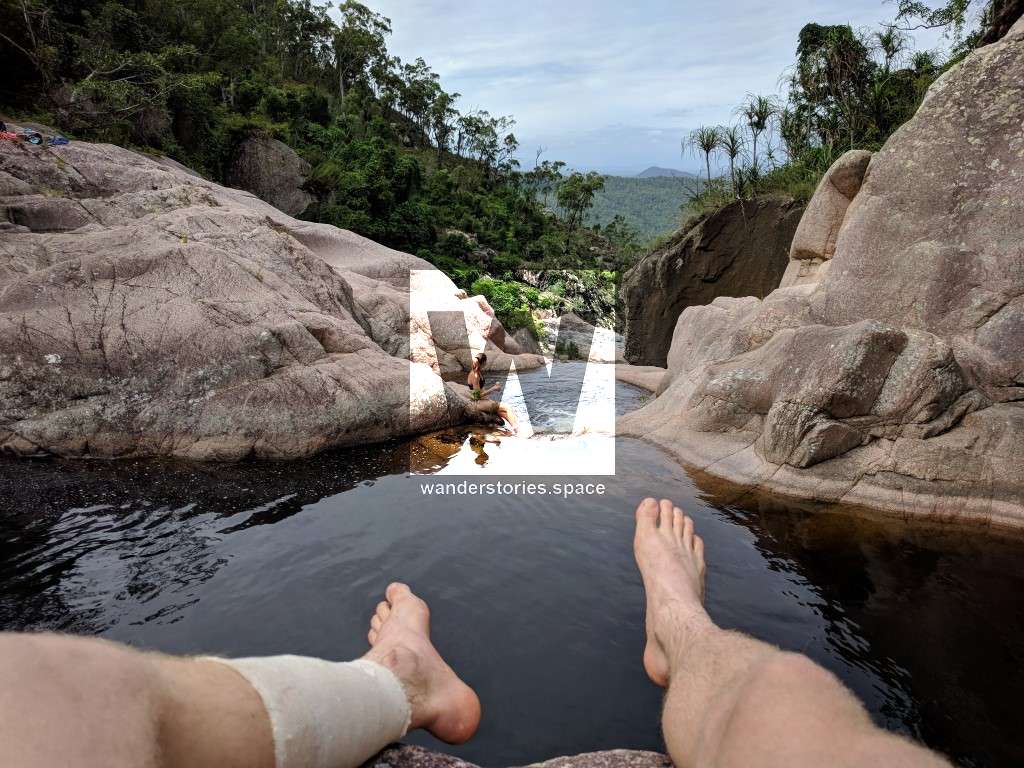
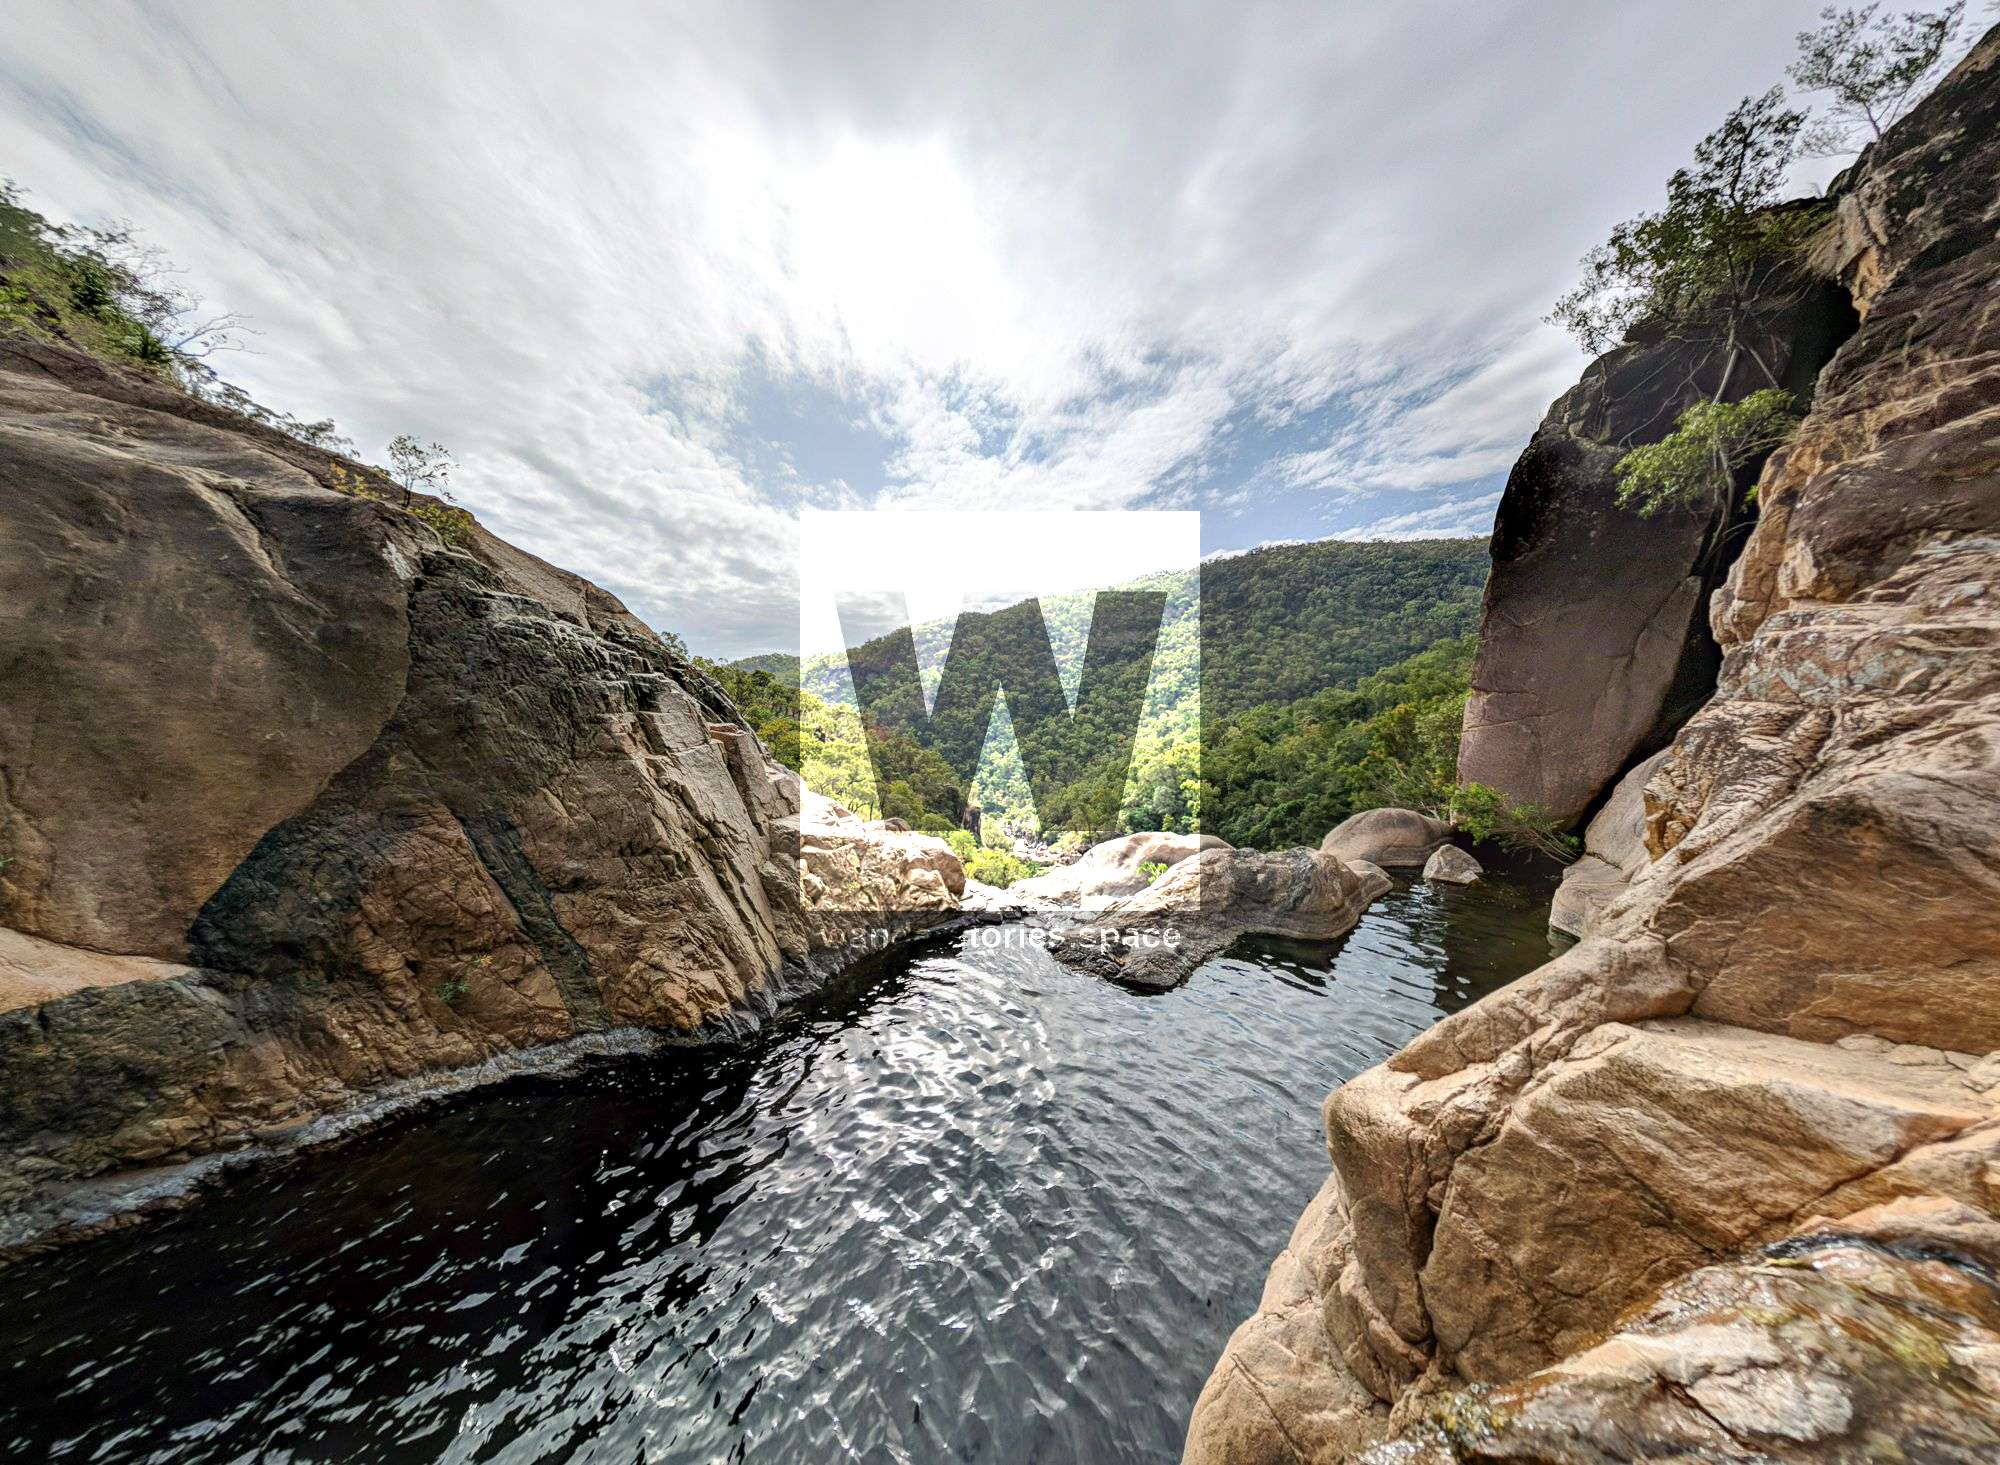
Large pool and decent swim out to next waterfall
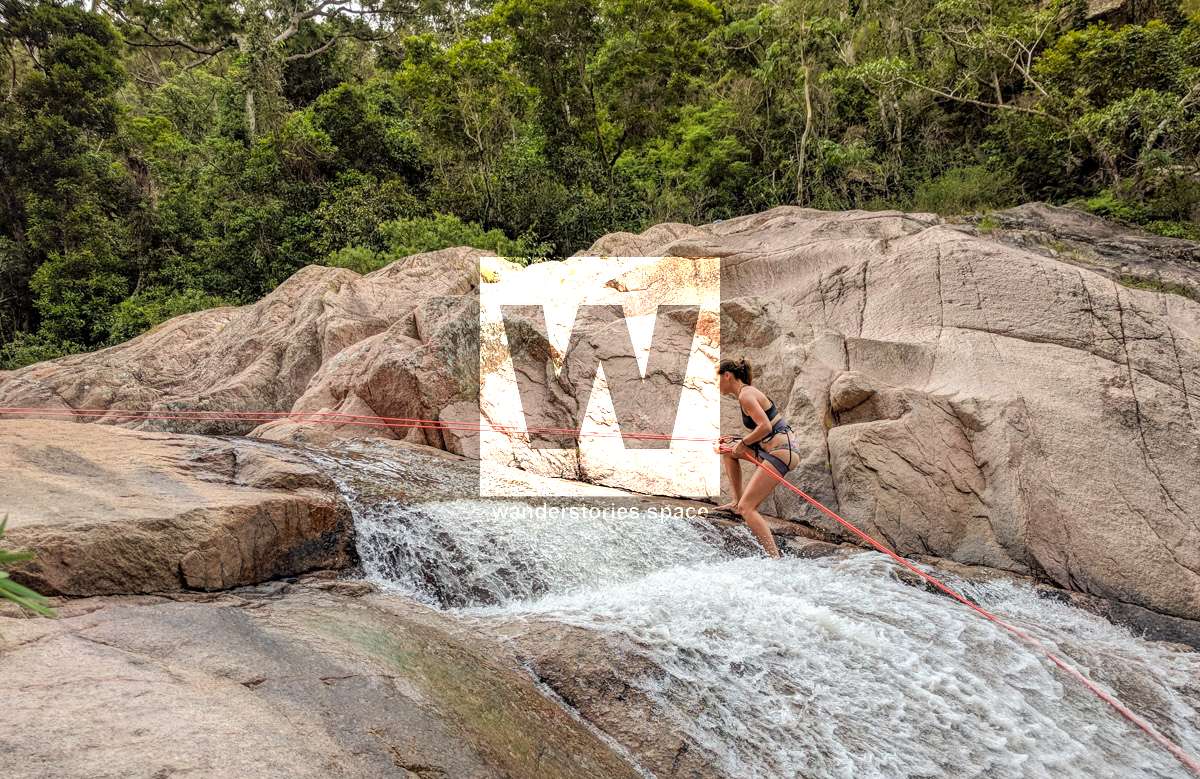
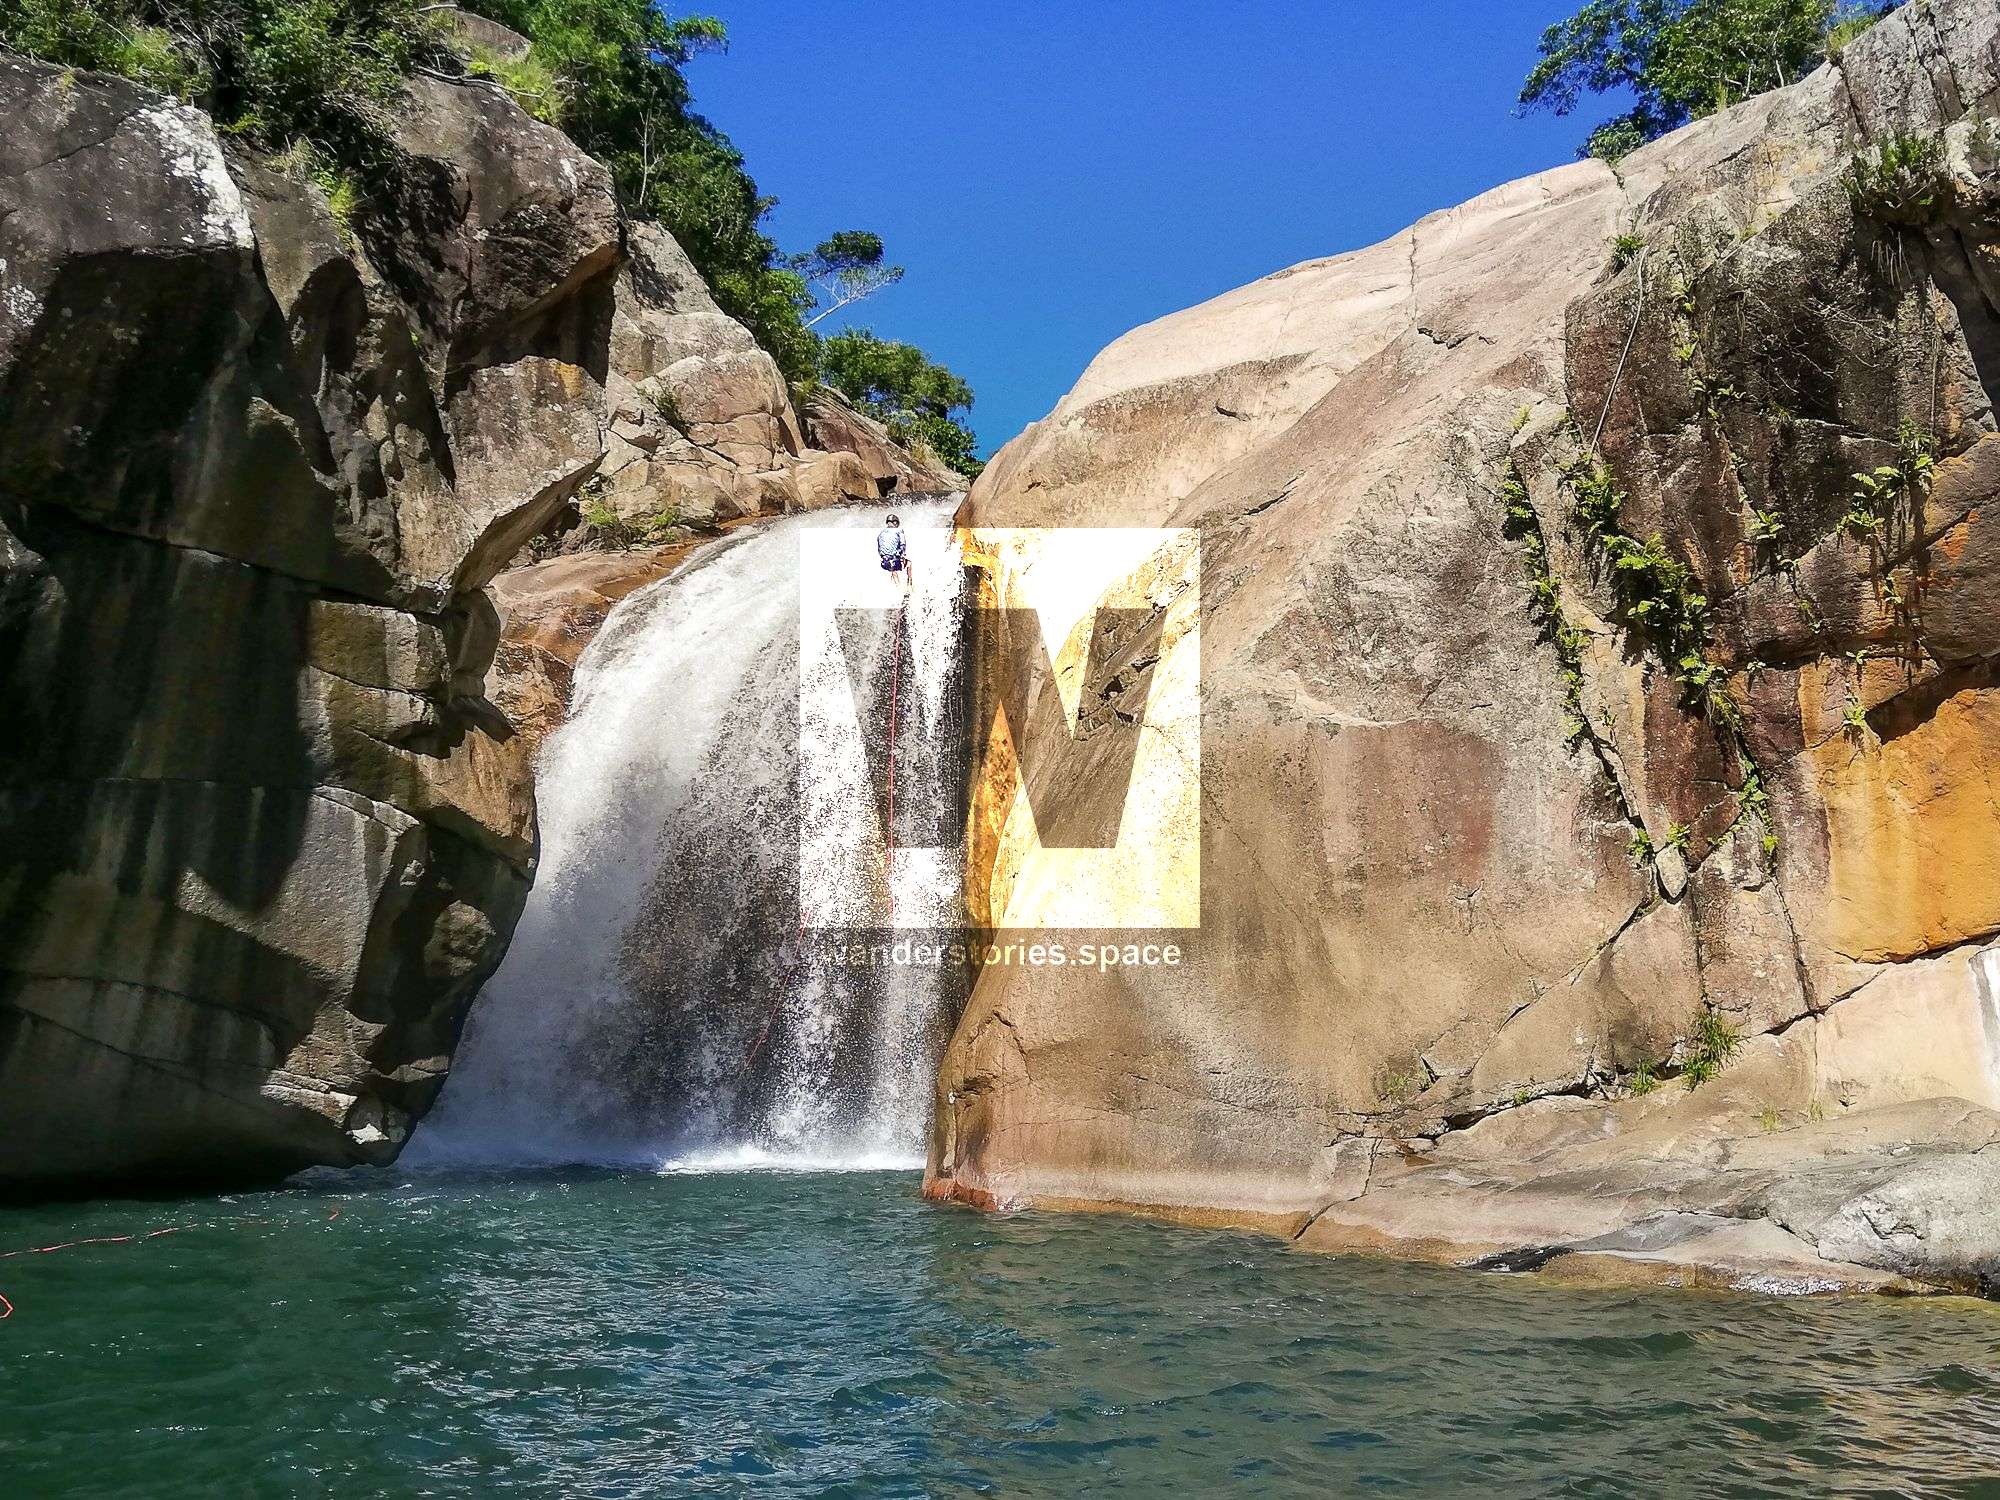
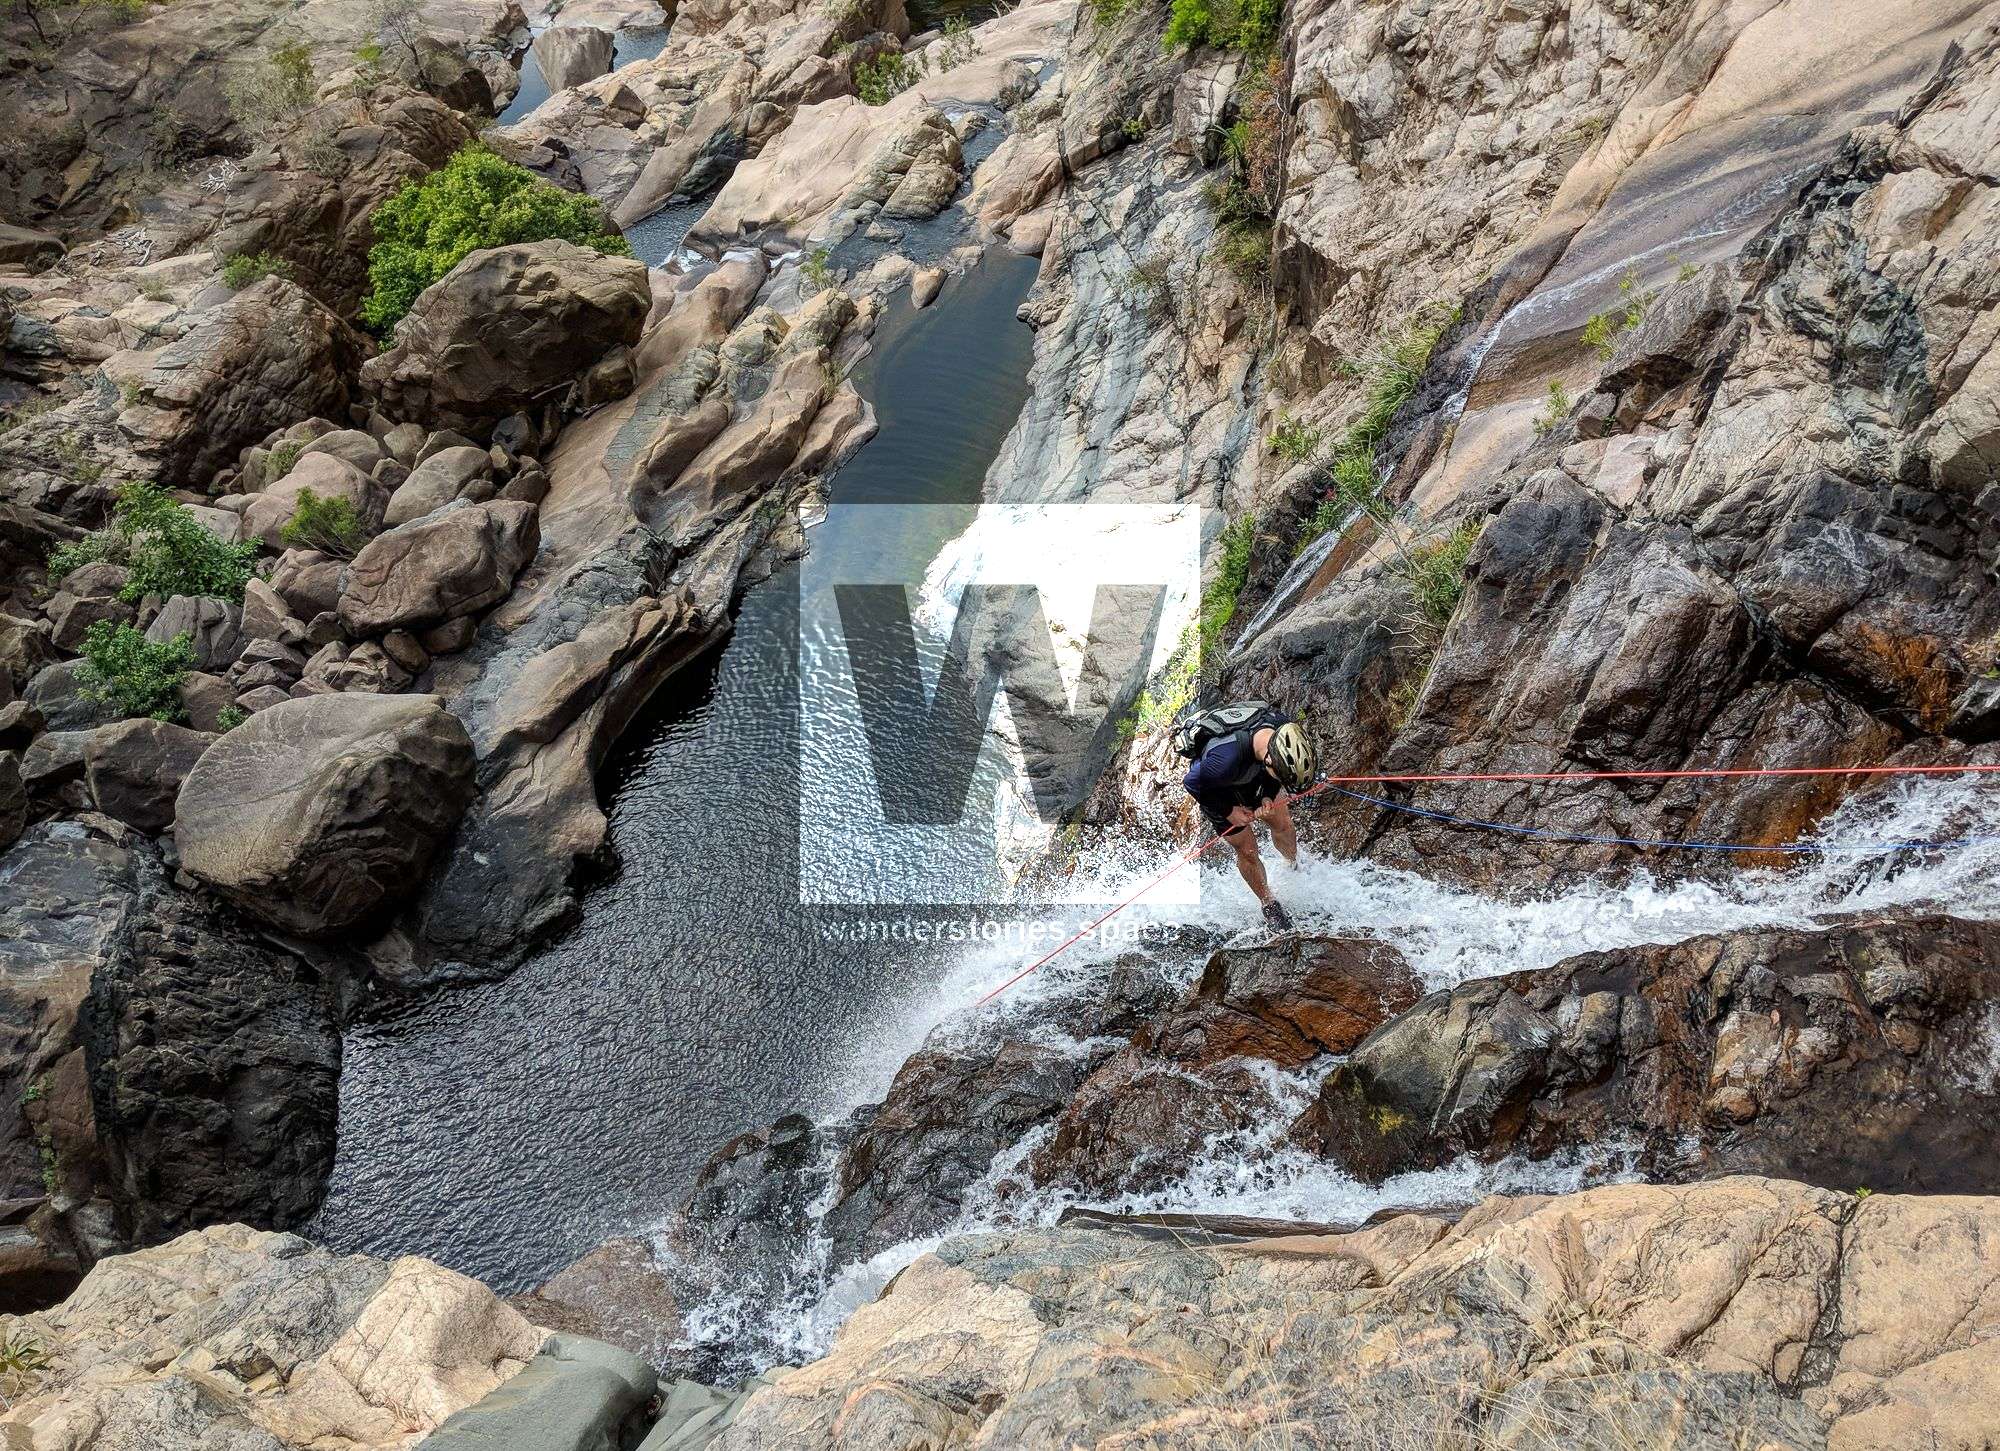
- Option 1: 8m rappel off double ring bolts centre - adjacent top of first major waterfall. A good place to practice a simul-rappel - deep water pool.
Caution 1: The slimy, granite slab atop of the falls can be very slippery. Take care when rappelling towards the edge.
Caution 2: The RHS of the falls has a crack system and ropes have been know to become stuck in the terrain traps. - Option 2: 8m rappel off natural anchor (tree) left side.
- Option 3: 8m cliff jump. This rappel is jumpable and is 8m height. You can scramble down for a shorter jump. Inspect pool for hazards and depth prior to jumping every trip without exception.
- Option 4: Scramble (grade 7) around left to below R2.
Danger Notes: If the water going over the first rappel forces you to use the natural tree anchor to the true left, do not continue without high water/high flow/swift water rescue experience.
Exit Notes: You can scramble (grade 10) out left and up to join into option 4 of R1.
Rappel 2
Short and overhanging
- Option 1: 6m rappel off double ring bolts centre. Two bolts between split pool overflow. Sloping pitch with overhang (watch your head) and pinning risk under waterfall at bottom in full flow. There are foot positions of the left-hand side of the waterfall as you are rappelling down.
Danger Notes: This rappel has a lip which a number of people trap their hand under the rope as they navigate the edge. This can be easily avoided with prior warning. Use option 2 if needed. In higher flow, it may be possible to get pinned / pinched under the overhang and between the rock. - Option 2: 6m rappel off natural anchor (tree) left side.
Exit Notes: Easy walk out to track via gully. Bail out left to track via gully.
Easy rock hop left side to next rappel right side.
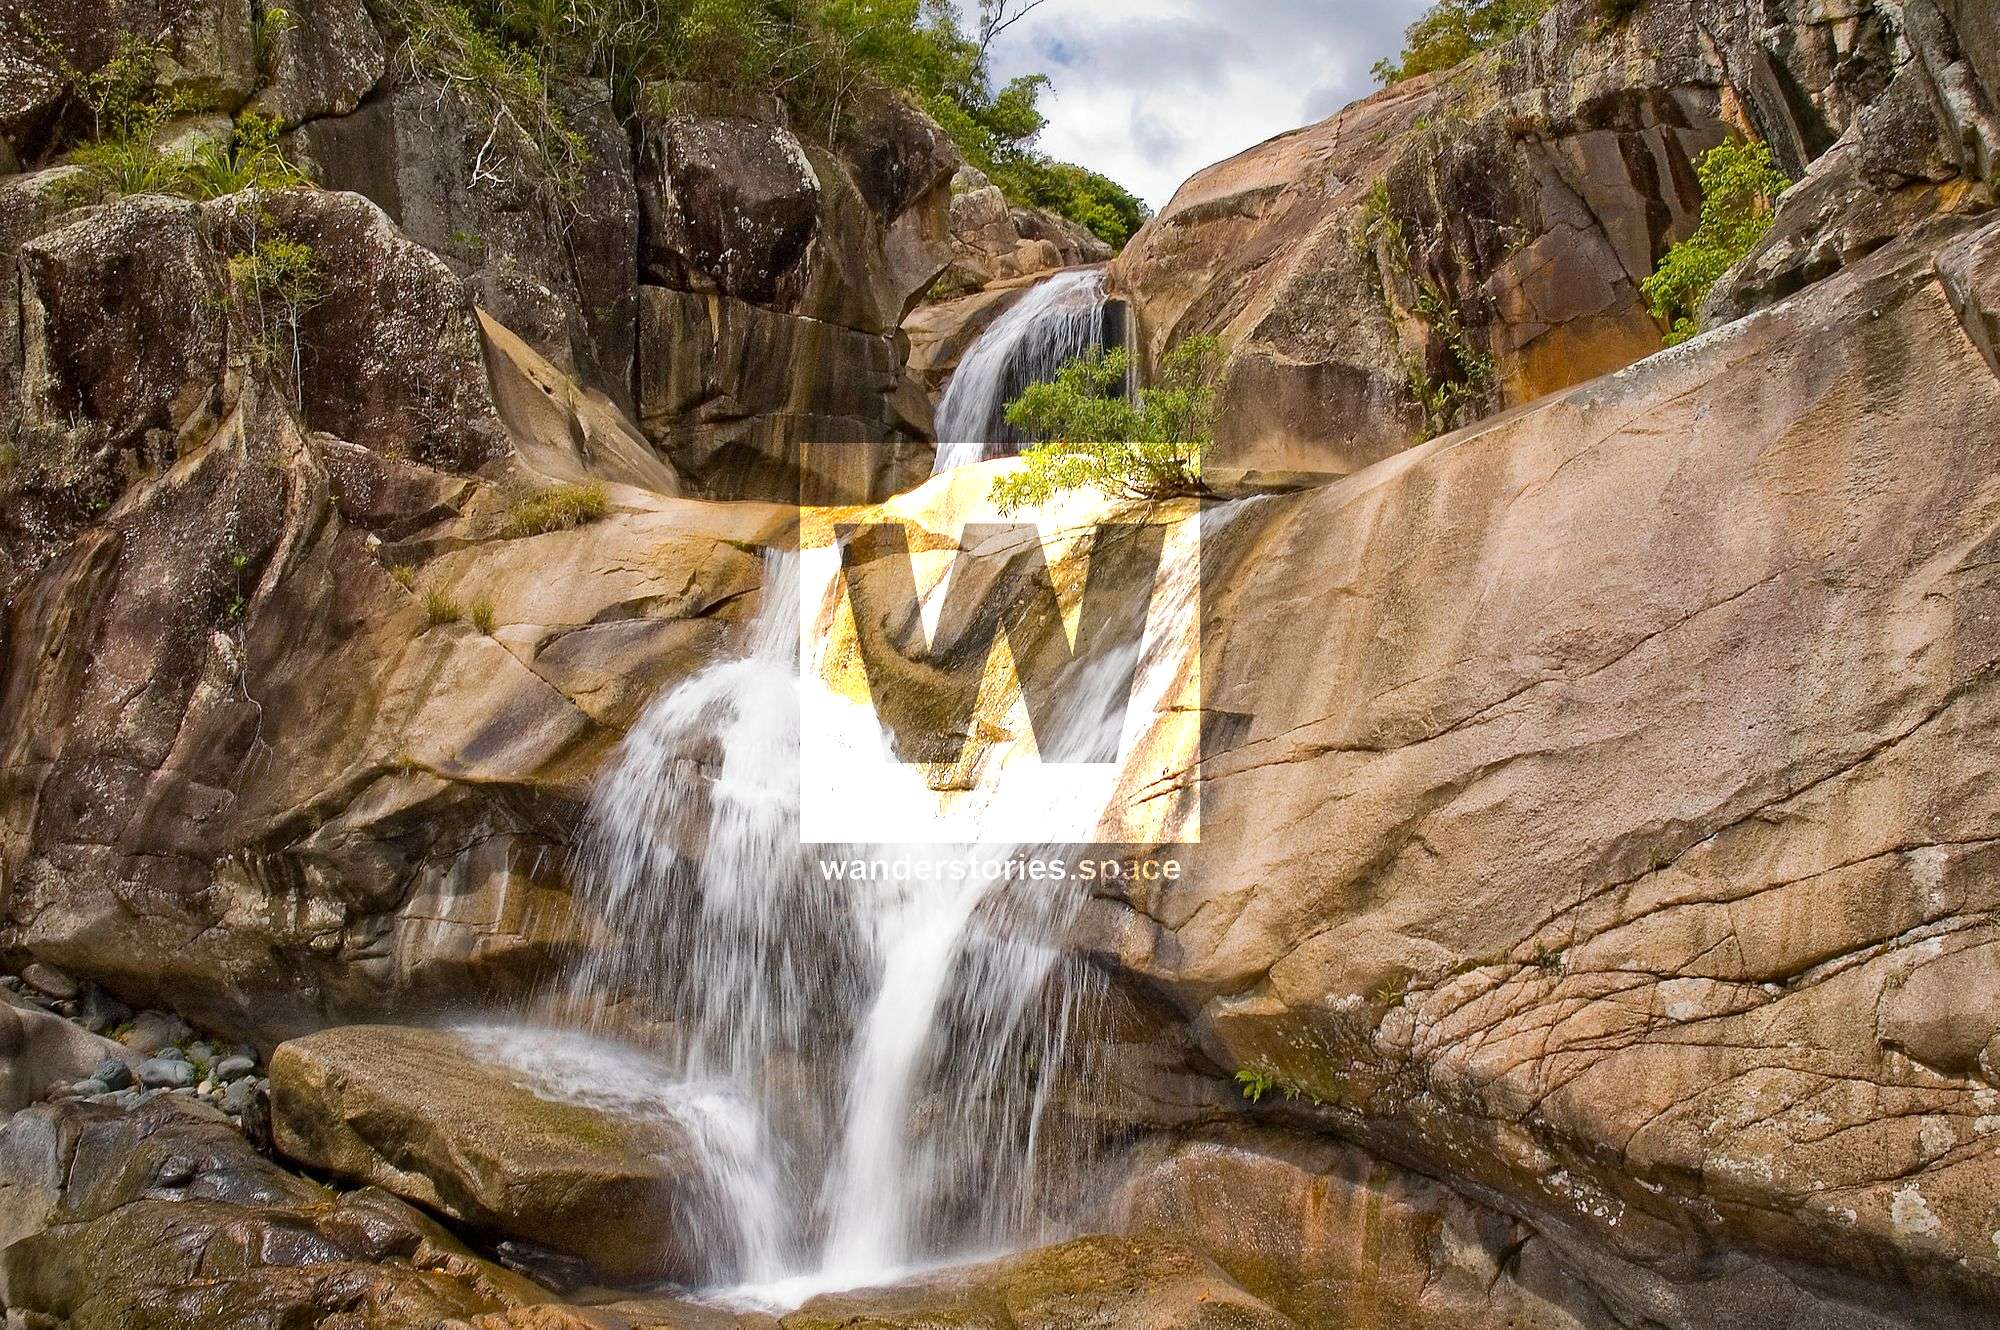
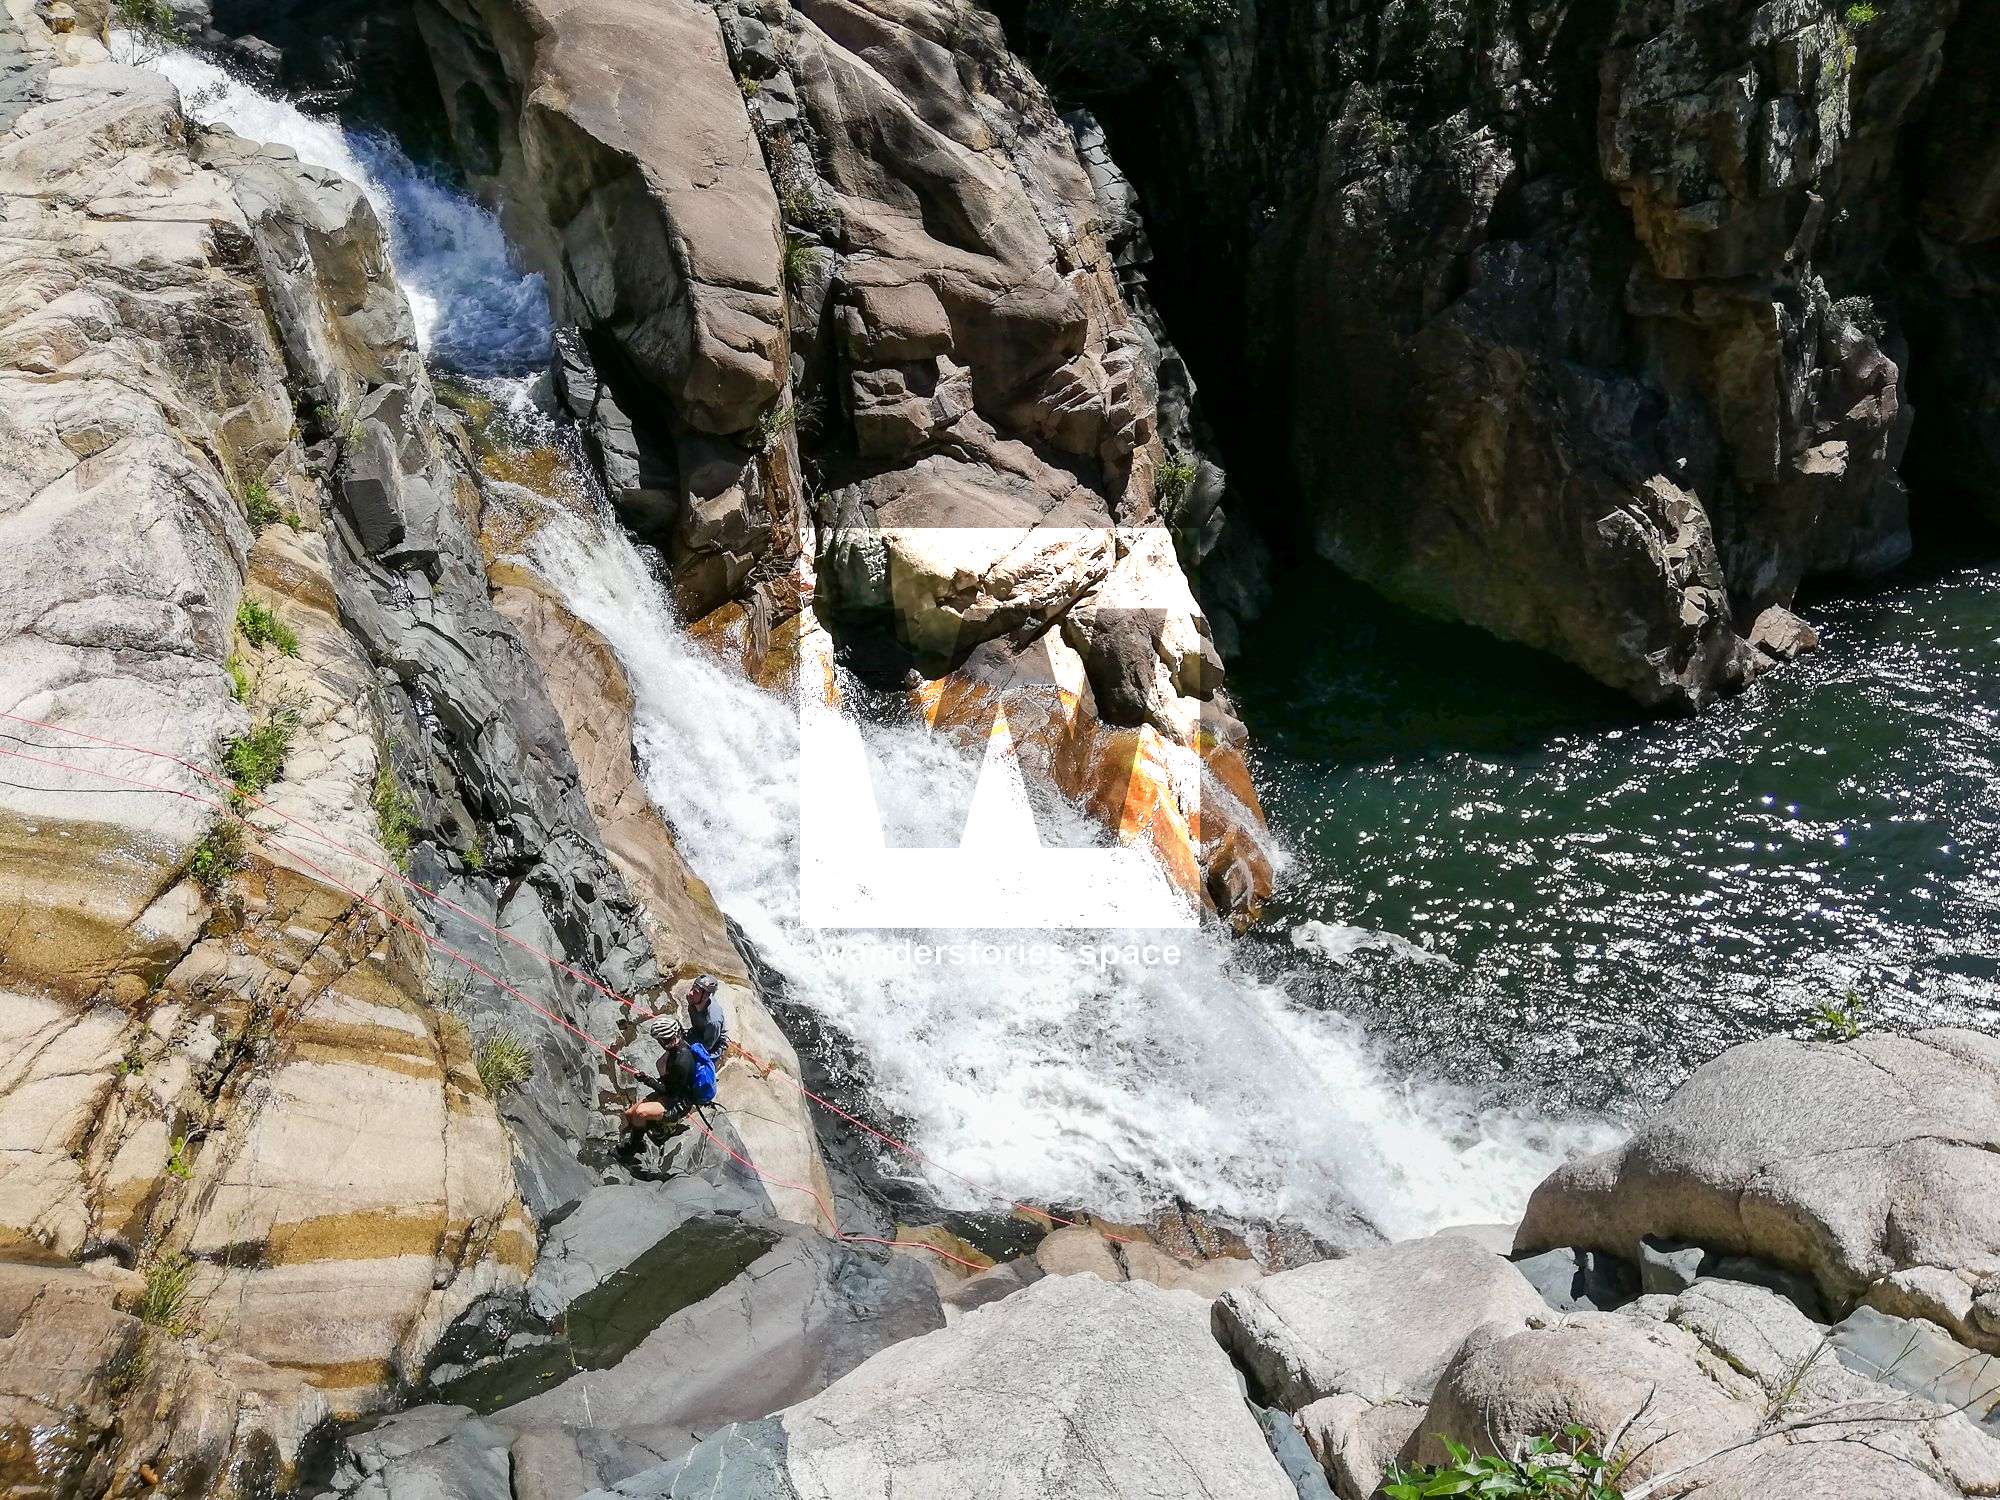
Rappel 3
Slaby rappel to ledge.
- Option 1: 25m rappel off natural anchor (tree) right side. Webbing on tree behind major rock formation true right. Dry abseil to ledge, rappel, jump, or rock slide into pool two metres below.
- Option 2: Scramble (grade 10) down right only when dry.
Exit Notes: Can swim to the left side and scramble (grade 10) out and up to cliff line. Walk along cliff line to join back into track.
Decent swim to top of next rappel (the big falls).
Caution: There are two shallow rocks in water on your way that are hard to see when water level is higher. Try not to bash your knees...
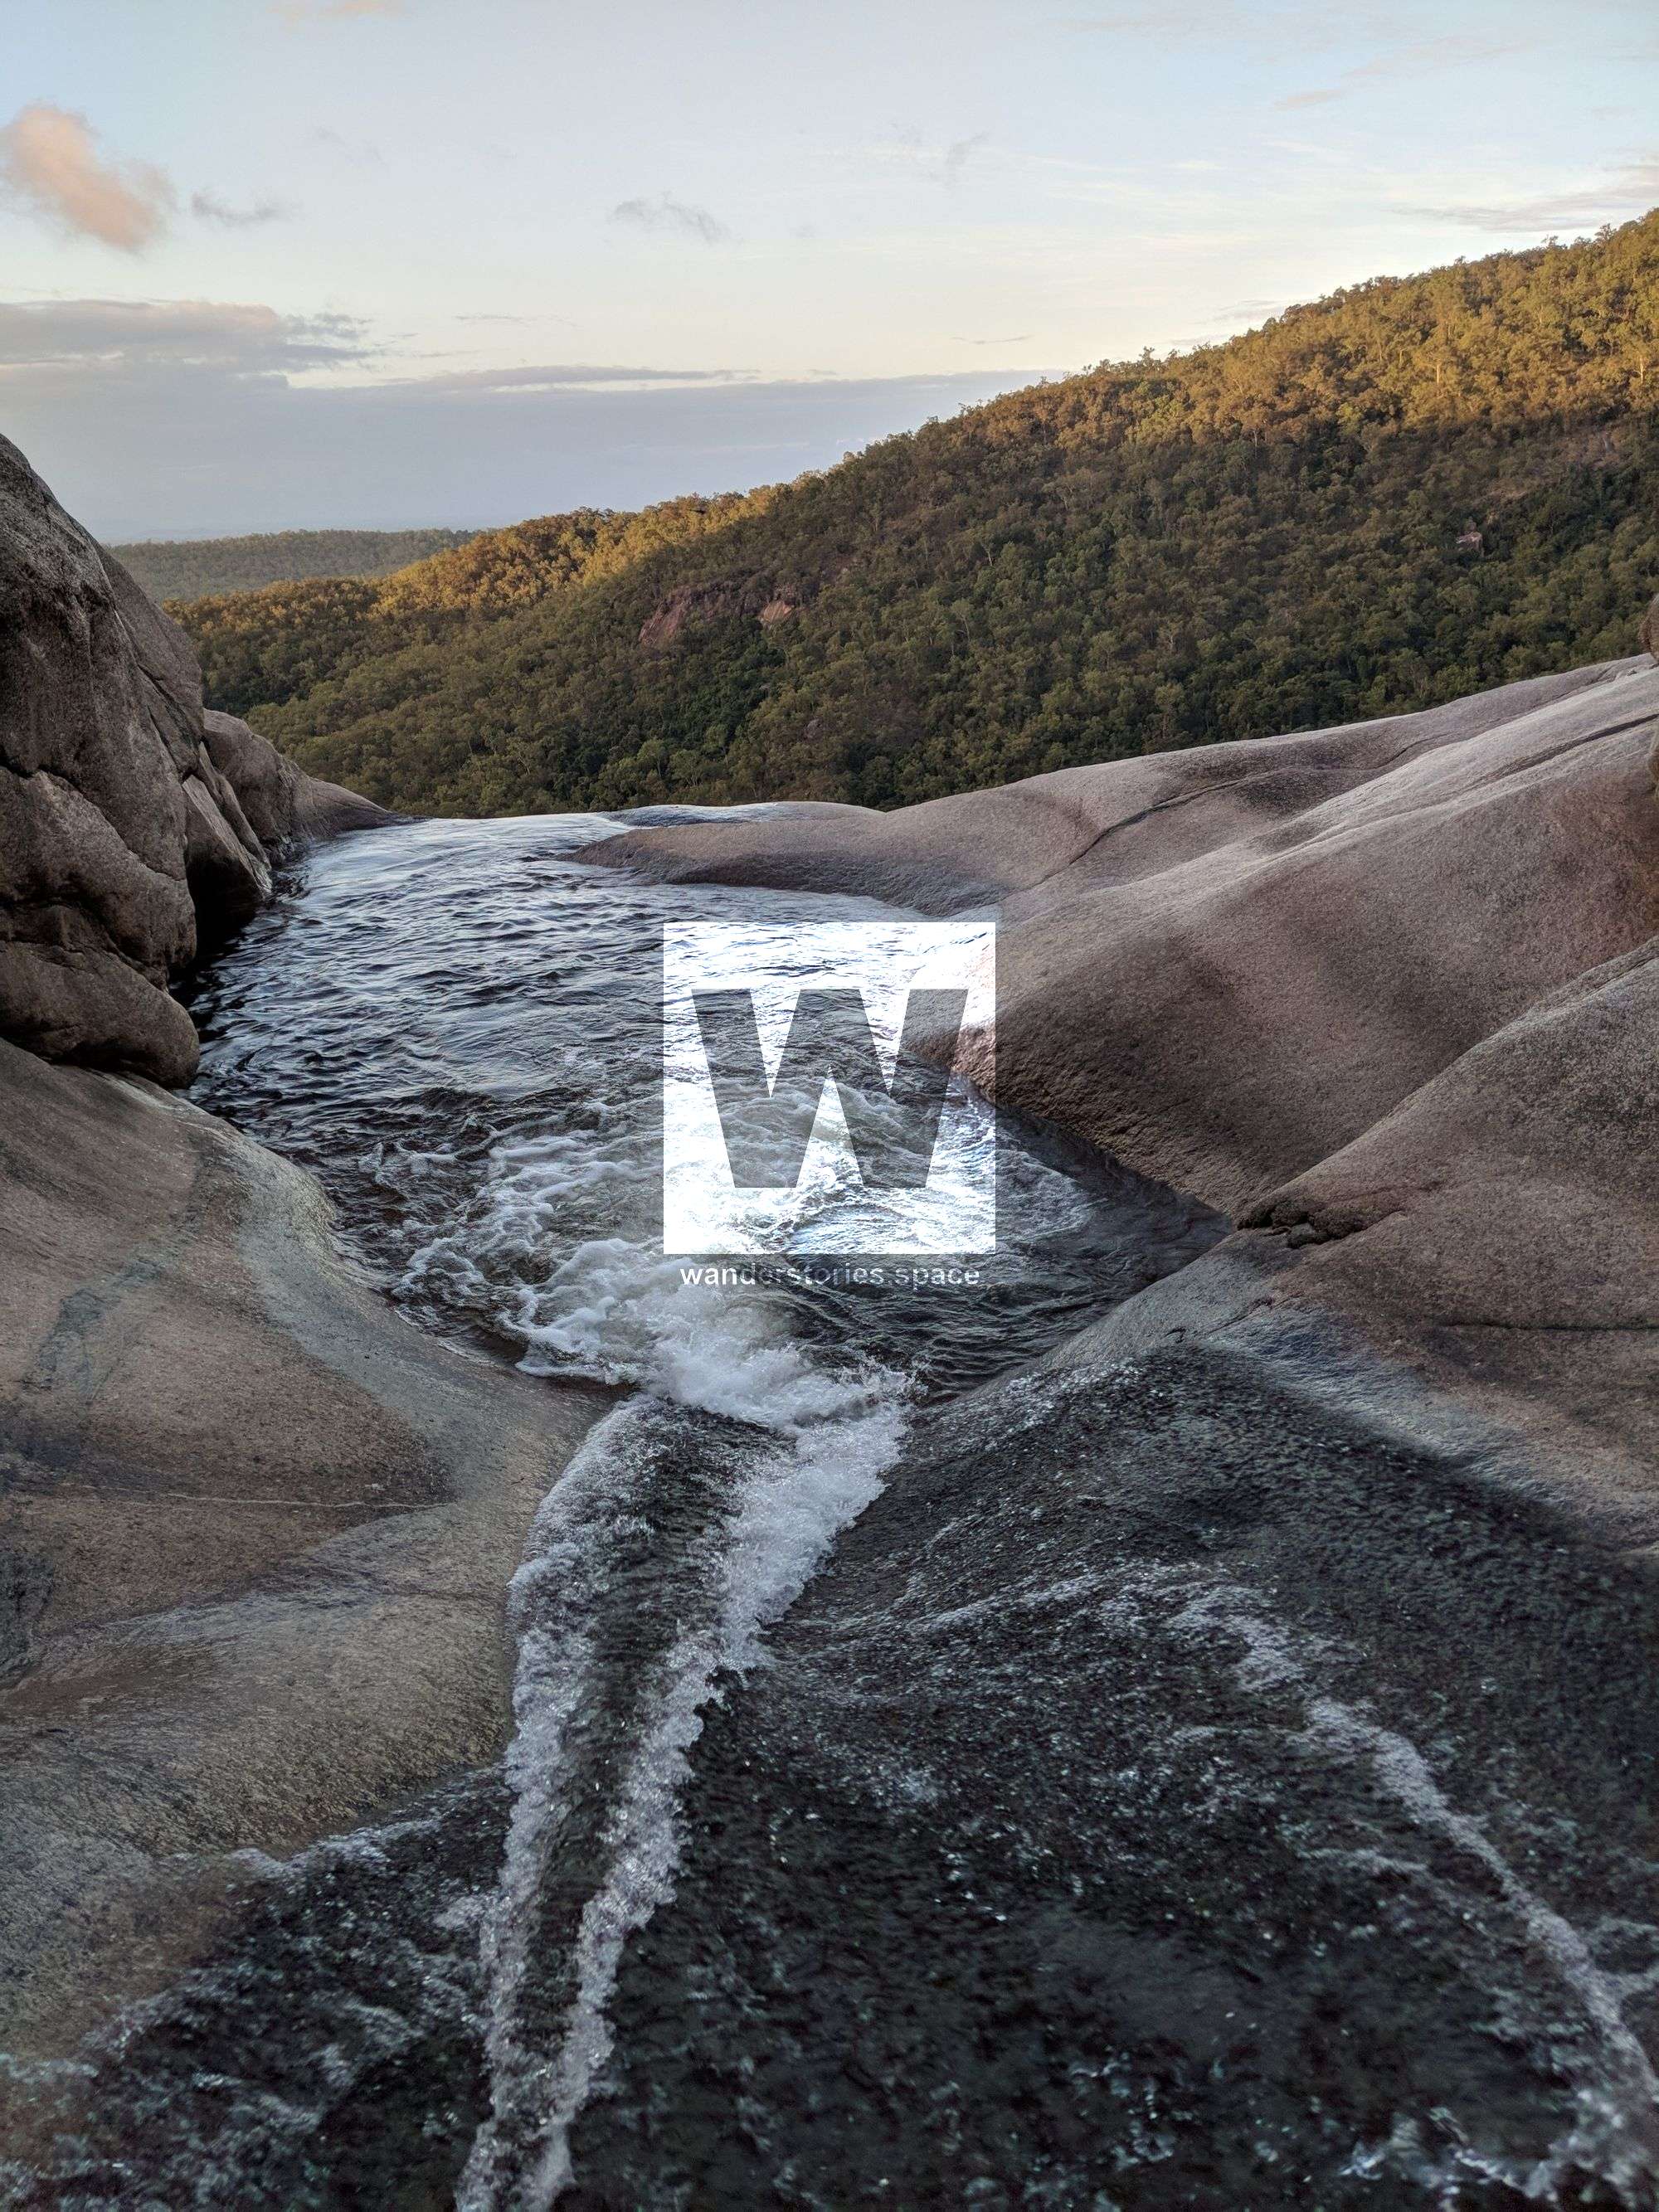
It's safe to slide down pool exit chute at low water levels, otherwise difficult to access next pitch without getting swept over 60m waterfall - higher flow it's possible to avoid the shute and climb out right (grade 11) though not a safe option. Possible to belay down exit shute although not needed in mid to low flow – assess before commiting.

Danger Notes: When coming up on the 60m rappel, the larger pool prior flows down a narrow restriction TL, approach the restriction with caution, when water flow is even medium there is a significant risk of being washed over the 60m waterfall.
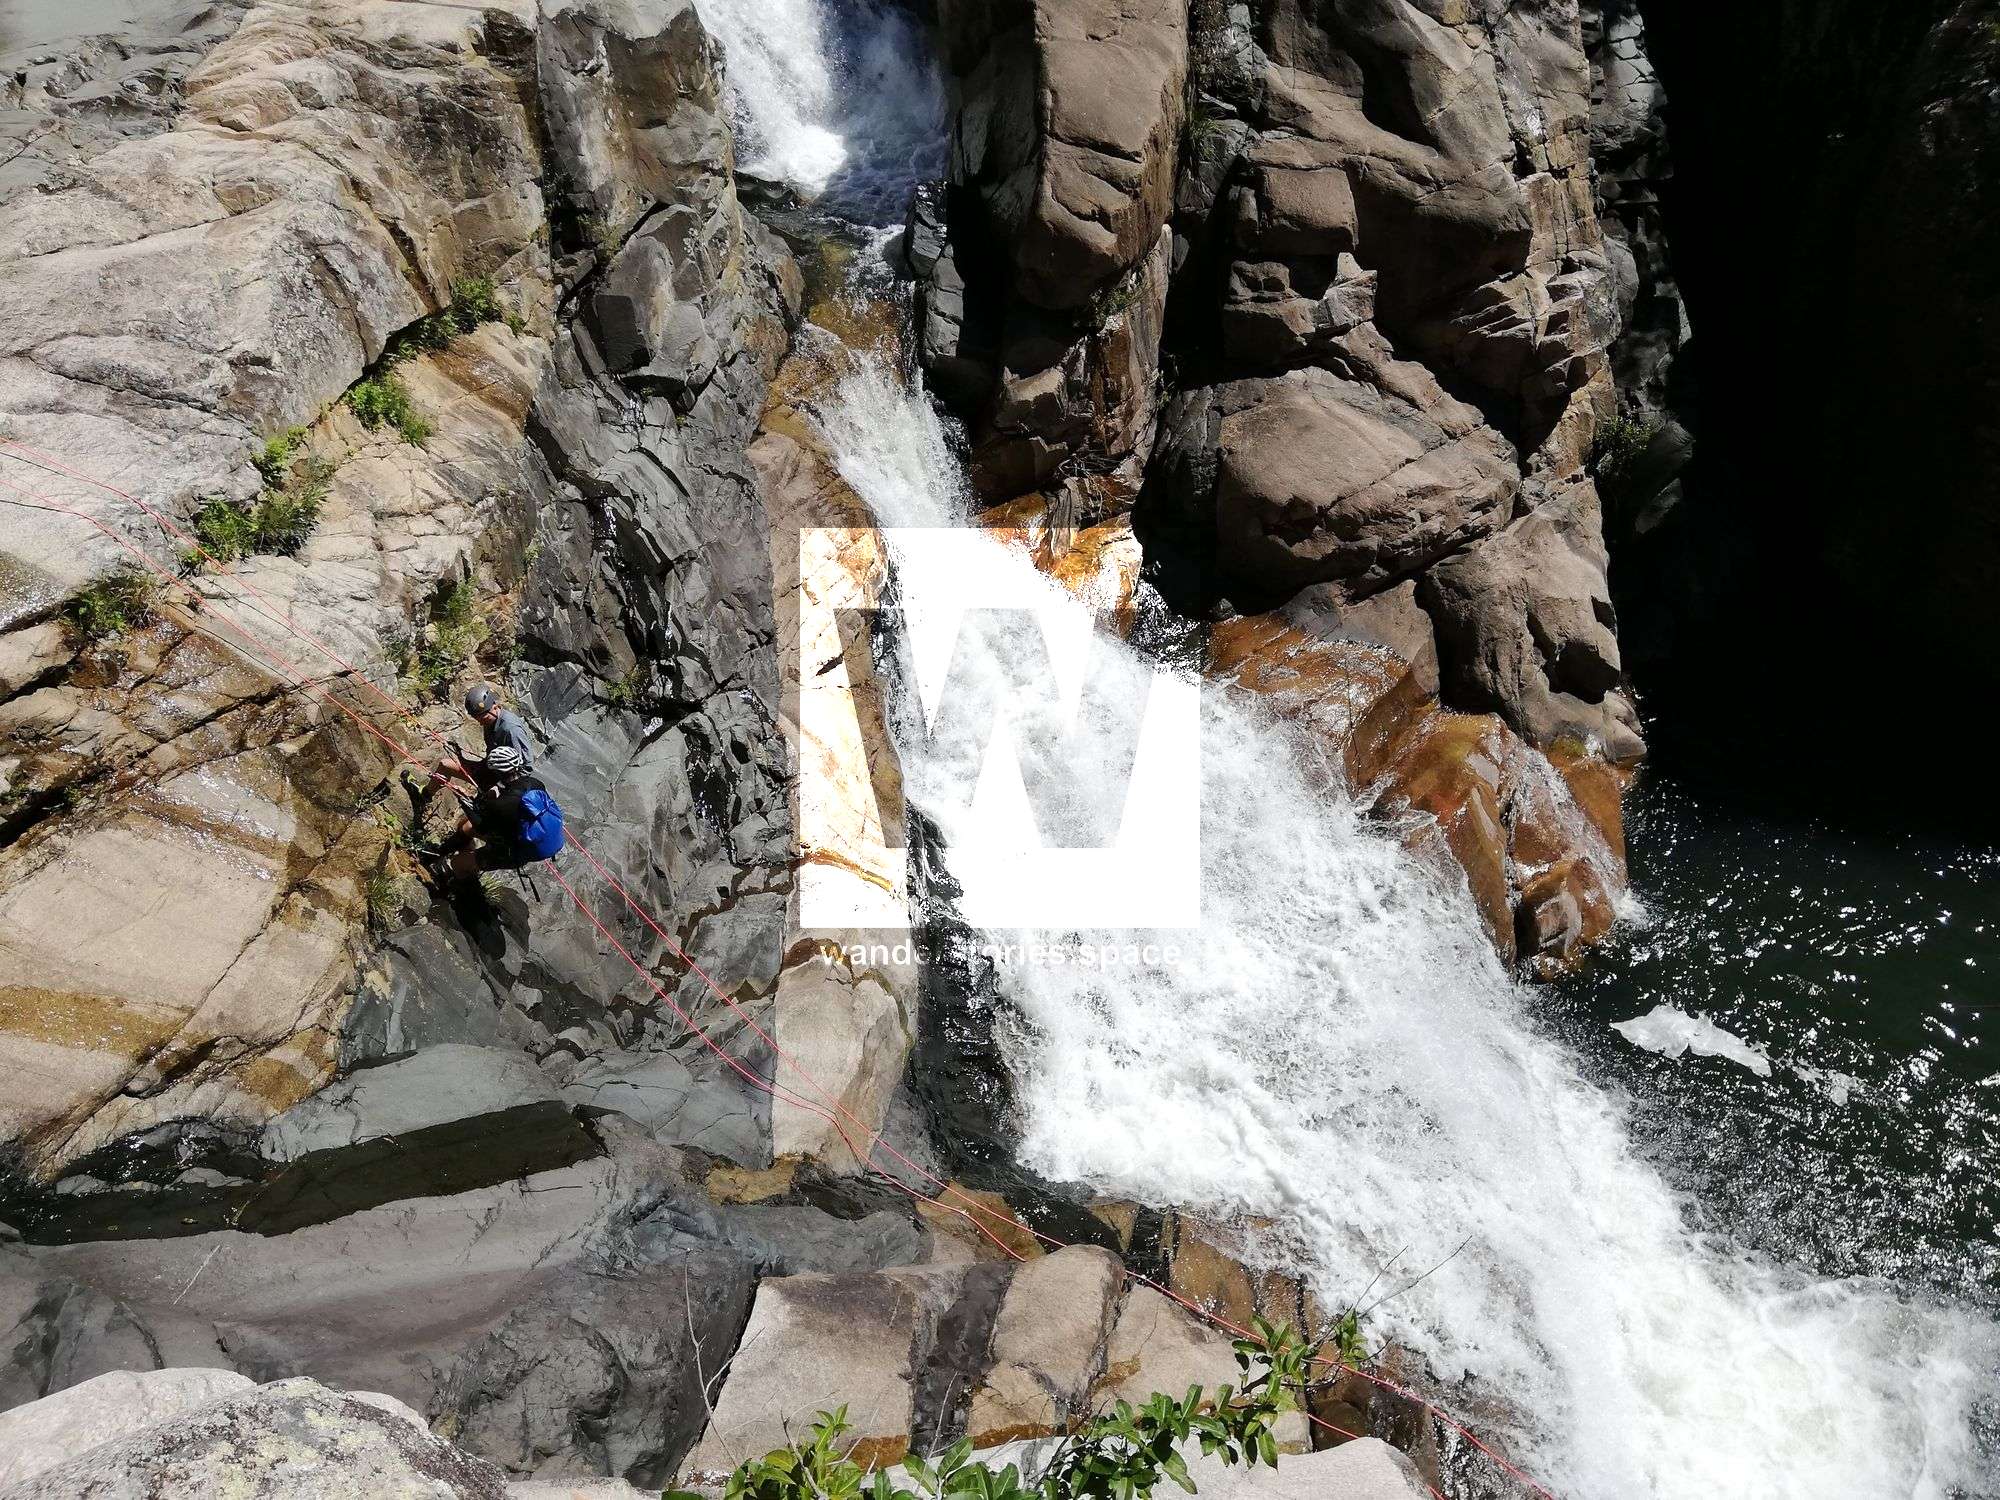
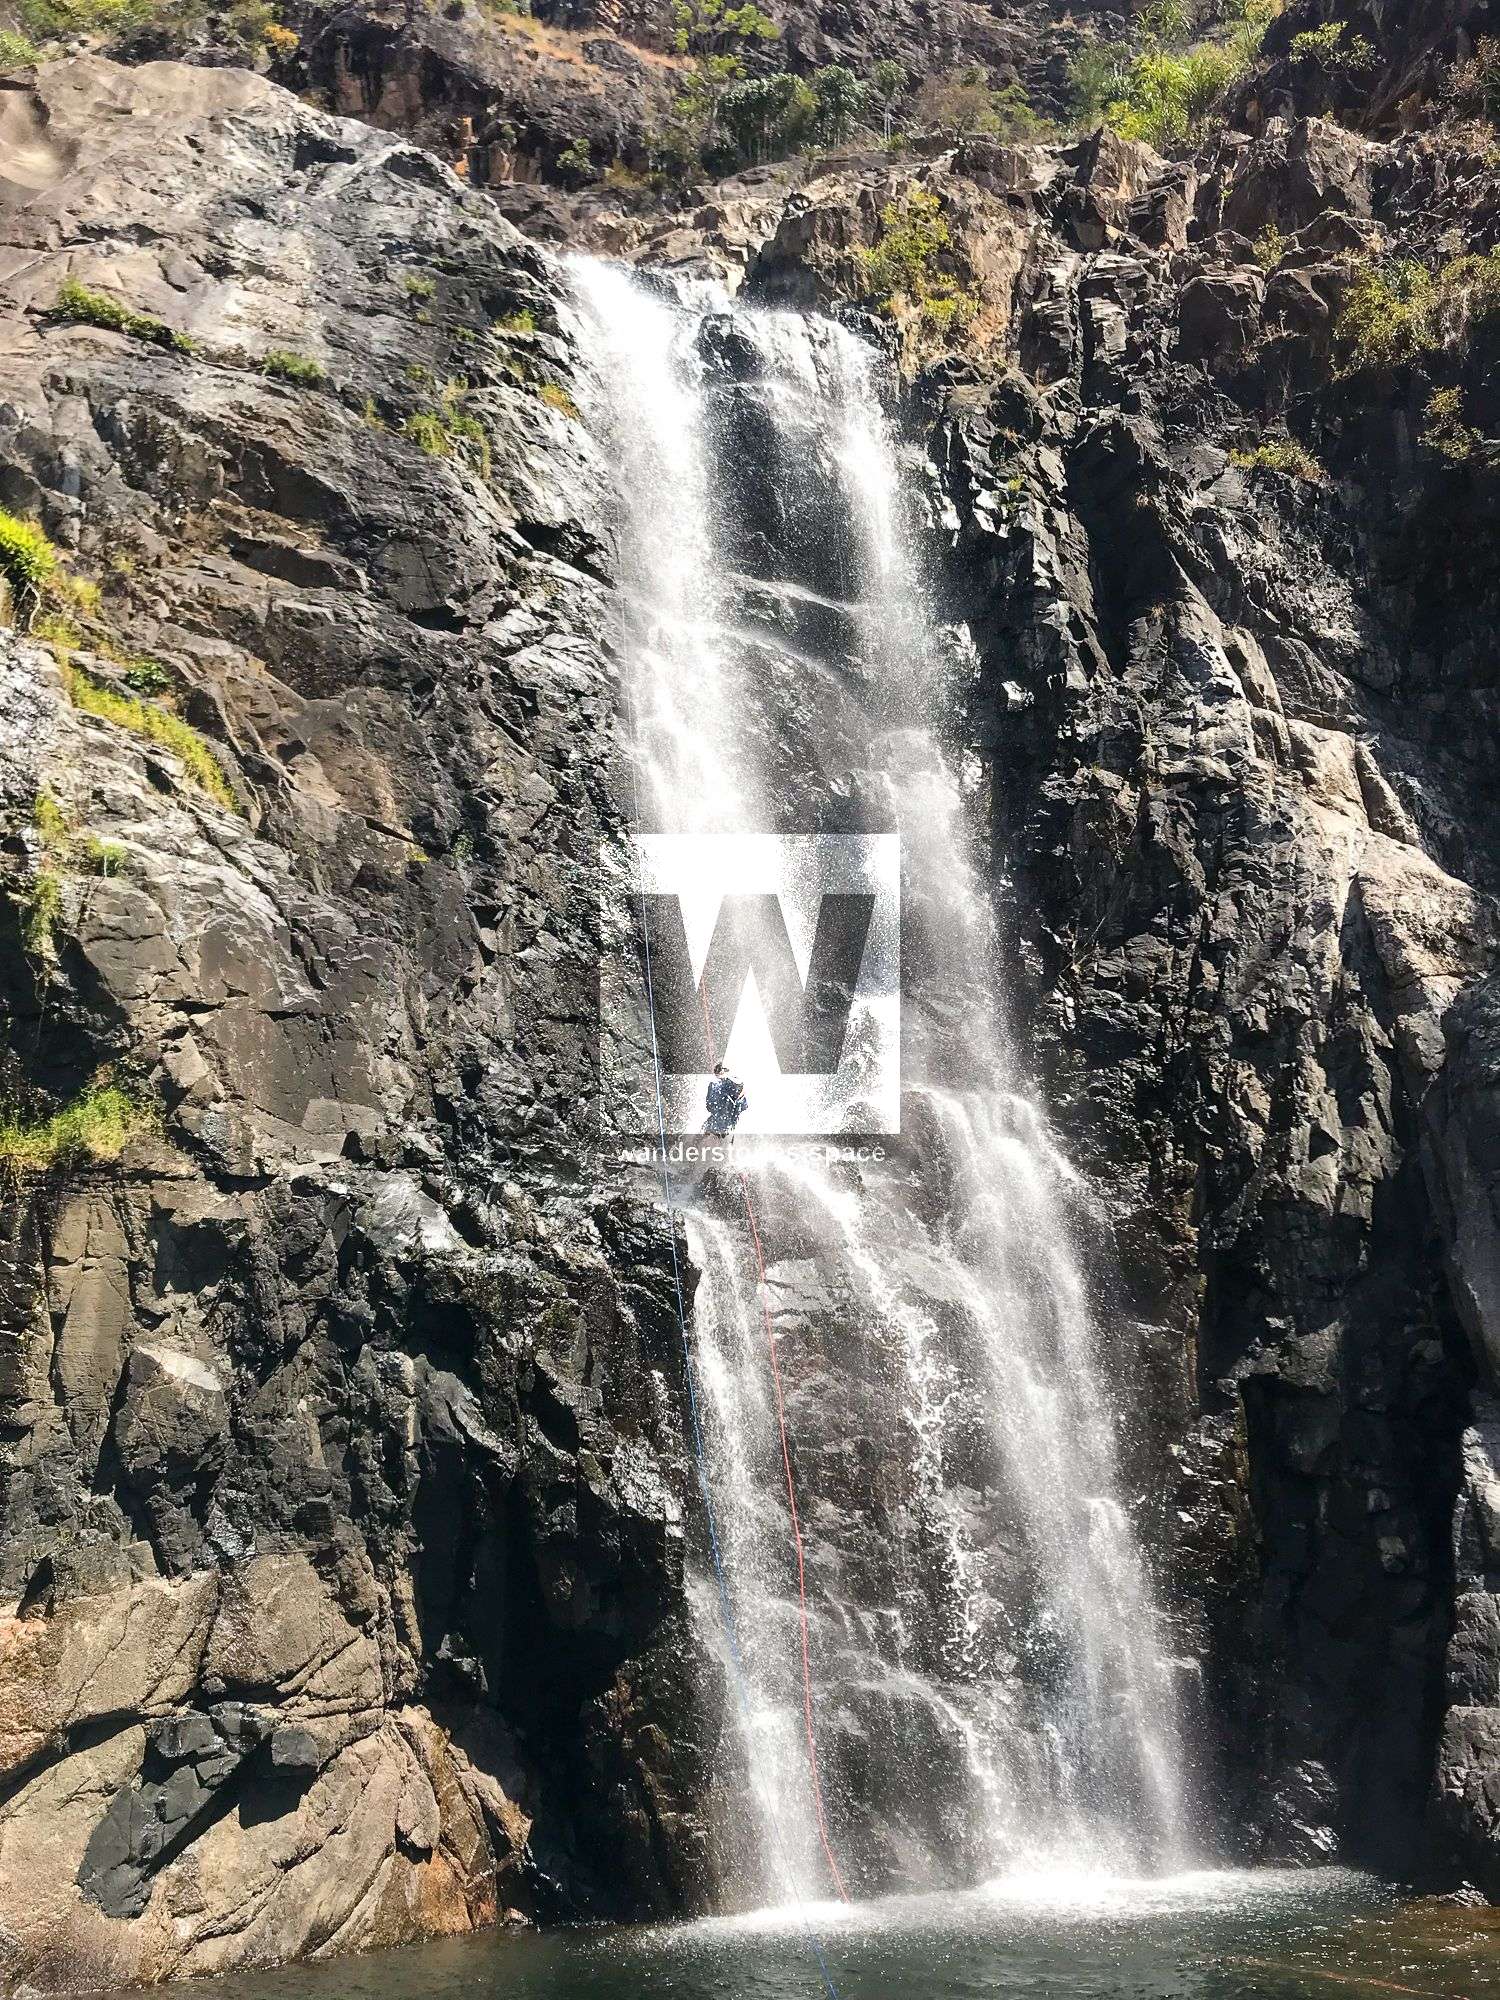
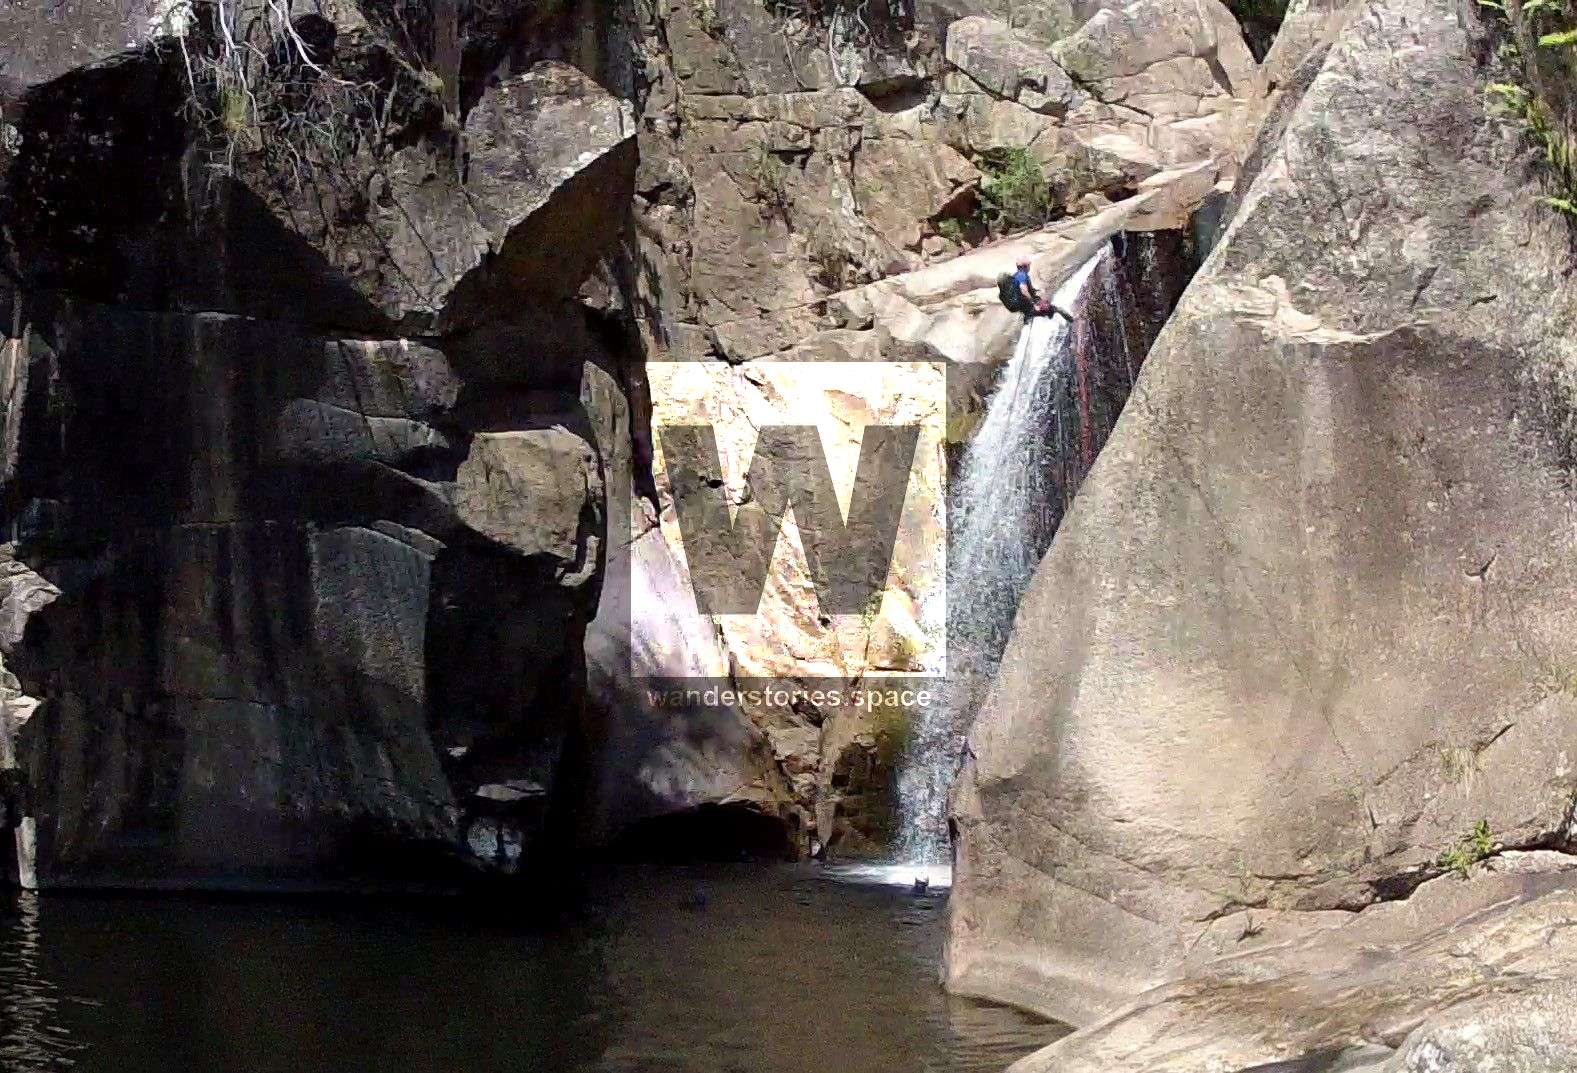
Rappel 4
Long slab, heavy water, very slick.
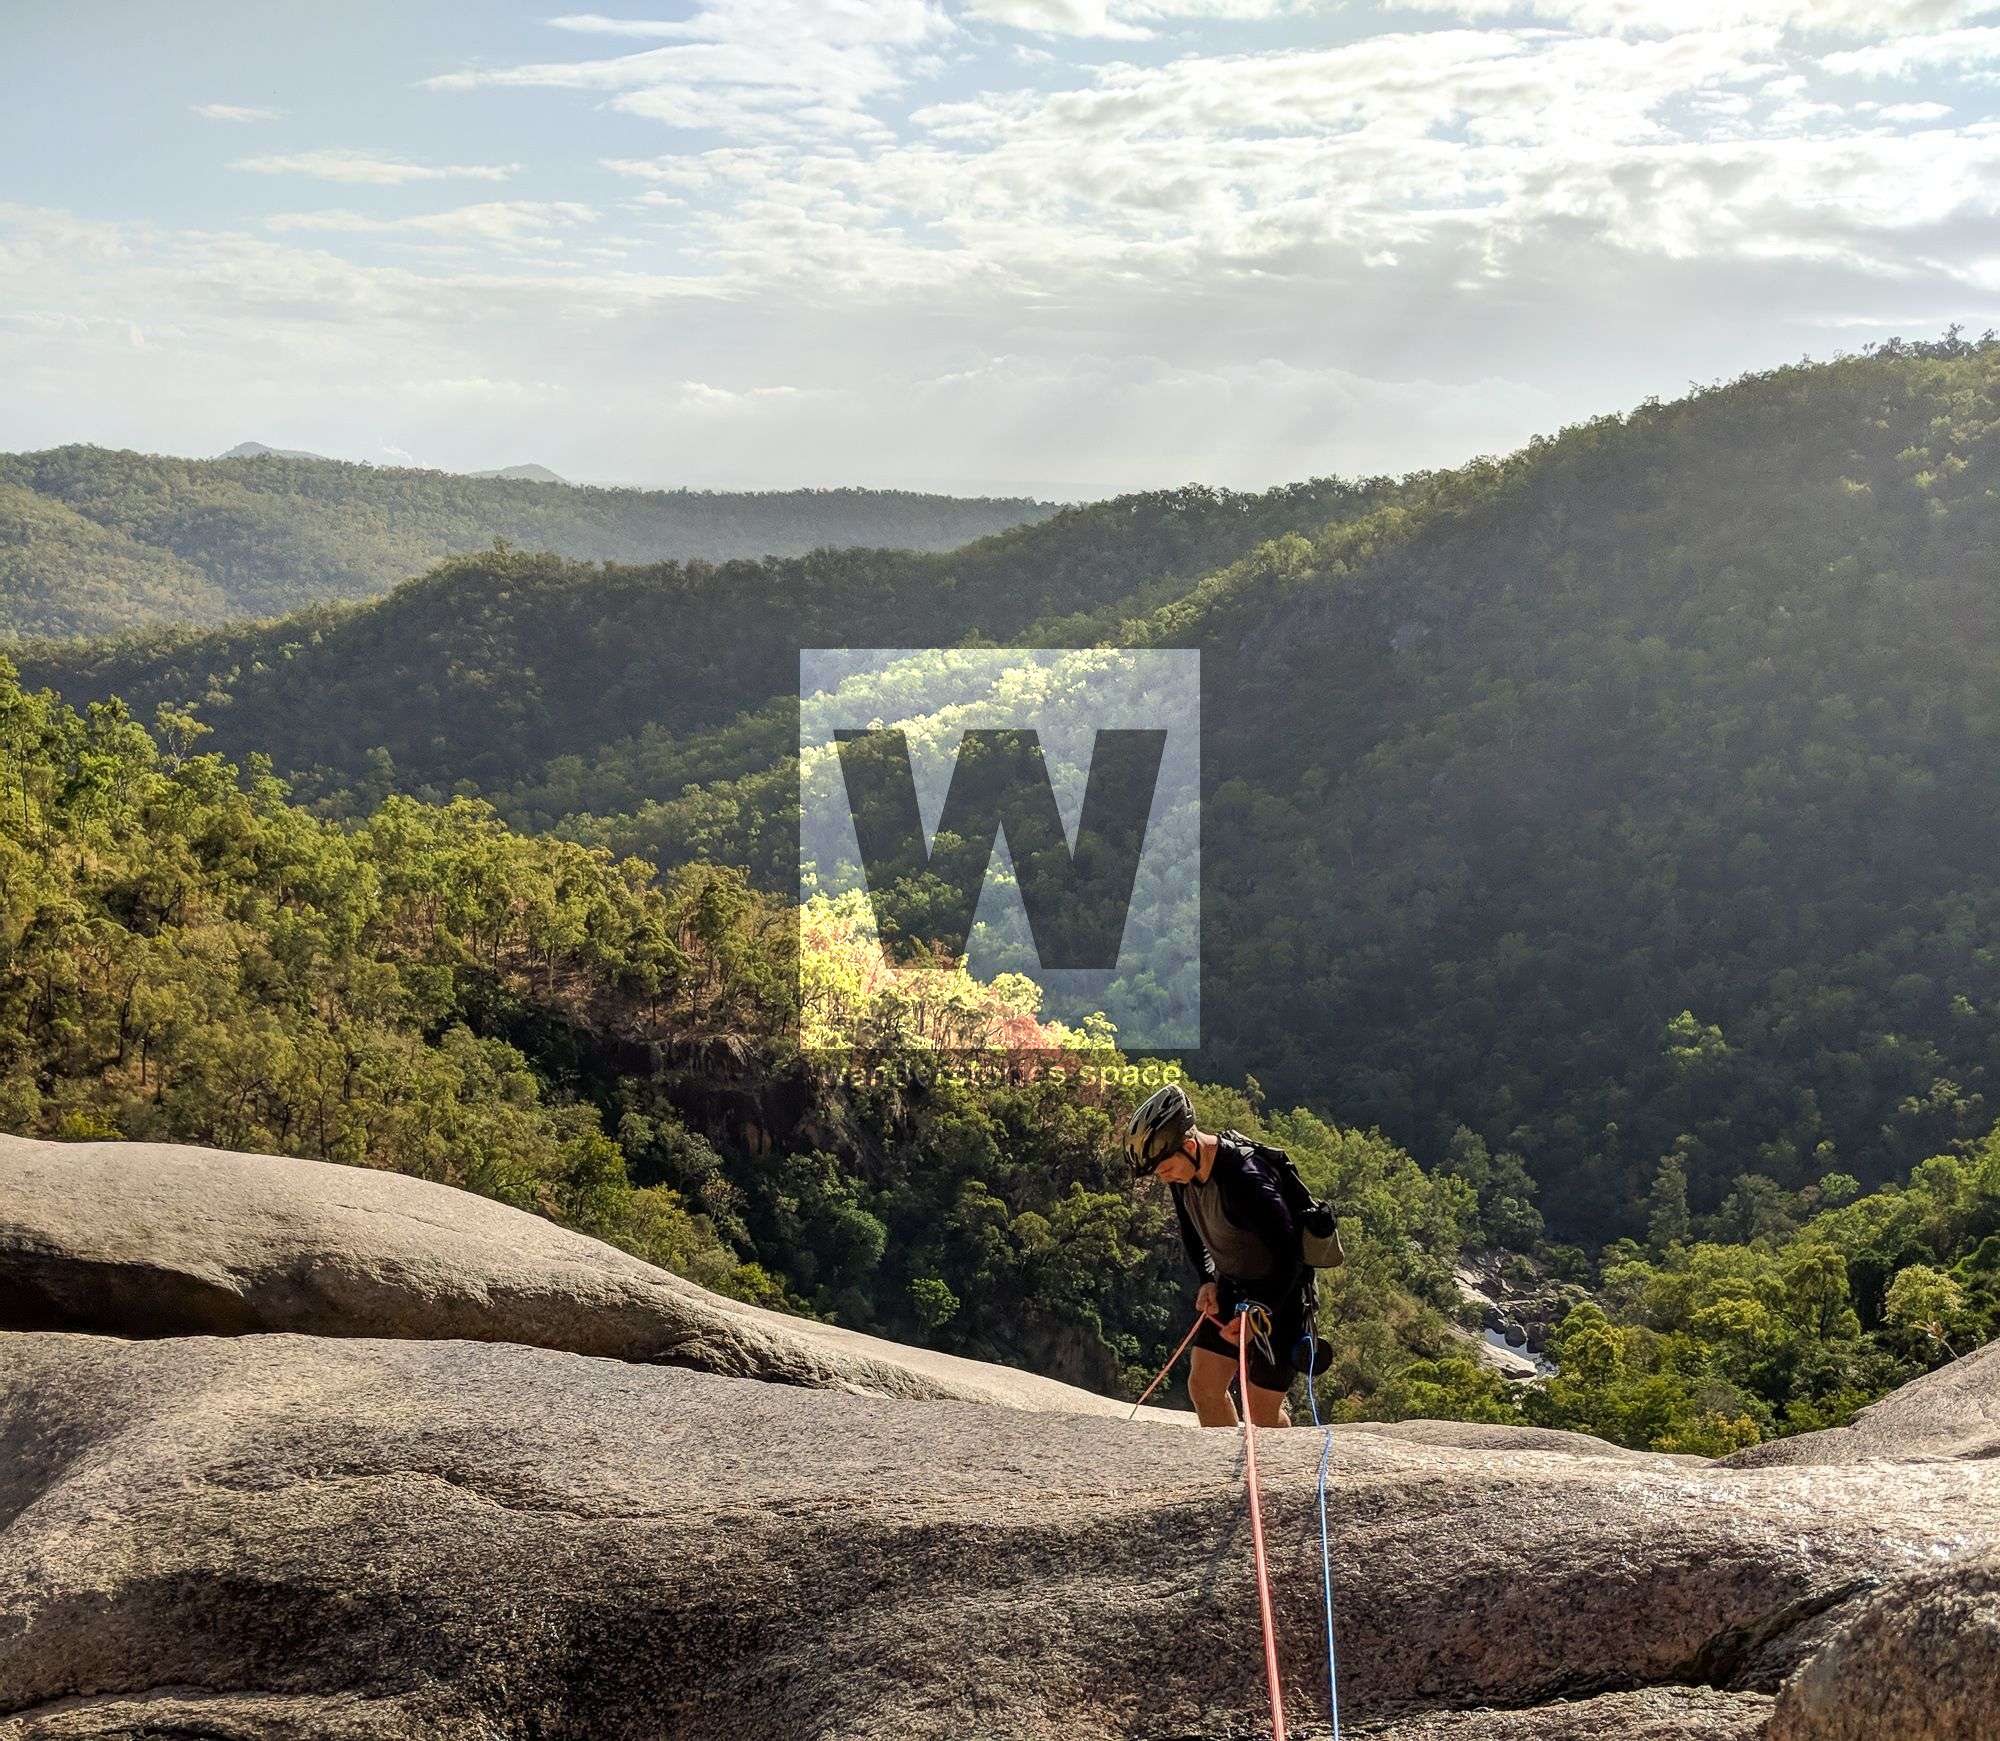
- Option 1: 60m rappel off two ring bolts right side. If you continue to rappel a (100 meters total), you can avoid R5.
- Option 2: 60m rappel off natural anchor (tree) right side. If you avoid the bolt anchors on R4 and use the NA-TR, there are various sections of rough rock that will cause severe damage to ropes if ropes aren't creeped or edge pro present.
- Option 3: 60m rappel off natural anchor (tree) left side (DANGER). Climb around arete of cliff to large tree for semi-dry abseil. Can be broken up into a multi-pitch - not recomended.
Rappel 5
At the time of writing, there are no bolts to get down next the next 5m waterfall.
- Option 1: 30m rappel natural anchor (rock) right side. A rock feature is present that ropes can be passed around to rappel TR.
- Option 2: 20m rappel natural anchor (tree) TR. Take caution as the approach to the tree is steep and slaby.
- Option 3: Scramble (~ grade 7) carefully down a slabbing traverse trending right and then zagging back left to major gully behind monolith down to long pool. The down climb should only be conducted by experienced climbers.
- Option 4: The pool at the base of R4 has anchor building options in the vertical cracks for advanced canyoneers in the waterfall TL.
Enter long pool to swim and then rock hop to next rappel.
Otherwise, V0+ problem out right to avoid pack swim and scramble up and down to join pool swimmers.
Jump three metres into pool below. Or walk around left.
Rappel 6
Stepped falls.
- Option 1: 40m rappel off double ring bolts true left. Rough abseil down blocky, broken waterfall, heavy water.
- Option 2: Descend 6m ramp true right to ledge. There's an old rope left behind by previous parties tied to bottlebrush. 30m rappel from natural anchor (tree) - semi-dry rappel (intermittent stream).
Danger notes: Do not trust material left behind from other parties before inspection. Remove and replace damaged or suspect gear. - Option 3: Descend 6m ramp true right to ledge. Skip the abseil (option 2) and continue on rock scrambling down true right.
Exit notes: An unkept trail from R6 to lookout. This trail is relatively easy to follow from the national park's lookout, you proceed up the ridge line, staying on the waterfall side until you see the old national park lookout. Then continue along the same trail a short distance (40m); you will see the trail continues up the mountain and a less prominent trail breaks left and follows along around the same altitude heading towards the waterfalls. If you follow this around until you are basically walking down directly towards the falls you will end up at the water's edge. Continue heading upstream until you hit R6. If you wish to exit on this trail it is recommended to hike it from the lookout to become familiar with the route first. The track can become overgrown and is easier to follow from the lookout than the exit direction.
Rappel 7 - Optional
Waterfall into pool.
- Option 1: 35m rappel natural anchor (tree) true left.
Danger notes: If you decide to rappel R7 from the NA on the ledge TL, use the trees to the rear to set a safety line and access the ledge, if you slip crossing this section you will be washed off R7-35m. - Option 2: 30m rappel double ring bolts (12mm) true right.
Exit Notes: Once you have finished R7 you can exit via a small down climb then head along TL of the lower waterfall and you will meet the water again at the bottom of the optional R8 rappel. Follow the water TL until you reach the national park track which you come in on. If you miss the small national park track exit TL, you will eventually cross the national park track as it crosses the river, again the same way you come in.
Rappel 8 - Optional
- Option 1: 15m rappel natural anchor (tree) true right.
- Option 2: Easy scramble (grade 5) around true left.
Exit notes: Once completing R8 you exit via the same as R7.
WHAT YOU WILL NEED
- Experience in abseiling (there are some technical challenges)
- Enough rope for a 60m rappel
- Rappel devices, prusiks, and webbing
- Grippy shoes on smooth, wet granite rocks
- Helmet
- Backpack
- Food and snacks for the day
- About one litre of water to hike to the top and a way to sterilise your water from the creek
Anchoring notes
There are various bolt anchors throughout the canyon however it is not unusual to come across damaged or even missing anchors, especially after flooding events. Please use sound judgement when considering previously installed anchors, this includes tape slings, ropes, and other textiles.
Surfaces
Along the route there are various sections of wet and dry rock, as with all canyon environments. Please be mindful of your traction and regularly test your grip throughout the route as you cannot rely on the colour or texture of the rock to determine its safety against slippage.
Experience
No responsibility or liability is taken for any harm, death or loss of property resulting from the use of this article. You must carry anchor building materials, be experienced and use your own judgement when canyoning. Flooding events can strip anchors and change the canyons layout and conditions. Improper and insufficient experience will result in serious injuries or in many cases death. Always respect all signs you encounter and take everything in you brought with you.
Please read the Beginners' tips for canyoning in North Queensland article.
See our general disclaimer that includes canyoning.
Canyoning Topo
This canyoning topo is for illustration-purposes only.
Legend
X / XX - Single and twin bolt anchor.
NA - Natural anchor such as a tree or rock.
TL / TR / C - True left, true right and centre when looking downstream.
R1-8m / R2-6m - First rappel and its height in metres, second rappel and height.
Optional - These rappels can be avoided by exiting prior or walking around.
Please note that an activity permit may be required in national parks.
If this information is outdated or you would like to make a correction, please contact us.
This article, and all other articles, are for entertainment purposes only and are not to be used as a guide. Please see our Disclaimer for more information.